Realistic Clay Flower Pot
~ an introduction to vectors and creating custom gradients ~
created by Arizona Kate ©2000 All rights reserved.All tutorials, including images, remain the property of Arizona Kate and
may not be sold or distributed in any format without purchasing a license from ArizonaKate.com
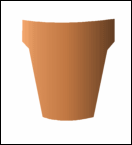
With this tutorial we'll be making a realistic clay flower
pot that has the front and back on separate layers so you can 'plant' some
flowers inside! We'll also create a custom gradient.
![psp icon]()
This tutorial uses the vector tools in Paint Shop Pro version 7. It is also suitable for version 6, however, it was written for v.7.

ClayPot color swatch
Right click and copy this color swatch. Use Dropper Tool to pick all colors needed for this exercise. The bottom row is the clay colors. The top row will be used for moss and shadows.
Don't forget to SAVE at each step (or turn on the PSP7 AutoSave feature) and empty your clipboard frequently!
This tutorial uses the vector tools in Paint Shop Pro version 7. It is also suitable for version 6, however, it was written for v.7.
ClayPot color swatch
Right click and copy this color swatch. Use Dropper Tool to pick all colors needed for this exercise. The bottom row is the clay colors. The top row will be used for moss and shadows.
Don't forget to SAVE at each step (or turn on the PSP7 AutoSave feature) and empty your clipboard frequently!
Making a Custom Gradient
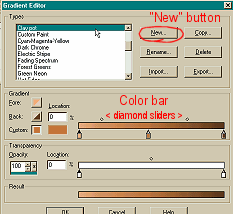
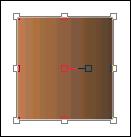
Before we start drawing the flower pot, we'll make a custom gradient for coloring the pot. Create new image 200x200 with 16 mil colors. We'll be using the bottom 3 colors from the color swatch above, so open your color swatch file. Use the dropper tool and pick the lightest color in bottom row for stroke/foreground color and the darkest color in bottom row for your fill/background color selection.Select your new 'blank' image to make it the active image. Select linear gradient in the PSP 7 Styles box...angle 90, repeats 0. Now click the Edit button in the dialog box, this brings up the Gradient Editor. At the upper right is a button called NEW.....select that and give your new gradient a name ("claypot" or your choice). When you say OK, the upper color bar will probably turn to all the same color, that's OK, we'll be editing it.
Along the bottom edge of the upper color bar in the
Gradient Editor are 2 'crayon' looking markers. The left marker
should be the same color as your foreground color (the lightest clay
color). If it isn't, select the left marker, then select the button next
to the word Fore. The marker should turn into your foregound
color.
Now select the right hand marker, then select the button next to the word Back. The right hand marker should turn into your background color.
Now tap your mouse/stylus UNDER the color bar...in the center. A new 'crayon' marker will appear. We want to change the color of this marker. To change the color, click the Custom button and click the color box next to the custom button. Your cursor will turn into a dropper and the Color dialog box will pop up. Move your dropper over to our color swatch and pick the center color in the bottom row. The center marker for the Gradient color bar should change to that color and should look like the screenshot above.
Now check the location of the small diamonds that are along the TOP of the upper color bar. They should be in a position similar to the screenshot above. These diamond markers slide left-right to change the point where one color blends with the next. Slide these around to see what happens, then move them into the same position as shown in the screenshot.
Keep the lower Transparency bar at the default setting of 100% for an opaque gradient.
Now click OK to exit the Gradient Editor and save the new gradient pattern. Click OK again in the Gradient dialog box. This will be your fill style for the basic clay pot.
PSP6 does not have a Styles option, so you'll have to create your pot with a solid color and flood fill with gradient afterwards.
Now select the right hand marker, then select the button next to the word Back. The right hand marker should turn into your background color.
Now tap your mouse/stylus UNDER the color bar...in the center. A new 'crayon' marker will appear. We want to change the color of this marker. To change the color, click the Custom button and click the color box next to the custom button. Your cursor will turn into a dropper and the Color dialog box will pop up. Move your dropper over to our color swatch and pick the center color in the bottom row. The center marker for the Gradient color bar should change to that color and should look like the screenshot above.
Now check the location of the small diamonds that are along the TOP of the upper color bar. They should be in a position similar to the screenshot above. These diamond markers slide left-right to change the point where one color blends with the next. Slide these around to see what happens, then move them into the same position as shown in the screenshot.
Keep the lower Transparency bar at the default setting of 100% for an opaque gradient.
Now click OK to exit the Gradient Editor and save the new gradient pattern. Click OK again in the Gradient dialog box. This will be your fill style for the basic clay pot.
Note to users of PSP 6 & older versions.....
To get to the Gradient Editor, select the Flood Fill tool. In the tool options box pick "Linear Gradient" as your fill style. Click the 2nd tab in the Tool Options box and then the Edit button and follow the steps above.PSP6 does not have a Styles option, so you'll have to create your pot with a solid color and flood fill with gradient afterwards.
Drawing the Basic Pot
Styles boxes: We need the linear gradient in the fill position with stroke set to Null Ø Cick the double-headed arrow to switch position of boxes, if necessary. For Textures: Select Null Ø for both.Select Preset Shapes tool and draw a standard rectangle in center of canvas, with both antialias and vector checked ('retain style' UNchecked). Make rectangle about 125x130, a little larger or smaller is OK...we'll be editing it's shape anyway!!
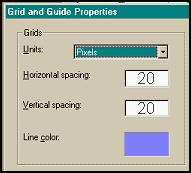
Turn grid guidelines on. View>Grid
Change grid size to 20x20. View>Change Grid and Guide Properties
Zoom in to double the size of your image to see better!
Change grid size to 20x20. View>Change Grid and Guide Properties
Zoom in to double the size of your image to see better!
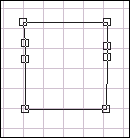
Select Object Selector tool. Select the rectangle
with it. Right click (RC) and select Node Edit. Add 4 nodes
... 2 on each side of rectangle (see node editing screenshot #1). Add
nodes by holding Ctrl key down as you hover the cursor over a line
segment...click when cursor changes to ADD+ and a node will be
added.
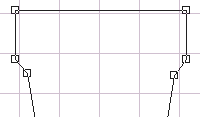
#3
While still in Node Edit, move the nodes around
until you have a pot shape. Use the grid as a guide to align nodes. The 2
nodes you added to each side should be close to each other but slightly
offset to create the lip of the pot. See screenshot #2.
The 2 nodes at the bottom corners of the rectangle should be set slightly narrower than the top for the traditional clay pot shape. For the pot in screenshot #3, I've moved the nodes at the bottom of the pot in almost a full grid square narrower than top edge.
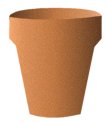
There are many different shapes to the basic clay pot, some have a sharp angle between the lip and the bottom of the pot and some will gradually merge the lip into the bottom. For some pots the base will be much narrower than the top, for others only a slight difference. Some pots will be tall, some short! Screenshot #3 shows a pot lip which has more of an abrupt transition between the top and bottom than the angle in screenshot #2. Draw whichever pot shape you prefer.
The 2 nodes at the bottom corners of the rectangle should be set slightly narrower than the top for the traditional clay pot shape. For the pot in screenshot #3, I've moved the nodes at the bottom of the pot in almost a full grid square narrower than top edge.
There are many different shapes to the basic clay pot, some have a sharp angle between the lip and the bottom of the pot and some will gradually merge the lip into the bottom. For some pots the base will be much narrower than the top, for others only a slight difference. Some pots will be tall, some short! Screenshot #3 shows a pot lip which has more of an abrupt transition between the top and bottom than the angle in screenshot #2. Draw whichever pot shape you prefer.
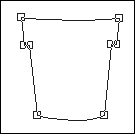
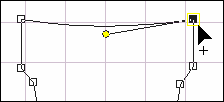
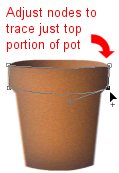
Put a little curve to the top edge of the top. While still
in Node Edit, select the node in the top right corner, RC
select Node Type>Curve Before. A handle will appear to the left
of the node (highlighted by yellow in screenshot #4). Pull down slightly
on this handle, and slightly toward center, until the top line of your pot
turns into a shallow, gentle curve.
Now make a matching curve for the bottom of the pot by selecting the bottom right node. RC, select Node Type>Curve After.
Now make a matching curve for the bottom of the pot by selecting the bottom right node. RC, select Node Type>Curve After.
Zoom in more, if necessary, to make sure lines are smooth
transitions and you don't have any zigzags in the line
segments!!
When you're satisfied with your shape, RC select Quit Node Editing.
When you're satisfied with your shape, RC select Quit Node Editing.
Select View>View Grid again to hide the grid
guidelines.
If you don't like how the pot shape looks now that the fill color re-appears, you can always go back into Node Edit and make some adjustments.
If you don't like how the pot shape looks now that the fill color re-appears, you can always go back into Node Edit and make some adjustments.
Inside/Back Edge of Pot
On your Layer Palette, RC the vector layer that was created when you made the rectangle above...Rename this layer "pot front". Now RC the new layer icon at the top left of the Layer Palette and select New Vector Layer. Name this layer "inside pot" and hit OK. On the Layer Palette, move "inside pot" layer BELOW your "pot front" layer by dragging the layer button below the other layer.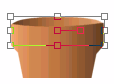
Note: When using vector tools, every object has it's own sub-layer within the vector shape and manually adding new vector layers is usually not necessary. However, when you convert a vector layer to a raster layer...which we'll be doing later.... all vector object sub-layers will merge into one raster layer. For this drawing, we want to keep the "inside" of the pot separate from the rest of the pot so we can plant something inside! That's why we're creating separate vector layers for the "inside" and "outside" of the pot.
Your "claypot" linear gradient should still be displayed
in the Fill box with all other boxes Null. Click within the gradient box
and, in the pop up window, mark the square to Invert Gradient and
hit OK.
To make things easier, do this next step zoomed in at least 2:1.
With the "inside pot" layer active, select Preset Shapes>Ellipse, antialias and vector both checked ('retain style' UNchecked). Create an ellipse shape for the inside of the pot. With the Object Selector tool, move the selection box handles until the "inside" lines up perfectly with the "outside" of the pot. The bottom of the ellipse should not be visible...it's behind the lip of the pot.
You should now have a complete clay pot with graduated color. The gradient, however, is probably showing color bands or stripes. To fix this, we'll add some Noise. But first, we must convert the vector layers into rastor layers in order to add any Effects.**
**Before adding any shading, you might want to save the vector version of the pot as a separate image in psp format in order to make some different pot shapes at a later time. Go to Window>Duplicate to duplicate the image. Save the duplicate image with a new name and close file. Or you can go to File>Save Copy As and save a copy with new name.
Convert to Raster
Right click the 'outside pot layer' (on Layer Palette) and select 'Convert to Rastor Layer'. Right click the 'inside' layer and select 'Convert to Rastor Layer'. Select Effects>Noise>Add>Uniform noise 7%. Do the same for both the inside and outside layers of the pot. This should correct the color banding of the gradient and also add a little texture to the pot.Shaping the Top Edge of Pot
The pot needs a little more dimension to be "realistic" ...some Cutout effects should add to the 3D illusion.RC the 'pot front' layer and select Duplicate Layer. RC again and rename the new layer 'outside shaping'. With this new layer active, select Effects>3D Effects>Cutout with these settings:
Vertical: -9
Horizontal: -1
Opacity: 65
Blur: 40
Fill interior with color: UNchecked.
Shadow color: Use dropper to pick the dark color in the upper right square of the "pots" color swatch.
Move to 'inside pot' layer, RC and duplicate it.
Rename this layer 'inside shaping'. Apply the same cutout with same
settings as above, except change horizontal to +20, Blur 20.
Create selection
Next, let's create a new layer to add a drop shadow to pot 'lip'. Move to top layer on Layer Palette, RC the layer icon in the top left corner of the Layer Palette and select "new vector layer". Name this layer 'lip shadow'. Using Preset Shapes(with vector checked) make a small rectangle over the lip area of the pot (color or fill doesn't matter...this will be deleted later). RC select Node Edit. Move the nodes around to trace and duplicate the shape of your existing pot lip. (Zoom in more if needed!!) Add a curve to the top and bottom of the pot lip just like you did before... RC the top and bottom corner nodes to change the Node Type to Curve Before or Curve After, as needed. When you've duplicated the pot lip shape, RC and select Quit Node Editing.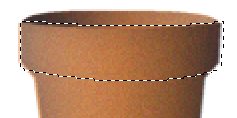
With Object Selector, select this traced pot lip
shape, RC and select Make Raster Selection. The marquee of
marching ants should appear. Save this selection to Alpha Channel for now.
Selection>Save to Alpha Channel
All we needed from this step was the selection ... so we can clear everything from this layer. First de-select. If we don't de-select first, some unwanted stray pixels will remain because of the anti-aliasing. After de-selecting you can cut/clear the layer. Then RC and convert this layer to a raster layer.
All we needed from this step was the selection ... so we can clear everything from this layer. First de-select. If we don't de-select first, some unwanted stray pixels will remain because of the anti-aliasing. After de-selecting you can cut/clear the layer. Then RC and convert this layer to a raster layer.
Load the pot lip selection from Alpha Channel.
Selection>Load from Alpha Channel
Apply Effects>3D Effects>Drop Shadow with these settings:
Vertical: 3
Horizontal: 0
Opacity: 75
Blur: 20
Shadow color: Pick the dark color in the upper right square of the pot color swatch.
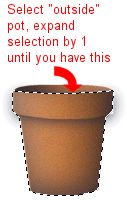
Go to the Layer Palette, 'pot front' layer, and select the blank area around the pot with the Magic Wand. Set the Tolerance to 0, Feather 0, Sample merged UNchecked. Then go to Selections>Modify>Expand and increase the selection by 1.
Apply Effects>3D Effects>Drop Shadow with these settings:
Vertical: 3
Horizontal: 0
Opacity: 75
Blur: 20
Shadow color: Pick the dark color in the upper right square of the pot color swatch.
Remove stray pixels
No matter what method I tried to get a lip shadow, there was always some stray pixels outside the edge of the pot! Here's the solution to get rid of any pixels outside the pot:Go to the Layer Palette, 'pot front' layer, and select the blank area around the pot with the Magic Wand. Set the Tolerance to 0, Feather 0, Sample merged UNchecked. Then go to Selections>Modify>Expand and increase the selection by 1.
Your selection should look like the screenshot to the
left.
With the selection still active, move to the 'lip shadow' layer ...the layer with the stray pixels!! Cut/delete those stray pixels!! De-Select.
With the selection still active, move to the 'lip shadow' layer ...the layer with the stray pixels!! Cut/delete those stray pixels!! De-Select.
Add some highlites
One more step in shaping the pot, some highlites! If you're still zoomed in to enlarge image, you can select View>Normal for the rest of the tut. Select the 'outside pot' layer, RC and duplicate this layer to make adding hilites easier! Rename the layer 'hilites' and move the layer to the very top of all the other layers.Select Effects>3D Effects>Cutout with these settings:
Vertical: 2
Horizontal: 2
Opacity: 80
Blur: 10
Fill interior with color: UNchecked.
Shadow color: Pick the lightest clay color in the lower left square of the pot color swatch.
Before doing the the next step!!!.....
If you want to do the companion tutorial for a used, weathered & broken clay pot...you must have a psp copy of this clay pot available with shaping and highlight layers separate from main pot layer.! Save a copy before merging layers in next step.
Merge visible layers & convert to raster
You'll be wanting to add some flowers and stuff "inside" this pot, so we'll keep it saved with 2 separate layers, front & back.Select and HIDE the 'hilites', 'lip shadow', 'outside shaping' and 'pot front' layers.
Make one of the visible layers the active layer and select Merge>Visible. (This choice will be grayed out unless the active layer is a visible layer.) Any vector layers will convert to raster when merged.
Hide the merged layer, select one of the remaining layers ('inside pot' and 'inside shaping') as the active layer and Merge>Visible.
You might want to rename each layer as pot front and pot back and add a background layer that matches the color of your webpage!
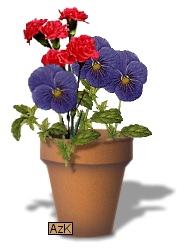
Finally, *G* your flower pot is done!! You can save it as a tube or complete the image by adding some flowers and saving as an Optimized JPEG. This image can have an optimized value of 10-15 or more without losing too much quality.
Create a perspective shadow for your flower pot
Using the PSP's drop shadow effect will not give you a realistic 'cast' shadow...so we must do a little 'workaround'.Increase canvas size to 300x300 to give you some working room. Use Magic Wand to select blank area around pot, invert selection. Create new raster layer BELOW the pot layer. Modify your selection to feather by 10. Fill selection with solid black. De-select. Use Deformation tool, select center top handle and pull down to make shadow shape a little shorter (about half height). Then, while holding shift key down, pull corner of the deformation box to the right. Line up shadow with bottom of pot. Reduce opacity of the shadow layer to around 40. You can add a little Blur to the shadow layer if you don't think the feathered selection gave it enough blur.
Arizona Kate Homepage ~ What's New
back to>> Clay Pot tutorial, page 1
~ tutorial hints & tips, guest book, translation links, tut index and navigation menu ~