|
WHAT YOU WILL NEED

Supplies
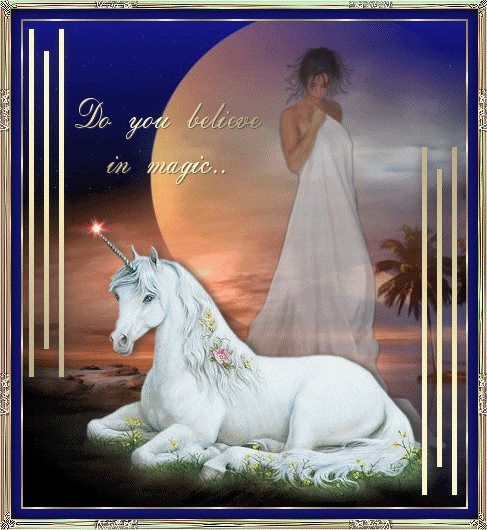
1. Open up the Magic background image ---> copy and paste the Unicorn as a new layer, position this tube down the bottom
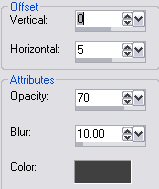
2. Apply the following Drop Shadow
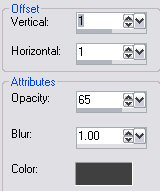
3. Copy and paste the Lady as a new layer, drag this layer down below the Unicorn layer and apply the same drop shadow only change the Horizontal to 2 - position this layer off centre towards the right then lower the Opacity to 70
4. Layers Merge Visible
5. Add a new layer
6. Selections - Load/Save Selections - Load selection from disk - find and apply the SDE_magic selection - while selected flood fill with the gold gradient with has the Angle set on 45 Repeats 0
7. Keep selected and apply the following drop shadow

8. Layers Merge Visible
9. Add a new layer - set your background to the gold gradient, X off the foreground layer, select the Text tool and find your favorite font, and type in your text ... I used a font called Romance at the following settings

10. Pull the nodes in and down at the sides so that the words are not touching the lady - Layers - convert to Raster Layer
11. Keep selected and apply the following drop shadow - Layers merge visible
12. Select none
13. Add a 2px border - select and fill with the gold pattern
14. Add a 10px border - select and fill with color #151782
15. Add a 1px border - select and fill with the gold pattern - Keep selected - Invert and apply the following Cut-Out

16. Select none
17. Open up the SDE_MagicFrame ---> copy and paste the Image you've just created as a New Layer onto the MagicFrame - Merge layers visible
18. Copy and paste the Magic Flare as a new layer, position the flare at the end of the Unicorn's horn
19. Duplicate this layer twice more
20. On the top layer move the Opacity down to 30, on the next layer slide it down to 50 - leave the other tube layer set on 100
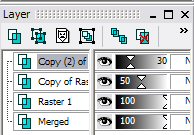
21. Cross off the top two layers, make sure your highlight is on one of the remaining layers (and merge visible - Edit - Save As and save as magic1.psp)
or rather save copy as magic1.jpg
22. Edit - undo merge visible (if you did do merge)
23. Cross off Raster 1 layer and the top layer, make sure you move your highlight to one of the remaining layers, (merge visible and save as Magic2.psp)
or save copy as magic2.jpg
24. Repeat step 22 (if you did do merge)
25. Cross of Raster 1 and Copy of Raster 1 layers, move your highlight to one of the remaining layers and (merge visible - save as Magic3.psp)
save copy as magic3.jpg
ANIMATION SHOP
1. Click on the Animation Wizard > same size as first image > next >
Transparent > next > upper left corner - with canvas colour > next >
yes repeat and display for 25 > next > add image > find and add the 3 images you saved -
make sure they are in order of 1, 2 and 3 > finish
2. Click on the 1st layer to highlight it > Animation - Frame Properties
and change the number here to read 50 > repeat these steps on the last frame
but leave the middle one set on 25
3. File - Save As - name your frame > next > next > next > finished
And so are you !
Hope you enjoyed this one
*s*

Tutorial Copyright ©Sandee's Place & SDE Designs
February 2005
|