|

I was just experimenting
again trying to make some different room views for my "Special
Websets" images. This tutorial is quick and easy and only takes a
few steps to prepare. You can use different versions of background
scenery to make it either a back verandah overlooking your garden.

or you can use the Hawaii scene I gave you in the
penthouse tutorial or any other city scape to make it appear like an
apartment or condominium balcony.

When
the basics are completed, then it is up to you to decorate to your
heart's content.
I place absolutely NO restrictions on the
use of your finished image and if you wish to share this link with
friends, please feel free to do so without writing and asking for
permission.
This tutorial was completed using PSP7 but can
easily be done in PSP6.
What You Will Need:
Paint
Shop Pro: download a trial version here
Zip of my image files (2
fills for ceiling and floor): you can download it here
Zip
of my selections: you can download it here
PLEASE
save your work often!! I did it after every layer. It is better to
be safe than sorry.
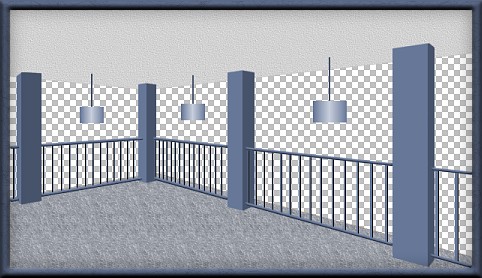
(1) Open a new image 617 x 344, 16
mil colours, transparent background.
(2) Create a new layer
and load selection "floor.sel"
open the floorfill image from the
zip
set it as your pattern fill at size 50% then fill the
selection.
(3) Create a new layer and load selection
"ceiling.sel"
open the ceilingfill image from the zip and
floodfill at 50% size.
I darkened it just a little by going to
colours-adjust brightness and changed it to -10, and left contrast
at 0.
(4) Create a new layer and load selection
"lightcolumns.sel"
floodfill with colour #667798
as you fill
one area, the rest will fill in at the same time.
(5) Create
a new layer and load selection "darkcolumns.sel"
floodfill with
colour #47536B
once again, fill one area, and the rest will fill
in at the same time.
(6) Create a new layer and load
selection "lightspokes.sel"
floodfill with colour
#667798
because there are so many, look for the one largest one,
zoom in if you have to, and just fill it.
this is where you
really appreciate that by filling one all the rest colour themselves
at the same time.
(7) Create a new layer and load selection
"darkspokes.sel"
floodfill with colour "black"
look for the
one largest one again, and just fill it.
this is where you really
appreciate that by filling one all the rest colour themselves at the
same time.
(8) Create a new layer and load selection
"lowerrail.sel"
floodfill with colour #667798
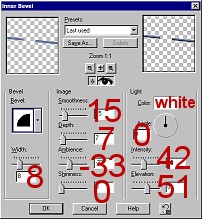
go to effects -
inner bevel - and apply the following settings
(9)
Create a new layer and load selection "upperrail.sel"
floodfill
with colour #667798
go to effects - inner bevel - and apply the
same settings as above.
(10) Create a new layer and load
selection "planterleft.sel"
Because we are going to use a
gradient fill to make the planter look as if it has shape, we have
to do one planter at a time. If we load up the three planters as we
did the columns or railings, we will get one planter dark, one light
and one dark instead of the gradient going into each individual
planter. You can do one planter then load up the others all on the
same layer, but they have to be done one at a time.
Set up your
foreground colour to #667798
Set up your background colour to
the new lighter blue #C8CFDC
Then set your fill to gradient -
linear - foreground to background - angle 90 - repeats 1
(the
darker blue should be on both sides with the lighter blue in the
middle)
floodfill the first planter shape
load up selection
"plantermiddle.sel" and then floodfill with the gradient
load up
selection "planterright.sel" and then floodfill with the
gradient.
(11) Create a new layer and load selection
"planterwires.sel"
floodfill with darker blue colour or you could
use a gold if you wanted to simulate a chain.
WOW! You are
finished already.
At this point I would save this as a psp
file for future use, then duplicate your image and continue working
on the duplicate. That way you can go back and create new scenery
anytime, or colourize the blues to another colour for a totally
different look without doing everything all over again right from
the beginning.
Now you can create some new layers at the very
bottom and start building your background. Have fun with whatever
you choose to do. Remember you can fill the selection pieces with
any colour you want to rather than the blue. It is totally your
choice. Have fun and I hope I have given you another area to have
fun decorating.
If you have any problems or need further
explanations, please feel free to email me here
TUTORIAL
PAGE ONE
TUTORIAL
PAGE TWO
This tutorial
was posted at the site of "P. Ann's Place" June 5, 2003 and written
by Pat Sherman. All I ask is that you do not claim it as your
own.
  
| |