Annabelle
This tutorial is best
viewed at 1024x768.
Please read my Terms of Use if
you have any questions.
At this time I am not allowing my tutorials to
be translated
so please don't ask!
All images are the sole property of
© Designs By Astro
Do not copy, place on CD, make into Scripts or send
through email without my prior written permission.
A link is always
welcomed and appreciated though!!
All rights reserved.
The
image/images you make using this tutorial
is your property to do with as you
wish.
If you have any questions or need further help you
can
Email
me
Tutorial written June 26, 2006.
This tutorial is written using PSP X but can done in other version with a little
modification of tool locations.This is a vector tutorial so a working knowledge of PSP and vectors are a must.
I don't recommend this tutorial for newbies. If this is your first time vectoring,
I suggest you give my Vectors 101 tutes a try first before attempting this tutorial.
Vectors 101
Exploring Node Types
The two tutorials above are written for PSP 9 but vectors work the same in 9 as in X.This is a long tute but I think the end results will be worth it. Those that are
pros at vectoring should be able to move pretty fast through the tute.SAVE OFTEN!
Let's get started!
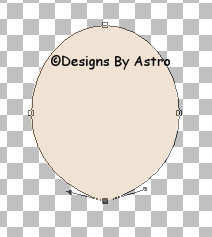
1. Open a 500X600 transparent canvas.
Let's make her head first.
2. Set your background color to #f0e3d4 ...foreground should be turned off.
3. Preset Shapes set to Ellipse, Show Nodes, Create on Vector and Anti-alias checked.
Add a new Vector Layer naming it face.4. On your canvas, draw out a simple oval...
Right click on the canvas and select "Convert to Path". Click on the Pen Tool to go into vector mode.5. Click on the bottom node to make it active. Right click and change the Node Type to Symmetric, right click
again and change to Cusp. Pull up on each end of the node handles just a little to make a pointed chin....NOTE... We will be using Cusp for most all of our vectors. If cusp is not showing you will first need to
select a different type then select again and Cusp will be available.Now, it depends on how you want to do your vectors. You can leave them intact and click Apply or you
can Convert to Raster as you go. This is up to you and how you like doing your vectors. I usually leave
mine intact and create each section on a separate layer but do yours however you want.SAVE!
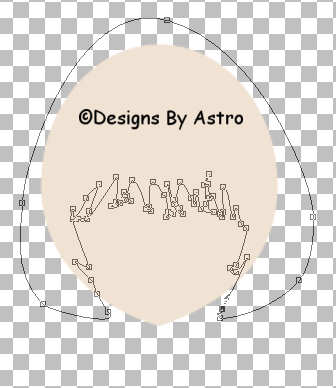
6. Set you background color to Black or whatever color you want her hair to be. Foreground should be
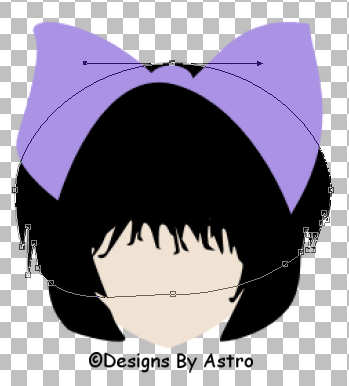
off.7. Preset Shapes same as above. Make a new Vector Layer naming it hair1.
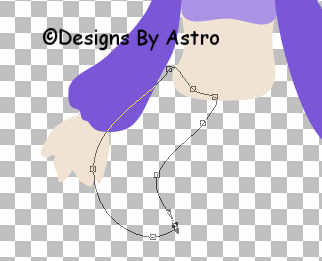
8. Draw out an oval across her face. Right click, select Convert to Path, click on the Pen Tool.
The hair can be as detailed as you want. The screen shot below will show you the placement of my nodes.
Most nodes have been changed to Cusp....SAVE!
9. Make Raster 1 your active layer. Add a New Vector Layer naming it bow. Set your background
color to #aa92e4 or whatever color you would like her bow to be.10. Change your Preset Shapes to Rectangle, all other settings the same as above.
11. Draw out a rectangle across the top of her hair. Right click on the canvas, select Convert to Path.
Click on the Pen Tool.12. The bow is real simple. Add a few nodes and change them to Cusp. See the placement of mine below...
13. Preset Shapes set back to Ellipse. Add a New Vector Layer naming it bow center.
14. Draw out a small oval in the center of the bow. In the screenshot below it shows where I added
a couple of nodes but later decided I didn't like it and chose to leave the simple oval instead....SAVE!
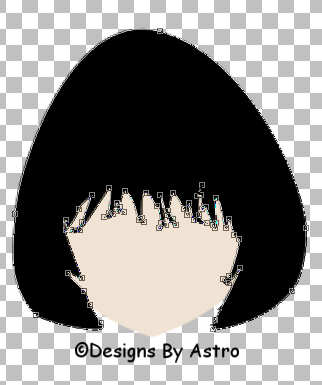
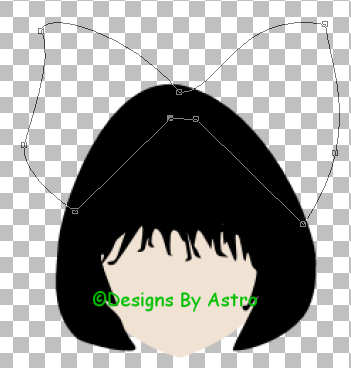
15. Make Raster 1 your active layer. Add a New Vector layer naming it hair 2. Set your background
color to black.16. Draw out a large oval behind her. Right click, Convert to Path, click on the Pen Tool.
17. The screenshot below shows the placement of my nodes...
SAVE!
18. Make your top layer your active layer. It should be hair layer. Add a New Vector Layer naming
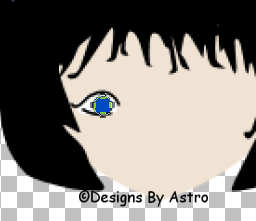
it L Eye1.19. Set your background color to white. Preset Shapes to Ellipse. Draw out a small oval on the left
side of her face. Right click, Convert to Path, click on the Pen Tool. Using the existing nodes shape
into something like an egg...20. Add a New Vector Layer naming it L Eye 2. Set your foreground color to black, background
turned off. Click on the Pen and set to these settings....21. Click once on the right side of where your white part of the eye starts, click again on the left side
where the eye ends...22. Right click on the line, Node Type, Curve Before. Use the handle to arch the line..
23. Always zoom in if you need to. Place a new node as I have below...
24. Now pull down on the handle of the first node to bring the curve downward and give it a little
curl.25. Add a new Vector Layer naming it L Eye 3. Use the Pen Tool to draw a small line at the bottom of
the eye. Right click on the left node and change the type to Curve After. Pull down on the node to
shape the eye...26. Set your background color to #004bc0, foreground color to black. Preset shapes set to Ellipse,
set your Line Width to 1, all other settings the same as we've been using.27. Draw out a small circle for the iris of the eye...
28. Pull the layer below the lines of the eye if you need to.
29. Add a New Vector layer naming it L Eye 4. Make black your background color, turn the foreground
color off. Draw out another small circle in the center of the iris for the pupil....30. New Vector Layer naming it brow. Black as the foreground color, background off. Using the
Pen Tool set to width 2, draw a line above her eye. Right click on the left node and change the type to
Curve Before. Add a node close to the left node, move the node up, move the handle on the left node down
to create an arched brow....
... and that's the left eye.SAVE!
We will shade the eye later and merge it together so we can copy paste and mirror it for the right side.
31. Add a New Vector Layer naming it mouth. Pen Tool set to line width 2, foreground color black,
background should be off.32. Draw a small line in the bottom center of her face. Right click on the left node and change the type
to Curve After. Pull down and over to the right on the handle. We want just a slight smile on the
mouth...That's her face for now! We will do the nose later and shading later.
33. Make Raster 1 Layer your active layer. Set your background color to the skin tone #f0e3d4
34. Add a new Vector Layer naming it neck. Preset Shapes set to Rectangle, other settings the same
as we've been using.35. Draw out a small Rectangle just below her chin. Right click and select Convert to Path, click on the
Pen Tool.36. Angle your Rectangle something like the screenshot below. We want the neck to be slightly off
center...For those of you converting your vectors to raster as we go, DO NOT convert the neck layer yet.
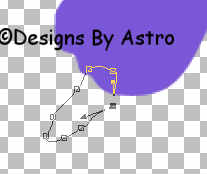
Leave the neck layer as a vector layer and click Apply. We will come back to it later.37. Add a New Vector Layer naming it left arm. Set your background color to #7a58d6 or a slightly
darker color than what you made her bow.38. Preset Shapes set to Ellipse. To the left of her neck draw out a long narrow oval...
39. Right click, Convert to Path, click on the Pen Tool. Add two new nodes just below the top original
node...40. Change the type of all your nodes to Cusp. Below is screenshots of the steps I took and
placement of my other nodes to shape my arm...SAVE!
41. Preset Shapes, same as above. Add a New Vector Layer naming it Right arm.
42. Draw out a long narrow oval on the right side of her neck. Below is the screenshot of the
steps and placement of my nodes...43. Change your background color to the bow color, #aa92e4
44. New Vector Layer naming it shirt. Preset Shapes, Ellipse.
45. Draw an oval just below her neck...
46. Change your nodes to Cusp. Below are the screenshots of the steps I took to shape
her shirt...47. Make your Right Arm layer your active layer. This layer should be below your neck layer.
Add a New Vector Layer naming it collar.48. Set your background color to the darker purple. Draw out an oval at her neck. Add nodes
and shape something like this...SAVE!
49. Let's go back to our neck now. Make the neck layer active. Click on the Pen Tool. Your nodes
should be showing so that you can shape each one, if they aren't, look on the Layers Palette and click on
the + sign beside the neck layer. The layer will open, click on the New Rectangle layer, this will activate
the node edit mode for the neck.50. Right click on all 4 nodes and change the types to Symmetric. This will give you a rounder neck. On
the left side of the neck straighten the nodes so that it is a tad squared off...
We're finished with the neck if you wish to convert to raster now.51. Make Raster 1 Layer your active layer. Add a New Vector layer naming it belly.
Set your background color to the skin tone. Preset Shapes set to Ellipse.52. Draw out an oval just below the shirt. Convert to Path, click on the Pen Tool.
53. Add two new nodes and change them all to Cusp. Shape into a cute little tummy...
54. Add a New Vector Layer naming it Left Hand. Preset Shapes and background color same as
for the belly.55. Draw out a small oval just at her left arm. Right click, Convert to Path, click on the Pen Tool.
56. Add nodes as needed changing the type to Cusp. Shape the hand something like this...
I know it doesn't look much like a hand right now but once we add our shading it will.57. New Vector Layer naming it Left Thumb. Draw out a small oval inside the hand. Add nodes and
shape the thumb something like this...SAVE!
58. New Vector Layer naming it Right Hand. Preset Shapes and background color the same as above.
59. Draw out a small oval at her right arm. Convert to Path, click on the Pen Tool. Shape the hand
as I have in the screenshot below...SAVE!
60. Make Left Hand Layer your active layer. Set your background color to the darker purple. Add a
New Vector Layer naming it Left Leg.61. Draw out an oval on the left bottom side. Add nodes and shape as I have below...
You don't have to be too particular about the waist. We will add a scarf belt later.
62. Add a New Vector Layer naming it Right Leg. Preset Shape and background color same as above.
Draw out an oval on the right side. Add Nodes and shape as I have below...SAVE!
63. Make the left leg layer your active layer. Add a new Vector layer naming it right leg 2.
Same preset shape and color as above. Draw out a small oval at the back of her right leg. Add
nodes and shape as below..64. Make Left Leg layer your active layer. Add a new Vector layer naming it shoe.
Preset Shapes set to Ellipse. Background color set to White.65. Draw out a small oval just below her right hand. Add nodes and shape as I have below...
SAVE!
66. Make the Right leg layer your active layer. Add a new Vector layer naming it belt. Preset shapes
set to Ellipse, background color set to the lighter purple.67. Draw a small oval at her waist. Add nodes and shape as I have below..
68. Add a new Vector layer naming it belt2. Draw out an oval to make the knot of the belt on the top of
her left side of the waist...69. Make belt layer your active layer, add a New Vector Layer naming it belt 3. Draw out a long
oval to make the ends of the belt coming out from the knot. Add nodes and shape as I have below...SAVE!
70. The last vector shape will be optional. I decided I wanted Annabelle to be an angel. The below
screenshot will be of her wings.71. Make Raster 1 layer your active layer. Add a new Vector layer naming it left wing. Set your
background color to white. Preset Shapes set to Ellipse.72. Draw out a small oval at the back of her left arm. Add nodes and shapes as I have below...
73. Copy, Paste and Mirror the wing to the Right side.
SAVE!
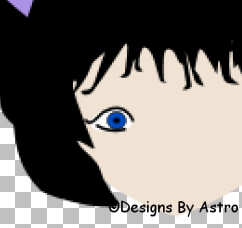
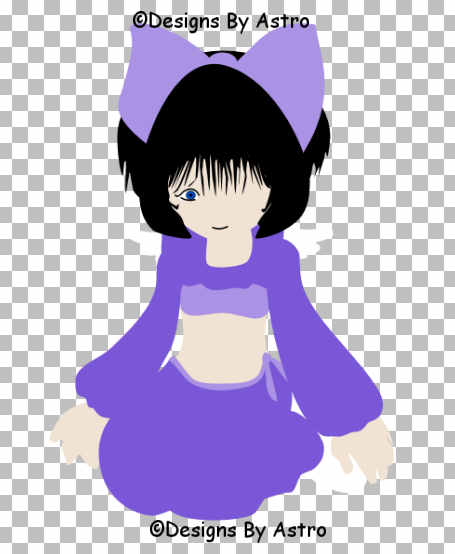
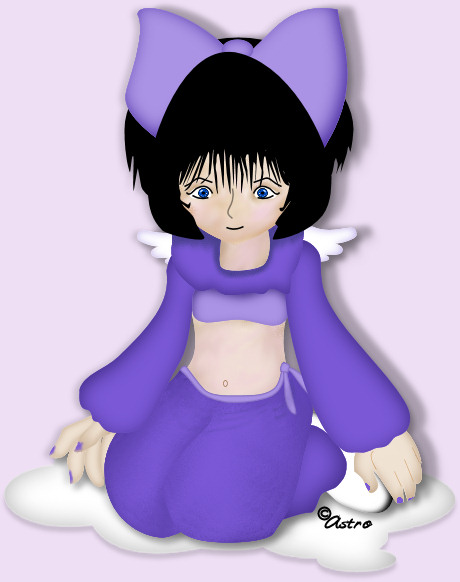
Okay, that's it for vectoring! You should now have a cute, one eyed little girl that looks
something like this...If you've saved your layers as vectors you can now convert them all to raster after saving a copy.
Let's start the shading!
74. First we'll shade the pupil. Make it your active layer. Select it, zoom way in so you can see the
eye. Use the Paint Brush to add some darker and lighter shades to the eye using pixel size 1....75. Close all layers except the 6 eye/brow layers. Merge the layers visible, copy, paste as a new
layer and mirror as the right eye.76. Make active her Face Layer. Select and Float the layer, Add a new raster layer if you wish.
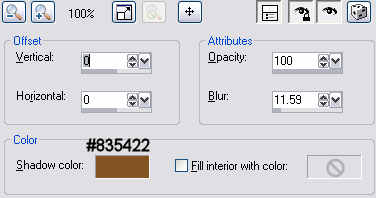
Go to Effects, 3D Effects, Cutout and apply these settings...
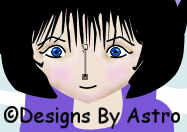
Shadow color.. #83542277. I used the shadow color above and the Airbrush with these settings...
to add a little shading around her eyes, I then changed my color to a rosie pink #eecfda to do the
shading on her cheeks using the same Airbrush settings...SAVE!
78. I guess she needs a nose eh? *L* Set your foreground color to black, background should be off.
Set your Pen Tool to these settings...79. Click once at the top center of her nose area then click again just above her mouth...
80. Right click on the bottom node and change the type to Symmetric. Move the handle to the left. Right
click on the top node and change it to Symmetric, move the handle to the right. You should end up with a
cute little nose something like this...
Convert the nose layer to a raster, rename as nose. You can lower the Opacity on the layer a little if
you wish.81. Make the neck layer your active layer, select and float the layer. Use the brown and the pink from
her face to shade the neck with the Airbrush. Use the Smudge Tool with these settings to blend the
shading...82. Make your belly your active layer. Using the Airbrush and the pink and brown, shade her belly.
Use the Smudge Tool to blend your belly shading.83. Make the brown you're using for your shading your foreground color. Preset Shapes set to Ellipse.
Add a New Vector Layer. Make a tiny oval to be her bellybutton...Convert to Raster.
SAVE!
84. Make your left hand your active layer, select and float it. Use the brown with the Airbrush
and the smudge tool to shade the hand and then the thumb...85. Make the right hand your active layer. Set the Pen Tool to line width 1 and draw out lines to
divide your fingers. Apply a cutout using the brown as your shadow color...86. I won't go through all of the shading of her clothes, I think you can handle that on your own.
On her bow and clothes layers all I did was apply a simple cutout using a darker shade of the
purples. You can also use the Airbrush or Pen Tool to add shades and folds to her clothes if you wish.
You can also add a little nail polish to her finger tips if you wish!That's it, you now have a cute little angel! I hope you've enjoyed this tutorial.
Until next time, God Bless!
Connie
Designs By Astro Index of
Tutorials
Tutorial written June, 2006
© Copyright
2006 Designs By Astro
All rights reserved.