|


WHAT YOU
WILL NEED
PSP 9
Supplies
1. Open
up a new image 500 x 550 - transparent
background
2. Set
your foreground to White and your background to
#c2adac
3. On
your gradient palette select
foreground/background - Angle & Repeat 0
- flood fill the layer
4. Add a
new layer
5. Layers
- Load/Save Mask - Load mask from disk - apply
the Bloemenrand mask - highlight the Raster 2
layer and flood fill with #c2adac
6. Move
your highlight on the layer palette to the
Mask Raster 2 layer - Image - Resize - 110% -
make sure you uncheck resize all
layers
7. You
can now delete the Mask Raster 2 layer - Merge
layers visible
8. Copy
and paster the rose & watch as a new layer -
position this to the top left of your
image
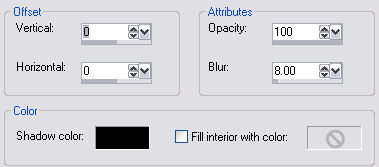
9. Copy
and paste girl_1 tube as a new layer - move this
layer down the bottom a little towards the right
- apply the following drop shadow

10. Copy
and paste the girl_2 tube as a new layer -
position this down the bottom towards the left -
set the opacity of this layer to around
90
If your
happy with where you have all your layers you
can now Merge Visible
11. Open
up my frame - copy and paste your image onto the
frame as a new layer - merge visible
12.
Selections - select all - selections - modify -
contract 12 - add a new layer and apply the
following cut-out
13.
Layers merge visible
14. Apply
my corner to each corner of the image or use one
of your own - merge all flatten
And your
all done !
Hope you
enjoyed this one
*s*

Tutorial
& Designs copyright ©Sandee's Place &
SDE Designs 2000
|