|
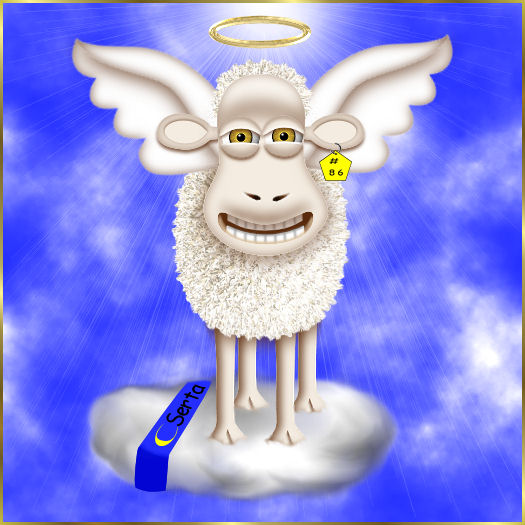
Number Eighty-Six
from
the
"Heavenly Farm Angels Series" |
|
|
©By Mary aka CowLady...May 5,
2005 |
.
|
|
| 9. |
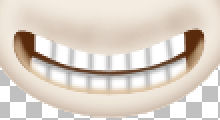
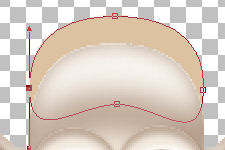
The Lips |
|
Foreground: 592A0B
Background: Null
Airbrush
Tool 
Brush= default round.

Active layer="head".
Selections/Select All/Float
New Raster Layer Name it
"upper lip". Name it
"upper lip".
Spray lightly
following the contours of the mouth.
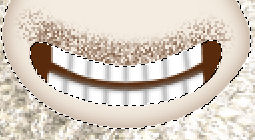
Adjust/Blur/Gaussian Blur/Radius=
3
Selections/Select None
Active layer="lower
teeth".
New Vector Layer Name it "lower lip". Name it "lower lip".
Foreground: #DCC2A0
Background: Null
Pen Tool 
Antialias: Checked
Create on Vector: Checked
Line Style: Solid
Line Width:
4

Using the pen tool, draw a curved
line following the curve of the lower edge of the
mouth.
Remember to do this we click
and drag at both the starting and ending points.
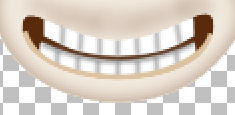
Convert to Raster
Layer.
Adjust/Blur/Gaussian
Blur/Radius= 1
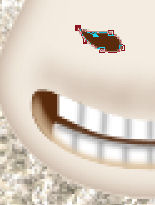
Switch to the
Smudge Tool 

Smudge the color up into the corners of
the mouth as shown below.
|
|
| |
| 10. |
The Nostrils |
|
Active layer="upper lip" ... the very
top layer.
New Vector Layer Name it "left nostril".
Foreground: Null
Background:
#592A0B
Ellipse
Tool 
Retain Style: Unchecked
Antialias: Checked
Create on
Vector: Checked
Line Style:
Solid
Line Width: 1
Draw a very small oval a short way above
the mouth.
Right click on your
ellipse/Convert to path.
Click on
the Pen Tool to edit.
Convert the node on the left side to "cusp". Draw it
out a bit and make it real pointy.
Click on the Object Selection Tool  and tilt the inner edge down just a smidgeon.
Convert to Raster Layer
Selections/Select All/Float
Foreground: #000000
Background: #Null
Airbrush
Tool
Brush= default round.

New Raster Layer Name it
"details3.
Spray, rather heavily,
a black spot at the wide inner part of the nostril.
Adjust/Blur/Gaussian Blur/Radius=
1
Selections/Select None.
Make sure that "details3" is your Active
Layer and that the "left nostril" layer is immediately
below.
Right Click/Merge/Merge
Down
Foreground:
#FFFFFF
Background:
Null
Pen Tool
Antialias: Checked
Create on
Vector: Checked
Line Style:
Solid
Line Width: 2

Active layer="left nostril"
New Vector Layer
Name it "highlight".
Draw a thin
white line just under the nostril.
Instead of blurring this which makes it totally
disappear, I switched to the Soften Tool  and
touched it up a bit with that. We just want a hint of a
highlight. and
touched it up a bit with that. We just want a hint of a
highlight.

Make sure that "highlight" is your Active Layer and
that the "left nostril" layer is immediately below.
Right Click/Merge/Merge Down
Active Layer = "left nostril".
Right Click/Duplicate/
Image/Mirror
Rename the
"copy" layer to "right nostril...reposition if
necessary.
I hope you are remembering to save
 your work. I keep
neglecting to remember to remind
you. your work. I keep
neglecting to remember to remind
you.
|
|
| 11. |
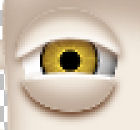
The Eyes |
|
Active layer="right nostril".
New Raster Layer Name it
"left eye".
Picture Tube Tool

Set the eyeball we made
earlier to about 45%. If you didn't save it as a picture tube
then you can copy/paste from your saved version. What ever
works for you.
Position the eyeball
about even with the ear.
Active
layer="left eye".
New Vector
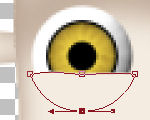
Layer Name it "left lower eyelid".
Foreground: Null
Background: #F4ECE1
Ellipse
Tool
Retain Style: Unchecked
Antialias: Checked
Create on
Vector: Checked
Line Style:
Solid
Line Width: 1
Draw an oval about as big as the
eye.
Right click on your
ellipse/Convert to path.
Click on the
Pen Tool to edit
Change the two side nodes to cusps and
pull them down below the pupil to form roughly half of a
circle.
Convert to Raster Layer
Selections/Select All/Float
Effects/3D Effects/Cutout with these settings
Vertical= -7
Horizontal= 0
Opacity= 35
Blur= 10
Shadow Color=
#592A0B
Selections/Select
None
Effects/3D Effects/Shadow
with these settings
Vertical= 2
Horizontal= 0
Opacity= 75
Blur= 5
Shadow Color= #592A0B
Active layer="left lower eyelid"
New Vector Layer Name it
"highlight".
Foreground:
#FFFFFF
Background:
Null
Pen Tool
Antialias: Checked
Create on
Vector: Checked
Line Style:
Solid
Line Width: 2
Draw a thin white line along the
top of the eyelid.
Here I
switched to the Soften Tool and touched up the
ends.
Make sure that "highlight" is your Active Layer and
that the "left lower eyelid" layer is immediately
below.
Right Click/Merge/Merge
Down
Active layer="left lower
eyelid".
New Vector Layer Name it "left upper eyelid".
Foreground: Null
Background: #F4ECE1
Ellipse
Tool
Retain Style: Unchecked
Antialias: Checked
Create on
Vector: Checked
Line Style:
Solid
Line Width: 1
Draw another oval about as big as the
eye.
Right click on your
ellipse/Convert to path.
Click on the
Pen Tool to edit
Change the two side nodes to cusps and
pull them up above the pupil. This time put a bit more of an
arch in it.

Convert to Raster Layer
Selections/Select
All/Float
Effects/3D
Effects/Cutout with these settings
Vertical= 4
Horizontal= 0
Opacity= 35
Blur= 10
Shadow Color= #592A0B
Selections/Select None
Effects/3D Effects/Shadow with these settings
Vertical= 2
Horizontal= 0
Opacity= 75
Blur= 5
Shadow Color= #592A0B
Active layer="left upper eyelid"
New Vector Layer
Name it "highlight".
Foreground:
#FFFFFF
Background:
Null
Pen Tool
Antialias: Checked
Create on
Vector: Checked
Line Style:
Solid
Line Width: 2
Draw a thin white line along the
edge of the eyelid.
Again, I
switched to the Soften Tool and touched up the
ends.
Make sure that "highlight" is your Active Layer and
that the "left upper eyelid" layer is immediately
below.
Right Click/Merge/Merge
Down
Active layer="left upper
eyelid"
In the layers
palette...Right Click/View/None
Remove the eye  on the "left upper
eyelid","the left lower eyelid", and the "left eye". on the "left upper
eyelid","the left lower eyelid", and the "left eye".
Right Click/Merge/Merge Visible
Rename the "Merged" layer "left eye".
Right Click/View/All
Active layer="left
eye".
Right
Click/Duplicate
Using the Mover Tool
 Click on the eye that is visible and just move it to
the right. You'll probably have to reposition both of them. It
is kind of a tight fit. Click on the eye that is visible and just move it to
the right. You'll probably have to reposition both of them. It
is kind of a tight fit.
Right
Click/Rename the "copy layer to "right eye".
With white paint and about a size three
paint brush put a dab of white on each eye... put a little
sparkle in them.
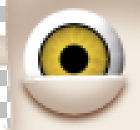
Whew! we finally have a face.
Does he look a little "sheepish"?

|
|
| 12. |
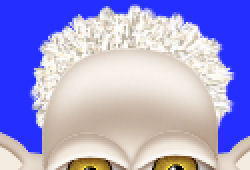
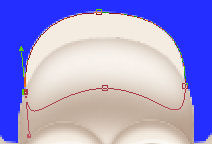
The Hair |
|
For those of you using
KPT5.
Active
layer="body".
New Vector
Layer Name it "hair".
Foreground: Null
Background:
#DCC2A0
Ellipse
Tool
Retain Style: Unchecked
Antialias: Checked
Create on
Vector: Checked
Line Style:
Solid
Line Width: 1
Draw a small oval behind our sheep's
head
Right click on your
ellipse/Convert to path.
Shape it
so that it shows only a small topknot.
Convert to Raster Layer
Selections/Select All/Float
Effects/KPT5/FiberOptix...use the
provided preset.
Your results
should be similar to those below.
For those of you
using Eye Candy 3.1. and 4000
Foreground: Null
Background: #F4ECE1
Ellipse
Tool
Retain Style: Unchecked
Antialias: Checked
Create on
Vector: Checked
Line Style:
Solid
Line Width: 1
Draw a small oval behind our sheep's
head
Right click on your
ellipse/Convert to path.
Shape it
so that it shows only a small topknot.
Convert to Raster Layer
Selections/Select All/Float
Adjust/Add Noise
Random: Checked
Monochrome: Checked
Noise=
23%
Adjust/Blur/Gaussian
Blur/Radius 1
Selections/Select
None
Effects/EyeCandy3.1/Jiggle
Movement Type = Brownian
Bubble Size=
12
Warp Amount= 12
Twist=41
Effects/EyeCandy4000/Jiggle
Movement Type = Brownian
Bubble Size= 8
Warp Amount= 8
Twist=20
Either Eye
Candy result should be similar to that below.

Use the eraser tool to remove
any free floating pixels resulting from the jiggle.
Continued on Page
3. |
|
|
|
©Mary aka CowLady; April 15,
2005 |
|
If you have any questions or need
help,
you may email me mbergen33@cableone.net |
|
|