
This tutorial was created August 19,
2006
Any resemblance to other online tutorials is purely coincidence
©N@thy 2006
This tutorial was written using PSP 9, but can be done in other versions
~ You will need ~
*** The bow I used is by Dozi. You can download it here (2nd set at the top) ***
Paint Shop Pro, a 30 day trial can be downloaded here
My supplies here. The zip includes the tubes and font
Double click to open the font "Saginaw" and minimize it on your desktop
Open the tubes in PSP and minimize them all
Open @-template157.psp
Resize to a width of 300 pixel (Resample using Bicubic, Resize all layers Checked)
Adjust, Hue and Saturation, Colorize and use these settings:
Hue: 28, Saturation: 108
Adjust, Sharpness, Unsharp Mask and use these settings:
Radius: 1.00, Strength: 64, Clipping: 2, Luminance only Unchecked
Layers, New Raster Layer
Layers, Arrange, Send to Bottom
Fill this layer with White color
Activate the top layer
Using Selection Tool, Point to point
Select the bottom part of the moon
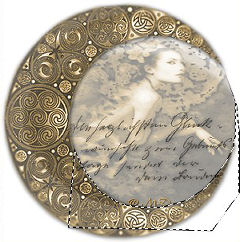
Maximize Mtm_Lady_ 142_Goldendoves -11 sept 2006.pspimage
Resize 44% (Resample using Bicubic, Resize all layers Unchecked)
Adjust, Sharpness, Unsharp Mask and use these settings:
Radius: 1.00, Strength: 64, Clipping: 2, Luminance only Unchecked
Effects, 3D Effects, Drop Shadow and use these settings:
Vertical and Horizontal 2, Opacity 50, Blur 10 and Color Black
Copy and paste as new layer into your canvas
Position the lady to the right (look at my image for placement)
Hit delete key on your keyboard once
Maximize VRA_Martini_Button-Love_FREEBIE.png
Resize 35% (Resample using Bicubic, Resize all layers Checked)
Copy and paste as new layer into your canvas
Position the button on top of the circle on the moon (look at my image for placement)
Effects, 3D Effects, Drop Shadow and use these settings:
Vertical and Horizontal 2, Opacity 50, Blur 10 and Color Black
Repeat Drop Shadow but change Vertical and Horizontal to -2
Maximize a-dozi's-satin-bow-01-g2.psp
Copy Layer8 and paste as new layer into your canvas
Resize 20% (Resample using Bicubic, Resize all layers Unchecked)
Adjust, Hue and Saturation, Colorize and use these settings:
Hue: 28, Saturation: 108
Effects, 3D Effects, Drop Shadow and use these settings:
Vertical and Horizontal 2, Opacity 50, Blur 10 and Color Black
Repeat Drop Shadow but change Vertical and Horizontal to -2
Position the bow at the bottom of the button (look at my image for placement)
Copy tag.pspimage and paste as new layer into your canvas
Position the tag at the bottom of the moon (look at my image for placement)
Set your Foreground to NULL and Background to #7C6332
Click on the Text Tool and use these settings:

Type your name
Position it into the tag
Adjust so it fits into the tag
In the layer palette right click on your text layer and convert to a raster layer
Effects, 3D Effects, Drop Shadow and use these settings:
Vertical and Horizontal 1, Opacity 30, Blur 1 and Color Black
Add your watermark and your tag is finished. I hope you have enjoyed this tutorial.
Any resemblance to other online tutorials is purely coincidence
©N@thy 2006
This tutorial was written using PSP 9, but can be done in other versions
~ You will need ~
*** The bow I used is by Dozi. You can download it here (2nd set at the top) ***
Paint Shop Pro, a 30 day trial can be downloaded here
My supplies here. The zip includes the tubes and font
Double click to open the font "Saginaw" and minimize it on your desktop
Open the tubes in PSP and minimize them all
Open @-template157.psp
Resize to a width of 300 pixel (Resample using Bicubic, Resize all layers Checked)
Adjust, Hue and Saturation, Colorize and use these settings:
Hue: 28, Saturation: 108
Adjust, Sharpness, Unsharp Mask and use these settings:
Radius: 1.00, Strength: 64, Clipping: 2, Luminance only Unchecked
Layers, New Raster Layer
Layers, Arrange, Send to Bottom
Fill this layer with White color
Activate the top layer
Using Selection Tool, Point to point
Select the bottom part of the moon
Maximize Mtm_Lady_ 142_Goldendoves -11 sept 2006.pspimage
Resize 44% (Resample using Bicubic, Resize all layers Unchecked)
Adjust, Sharpness, Unsharp Mask and use these settings:
Radius: 1.00, Strength: 64, Clipping: 2, Luminance only Unchecked
Effects, 3D Effects, Drop Shadow and use these settings:
Vertical and Horizontal 2, Opacity 50, Blur 10 and Color Black
Copy and paste as new layer into your canvas
Position the lady to the right (look at my image for placement)
Hit delete key on your keyboard once
Maximize VRA_Martini_Button-Love_FREEBIE.png
Resize 35% (Resample using Bicubic, Resize all layers Checked)
Copy and paste as new layer into your canvas
Position the button on top of the circle on the moon (look at my image for placement)
Effects, 3D Effects, Drop Shadow and use these settings:
Vertical and Horizontal 2, Opacity 50, Blur 10 and Color Black
Repeat Drop Shadow but change Vertical and Horizontal to -2
Maximize a-dozi's-satin-bow-01-g2.psp
Copy Layer8 and paste as new layer into your canvas
Resize 20% (Resample using Bicubic, Resize all layers Unchecked)
Adjust, Hue and Saturation, Colorize and use these settings:
Hue: 28, Saturation: 108
Effects, 3D Effects, Drop Shadow and use these settings:
Vertical and Horizontal 2, Opacity 50, Blur 10 and Color Black
Repeat Drop Shadow but change Vertical and Horizontal to -2
Position the bow at the bottom of the button (look at my image for placement)
Copy tag.pspimage and paste as new layer into your canvas
Position the tag at the bottom of the moon (look at my image for placement)
Set your Foreground to NULL and Background to #7C6332
Click on the Text Tool and use these settings:
Type your name
Position it into the tag
Adjust so it fits into the tag
In the layer palette right click on your text layer and convert to a raster layer
Effects, 3D Effects, Drop Shadow and use these settings:
Vertical and Horizontal 1, Opacity 30, Blur 1 and Color Black
Add your watermark and your tag is finished. I hope you have enjoyed this tutorial.