This tutorial was created in 2006
Any resemblance to other online tutorials is purely coincidence
©N@thy 2007
This tutorial was written using PSP 9, but can be done in other versions
~ You will need ~
Paint Shop Pro, a 30 day trial can be downloaded here
My supplies here. The zip includes tubes, background, image and font
Open everything in psp
Tubes have HIDDEN layers which mean you must unhide to see them
Minimize them all
Double click to open the font "Antique Type" and minimize it on your desktop
Set your background color to #807554
~ Step 1 ~
Maximize FloralSpray Paper.jpg
This will be our working area
Layers, Promote Background Layer
Image, Flip
Image, Mirror
~ Step 2 ~
Layers, New Raster Layer
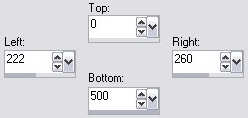
Activate your selection tool and using custom
selection with the following settings:

Copy FBR_215_ 7-30-06.jpg and paste into selection
Selections, Select None
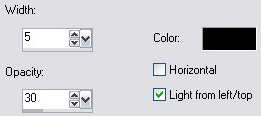
Effects, Texture Effects, Blind and use the following settings:
~ Step 3 ~
Layers, New Raster Layer
Activate your selection tool and using custom
selection with the following settings:
Copy AC_ButtonHoleTwill_ljc.pspimage and paste into selection
Selections, Select None
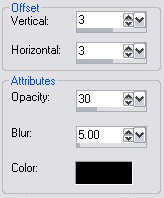
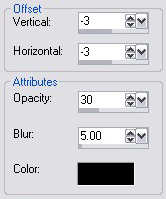
Effects, 3D Effects, Drop Shadow and use the following settings:
~ Step 4 ~
Copy StaplesLine.pspimage and paste as new layer
Move the staples a little bit up and to the left so it looks like
the staples are in the holes
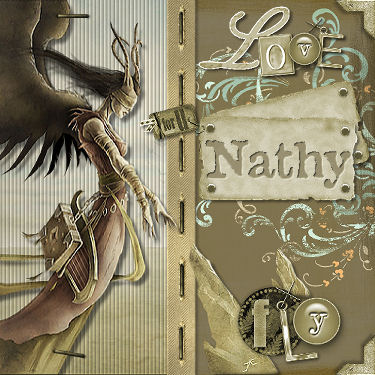
(Look at my image for placement)
~ Step 5 ~
Copy FBR_215 7-30-06.pspimage and paste as a new layer
Move the tube so the lady's wings are aligned
Effects, 3D Effects, Drop Shadow and use the following settings:

~ Step 6 ~
Copy Staple1.pspimage and paste as a new layer
Move the staple in the top left corner and position it like its holding the wing
Layers, Duplicate
Image, Rotate, Free Rotate: Direction: Right, Free: 10, All layers not checked
Move the staple in the bottom left corner and position it like its holding the dress
(Look at my image for placement)
~ Step 7 ~
Copy marsha-zepeda_old-photo-corner.pspimage and paste as new layer
Move it in the right bottom corner
Effects, 3D Effects, Drop Shadow and use the following settings:
Layers, Duplicate
Image, Flip
~ Step 8 ~
Copy ButtWings Title Fly.pspimage and paste as new layer
Move it down and to the right and position it like it would be hanging from the rock
Copy ButtWings Title Love.pspimage and paste as new layer
Move it up and to the right a little bit
(Look at my image for placement)
Effects, 3D Effects, Drop Shadow and use the following settings:

~ Step 9 ~
Copy MA_scr020.pspimage and paste as new layer
Move it up and to the right just under Love word
Effects, 3D Effects, Drop Shadow and use the same settings as before
Copy MA_scr021.pspimage and paste as new layer
Move it up and to the right so the 2 tag corners touch
Repeat Drop Shadow and use the same settings as before
(Look at my image for placement)
~ Step 10 ~
Copy agi_minibrad.pspimage and paste as new layer
Effects, 3D Effects, Drop Shadow and use the following settings:

Duplicate this layer 5 times
Position the screws in every visible corners of the tags
(Look at my image for placement)
~ Step 11 ~
Set foreground color to NULL
Activate text tool and use the following settings:

Type your name (or whatever you want)
If your name is too long then reduce the size of the font
Position the text in the middle of the tag
(Look at my image for placement)
Selections, From Vector Object
Layers, Convert to Raster Layer
Layers, New Raster Layer
~ Step 12 ~
Effects, 3D Effects, Cutout and use the following settings:

Effects, 3D Effects, Drop Shadow and use the following settings:

Selections, Select None
Change the opacity of this layer to 70
Change the opacity of the text layer to 70
Layers, Merge, Merge All (Flatten)
Save your work as jpg
Add your watermark and your tag is finished. I hope you have enjoyed this tutorial.
Any resemblance to other online tutorials is purely coincidence
©N@thy 2007
This tutorial was written using PSP 9, but can be done in other versions
~ You will need ~
Paint Shop Pro, a 30 day trial can be downloaded here
My supplies here. The zip includes tubes, background, image and font
Open everything in psp
Tubes have HIDDEN layers which mean you must unhide to see them
Minimize them all
Double click to open the font "Antique Type" and minimize it on your desktop
Set your background color to #807554
~ Step 1 ~
Maximize FloralSpray Paper.jpg
This will be our working area
Layers, Promote Background Layer
Image, Flip
Image, Mirror
~ Step 2 ~
Layers, New Raster Layer
Activate your selection tool and using custom
selection with the following settings:
Copy FBR_215_ 7-30-06.jpg and paste into selection
Selections, Select None
Effects, Texture Effects, Blind and use the following settings:
~ Step 3 ~
Layers, New Raster Layer
Activate your selection tool and using custom
selection with the following settings:
Copy AC_ButtonHoleTwill_ljc.pspimage and paste into selection
Selections, Select None
Effects, 3D Effects, Drop Shadow and use the following settings:
~ Step 4 ~
Copy StaplesLine.pspimage and paste as new layer
Move the staples a little bit up and to the left so it looks like
the staples are in the holes
(Look at my image for placement)
~ Step 5 ~
Copy FBR_215 7-30-06.pspimage and paste as a new layer
Move the tube so the lady's wings are aligned
Effects, 3D Effects, Drop Shadow and use the following settings:
~ Step 6 ~
Copy Staple1.pspimage and paste as a new layer
Move the staple in the top left corner and position it like its holding the wing
Layers, Duplicate
Image, Rotate, Free Rotate: Direction: Right, Free: 10, All layers not checked
Move the staple in the bottom left corner and position it like its holding the dress
(Look at my image for placement)
~ Step 7 ~
Copy marsha-zepeda_old-photo-corner.pspimage and paste as new layer
Move it in the right bottom corner
Effects, 3D Effects, Drop Shadow and use the following settings:
Layers, Duplicate
Image, Flip
~ Step 8 ~
Copy ButtWings Title Fly.pspimage and paste as new layer
Move it down and to the right and position it like it would be hanging from the rock
Copy ButtWings Title Love.pspimage and paste as new layer
Move it up and to the right a little bit
(Look at my image for placement)
Effects, 3D Effects, Drop Shadow and use the following settings:
~ Step 9 ~
Copy MA_scr020.pspimage and paste as new layer
Move it up and to the right just under Love word
Effects, 3D Effects, Drop Shadow and use the same settings as before
Copy MA_scr021.pspimage and paste as new layer
Move it up and to the right so the 2 tag corners touch
Repeat Drop Shadow and use the same settings as before
(Look at my image for placement)
~ Step 10 ~
Copy agi_minibrad.pspimage and paste as new layer
Effects, 3D Effects, Drop Shadow and use the following settings:
Duplicate this layer 5 times
Position the screws in every visible corners of the tags
(Look at my image for placement)
~ Step 11 ~
Set foreground color to NULL
Activate text tool and use the following settings:
Type your name (or whatever you want)
If your name is too long then reduce the size of the font
Position the text in the middle of the tag
(Look at my image for placement)
Selections, From Vector Object
Layers, Convert to Raster Layer
Layers, New Raster Layer
~ Step 12 ~
Effects, 3D Effects, Cutout and use the following settings:
Effects, 3D Effects, Drop Shadow and use the following settings:
Selections, Select None
Change the opacity of this layer to 70
Change the opacity of the text layer to 70
Layers, Merge, Merge All (Flatten)
Save your work as jpg
Add your watermark and your tag is finished. I hope you have enjoyed this tutorial.