
This tutorial was created in 2006
Any resemblance to other online tutorials is purely coincidence
©N@thy 2007
This tutorial was written using PSP 9, but can be done in other versions
~ You will need ~
Paint Shop Pro, a 30 day trial can be downloaded here
Eye Candy 3 (Glow), you can download here
My supplies here. The zip includes the tubes, picture, patterns and font
Open your tubes, picture and patterns in psp
Tubes have HIDDEN layers which mean you must unhide to see them
Minimize them all
Double click to open the font "Chopin Script" and minimize it on your desktop
~ Step 1 ~
File, New
Width 300, Height 300, Transparent background
Set your foreground to pattern, find redbg.jpg and use the following settings:
Angle: 0, Scale 100
Fill the layer with the pattern
~ Step 2 ~
Activate your Selection Tool
Click on Custom selection and use the following settings:

Layers, New Raster Layer
Set your foreground to pattern, find gold(69).jpg and use the following settings:
Angle: 0, Scale 100
Fill the selection with the pattern
Selections, Select None
~ Step 3 ~
Activate your Selection Tool once again
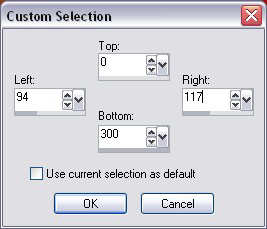
Click on Custom selection and use the following settings:
Set your foreground to #860E04
Set your background to #B81402
Set your foreground to gradient using the following settings:
Linear, Angle 0, Repeat 1, Invert not checked
Stay on the same layer
Fill the selection with the gradient
Selections, Select None
~ Step 4 ~
Layers, Duplicate
Image, Rotate, Free Rotate and use the following settings:
Direction: Right, Degrees: 90, All layers not checked
Move the border to the right so it fits perfectly
Layers, Merge, Merge Visible
~ Step 5 ~
Copy christmasglow.jpg and paste as new layer
Selections, Select All
Selections, Float
Selections, Defloat
Layer, New Raster Layer
Layer, Arrange, Move Down
Selections, Modify, Expand 3
Fill the selection with black
Selections, Select None
~ Step 6 ~
Make sure you are on the layer with the black square
Effects, Plugins, Eye Candy 3, Glow and use the following settings (color #CEAC4C):

Layers, Merge, Merge Visible
~ Step 7 ~
Set your foreground to NULL
Set your background to pattern, find gold(69).jpg and use the following settings:
Angle: 0, Scale 100
Activate Text Tool and use the following settings:

Type Christmas
Position it on top of the picture
(Look at my image for placement)
~ Step 8 ~
Activate Text tool once again with the same settings and type Glow
Position it at bottom of the picture
(Look at my image for placement)
Layers, Convert to Raster Layer
Effects, 3D Effects, Drop Shadow and use the following settings:

Layers, Merge, Merge Visible
~ Step 9 ~
Copy GoldStar_Tree_mm.psp and paste as new layer
Position it between Glow and the border
(Look at my image for placement)
You can add more if you'd like
Layers, Merge, Merge All (Flatten)
~ Step 10 ~
Image, Add Borders, 50px using white color
Activate your Magic Wand and select the border
Set your foreground to pattern, find redbg.jpg and use the following settings:
Angle: 0, Scale 100
Fill the selection with the pattern
~ Step 11 ~
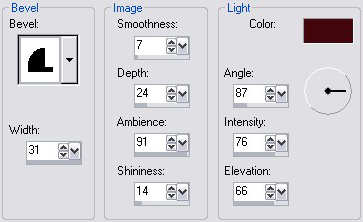
Effects, 3D Effects, Innver Bevel and use the following settings (color #43060B):
Do not deselect!
~ Step 12 ~
Layers, New Raster Layer
Copy nathytransparency.pspimage and paste into selection
Do not deselect!
Set your foreground to #B11202
Unlock the Transparency for this layer by clicking on the red X that is over the little lock (the red x will disappear)

Fill the layer with your foreground color
You may have to click several times to fill it completely
It might be a good idea to hide the background so you see better
but dont forget to unhide after!
Lock the Transparency by clicking on the lock so the red X reappears
~ Step 13 ~
Effects, 3D Effects, Drop Shadow and use the following settings:

Repeat Drop Shadow using the same settings but change Vertical and Horizontal to -4
Selections, Select None
Layers, Merge, Merge All (Flatten)
Save your work as jpg
Add your watermark and your tag is finished. I hope you have enjoyed this tutorial.
Any resemblance to other online tutorials is purely coincidence
©N@thy 2007
This tutorial was written using PSP 9, but can be done in other versions
~ You will need ~
Paint Shop Pro, a 30 day trial can be downloaded here
Eye Candy 3 (Glow), you can download here
My supplies here. The zip includes the tubes, picture, patterns and font
Open your tubes, picture and patterns in psp
Tubes have HIDDEN layers which mean you must unhide to see them
Minimize them all
Double click to open the font "Chopin Script" and minimize it on your desktop
~ Step 1 ~
File, New
Width 300, Height 300, Transparent background
Set your foreground to pattern, find redbg.jpg and use the following settings:
Angle: 0, Scale 100
Fill the layer with the pattern
~ Step 2 ~
Activate your Selection Tool
Click on Custom selection and use the following settings:
Layers, New Raster Layer
Set your foreground to pattern, find gold(69).jpg and use the following settings:
Angle: 0, Scale 100
Fill the selection with the pattern
Selections, Select None
~ Step 3 ~
Activate your Selection Tool once again
Click on Custom selection and use the following settings:
Set your foreground to #860E04
Set your background to #B81402
Set your foreground to gradient using the following settings:
Linear, Angle 0, Repeat 1, Invert not checked
Stay on the same layer
Fill the selection with the gradient
Selections, Select None
~ Step 4 ~
Layers, Duplicate
Image, Rotate, Free Rotate and use the following settings:
Direction: Right, Degrees: 90, All layers not checked
Move the border to the right so it fits perfectly
Layers, Merge, Merge Visible
~ Step 5 ~
Copy christmasglow.jpg and paste as new layer
Selections, Select All
Selections, Float
Selections, Defloat
Layer, New Raster Layer
Layer, Arrange, Move Down
Selections, Modify, Expand 3
Fill the selection with black
Selections, Select None
~ Step 6 ~
Make sure you are on the layer with the black square
Effects, Plugins, Eye Candy 3, Glow and use the following settings (color #CEAC4C):
Layers, Merge, Merge Visible
~ Step 7 ~
Set your foreground to NULL
Set your background to pattern, find gold(69).jpg and use the following settings:
Angle: 0, Scale 100
Activate Text Tool and use the following settings:
Type Christmas
Position it on top of the picture
(Look at my image for placement)
~ Step 8 ~
Activate Text tool once again with the same settings and type Glow
Position it at bottom of the picture
(Look at my image for placement)
Layers, Convert to Raster Layer
Effects, 3D Effects, Drop Shadow and use the following settings:
Layers, Merge, Merge Visible
~ Step 9 ~
Copy GoldStar_Tree_mm.psp and paste as new layer
Position it between Glow and the border
(Look at my image for placement)
You can add more if you'd like
Layers, Merge, Merge All (Flatten)
~ Step 10 ~
Image, Add Borders, 50px using white color
Activate your Magic Wand and select the border
Set your foreground to pattern, find redbg.jpg and use the following settings:
Angle: 0, Scale 100
Fill the selection with the pattern
~ Step 11 ~
Effects, 3D Effects, Innver Bevel and use the following settings (color #43060B):
Do not deselect!
~ Step 12 ~
Layers, New Raster Layer
Copy nathytransparency.pspimage and paste into selection
Do not deselect!
Set your foreground to #B11202
Unlock the Transparency for this layer by clicking on the red X that is over the little lock (the red x will disappear)
Fill the layer with your foreground color
You may have to click several times to fill it completely
It might be a good idea to hide the background so you see better
but dont forget to unhide after!
Lock the Transparency by clicking on the lock so the red X reappears
~ Step 13 ~
Effects, 3D Effects, Drop Shadow and use the following settings:
Repeat Drop Shadow using the same settings but change Vertical and Horizontal to -4
Selections, Select None
Layers, Merge, Merge All (Flatten)
Save your work as jpg
Add your watermark and your tag is finished. I hope you have enjoyed this tutorial.