This frame tutorial was made with PSP7
but can be created in earlier versions too ... Earlier versions may not have
the fine leather effect used in this tutorial but the frame can be
accomplished without it ...
This page is graphic intense so please be patient while this
page loads ...
Here is an example of the frame that we will be making ...
~ What You Will Need ~
Jasc Paint Shop Pro You can download a fully functional 30
day trial version ... Here
Flaming Pear SuperBladePro You can download a two week demo
version ... Here
Plug-In Filter - Graphics Plus You can download the filter
... Here Unzip
and place in your PSP Plug-in Filter folder
Image I used You can download the image ... Here Unzip
and then open in PSP
My BladePro Preset / SNTwist03 This preset will work in both
BladePro and SuperBladePro You can download the preset ... Here Unzip
and place in your BladePro enviromentals & textures folder
~ Instructions ~
1. Set Background color to a dark color from your image ... I
used #929286
2. Image / Add Borders / Symmetric Checked / 4 With the Magic
Wand....click on
the new border Effects / Plug-in Filters / Blade Pro / SNTwist03 Effects /
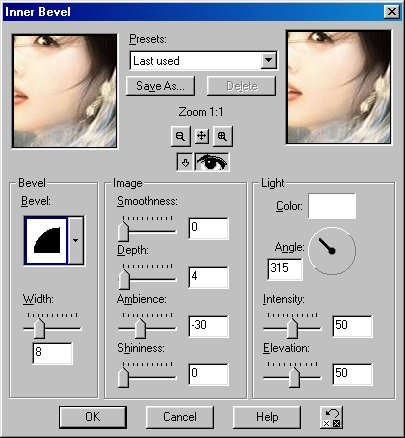
3D Effects / Inner Bevel with the following settings:
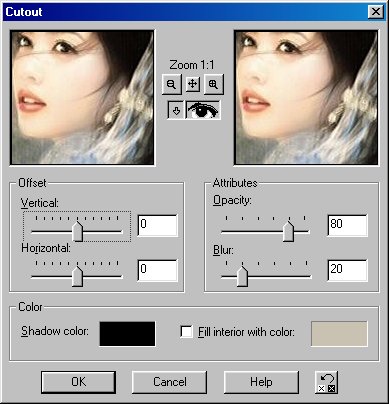
3. Selections / Invert Effects / 3D Effects / Cutout with the
following settings:
4. Image / Add Borders / Symmetric Checked / 14 Selections /
Select All Selections / Modify / Contract / 4 Selections /
Invert Effects / Plug-in Filters / Blade Pro / SNTwist03 Effects / 3D
Effects / Inner Bevel with the same settings as in Step #2
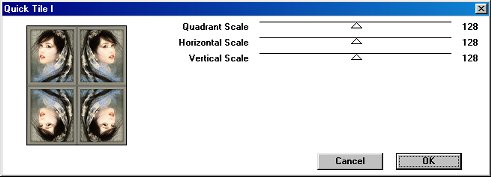
5. Selections / Select All Selections / Modify / Contract /
14 Selections / Invert Effects / Plug-in Filters / Graphics Plus / Quick
Tile 1 with the following settings:
6. Effects / Sharpen / Sharpen Selections / Select
None With the Magic Wand....click
anywhere on the outside green border Selections / Modify / Select
Similar Effects / Plug-in Filters / Blade Pro / SNTwist03 Effects / 3D
Effects / Inner Bevel with the same settings as in Step #2
7. Image / Add Borders / Symmetric Checked / 20 With the
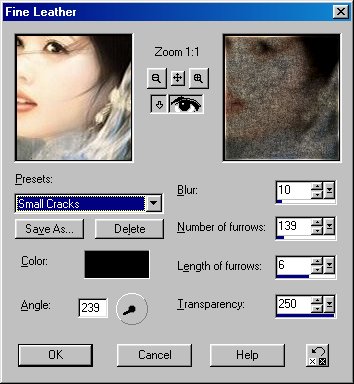
Magic Wand....click on
the new border Effects / Texture Effects / Fine Leather with the following
settings:
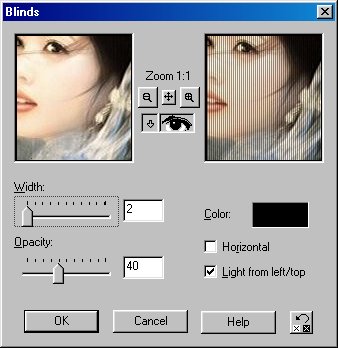
8. Effects / Texture Effects / Blinds with the following
settings:
9. Effects / 3D Effects / Cutout with the same settings as in
Step #3 Image / Add Borders / Symmetric Checked / 4 With the Magic
Wand....click on
the new border Effects / Plug-in Filters / Blade Pro / SNTwist03 Effects /
3D Effects / Inner Bevel with the same settings as in Step #2 Selections /
Select None
Now resize and sharpen image if necessary ...
If you have any questions or need additional info, please
feel free to email me ...