|
Easy XFrame or XCard
(PSP all versions - no
filters)
A tutorial by
Mar © 2005.

For a preview of the XCard, look at
the bottom
of this tutorial where the examples are.
What you need:
PSP. Download a 30 day trial
here.
Materials: Download
here.
Save your work often.
We are going to start
now.
Good luck with your XFrame or XCard.
1. Open one of the 5
Christmas images.
All Christmas images are royalty
free.
2. For the XCard open a new image 235
X 125.
Fill with red: #c00000.
The other steps are all the
same as the frame.
3. Image > Add borders > 2
Pixels > Symmetric > Blue.
4. With your magic wand  select (feather 0) the blue border.
5. Open the MD-Xmasgold.psp from the
ZIP.
Foreground to
pattern and look for the MD-Xmasgold.jpg.
Texture unchecked (=
bleu hand).

6. Fill the selection with the gold
pattern.
7. Effects > 3D-effects > Drop
shadow > Black.
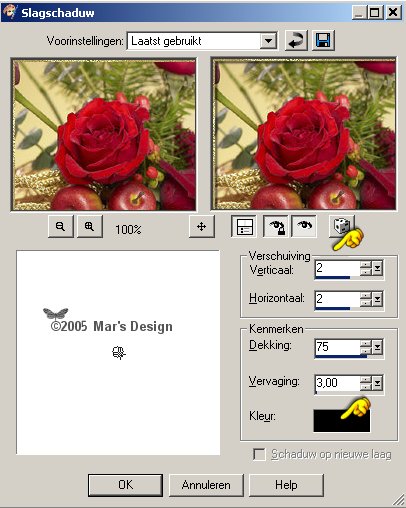
8. Repeat the drop shadow but this
time Vert. and Horiz. at - 2.
9. Image > Add borders > 15
Pixels > Symmetric > Blue.
10. Open the MD-PlaidRedGreen.jpg from
the ZIP.
Background to
pattern and look for MD-Xmasgold.jpg.
Texture unchecked (= bleu
hand).

11. Fill the selection with your
right mouse button (plaid pattern).
12. Image > Add borders > 2
Pixels > Symmetric > Blue.
13. With your magic wand
select the blue border.
14. Fill with the gold and repeat the
drop shadow at 2 and at - 2.
15. Image > Add borders > 35
Pixels > Symmetric > Blue.
16. With your magic wand
select the blue border.
17. Open the MD-RedFlakes.jpg and
copy.
For the XCard before you copy:
Rotate
MD-RedFlakes.jpg like this:
Image > Rotate > Rotate
clockwise 90 degrees.
Now copy the image.
Go back to your
frame / card.
18. Edit > Paste >
Paste into selection.
19. Image > Add borders > 2
Pixels > Symmetric > Blue.
20. With your magic wand
select the blue border.
21. Fill with the gold and repeat the
drop shadow at 2 and at - 2.
22. Image > Add borders > 15
Pixels > Symmetric > Blue.
23. With your magic wand
select the blue border.
24. Fill the selection with your
right mouse button (plaid pattern).
25. Image > Add borders > 2
Pixels > Symmetric > Blue.
26. With your magic wand
select the blue border.
27. Fill with the gold and repeat the
drop shadow at 2 and at - 2.
28. Open the MD-FabrcStars.psp and
copy.
29. Go back to your frame /
card.
30. Edit > Paste >
Paste as a new layer.
31. Move  the stars to the left upper corner.
32. Repeat the drop shadow but only at
2.
Was this a easy one or what?
LOL.
If you are making an XCard you
have to add the text.
I used Arial Black > Size 40 and stroke
2.0.
Background to the plaid pattern and foreground to
the gold pattern. Drop shadow at 2 like
before.
Your Easy XFrame or XCard is done.
I hope you like
this tutorial.
Thank you for using my tutorials.


This tutorial is written and
designed by Mar and therefore her property.
This tutorial may not be
downloaded for any purpose other
than to follow the tutorial. If
you're a Moderator of a group,
please e-mail me
before adding this tutorial to any lessons,
etc.
When you do have my permission..... only a text link is
allowed.
My tutorials are never ever to
be sent over any mailing list or to leave my
site.

Since
11-10-2005:
|