This tutorial was created April 2, 2006
Any resemblance to other online tutorials is purely coincidence
©N@thy 2006
This tutorial was written using PSP 9, but can be done in other versions
~ You will need ~
Paint Shop Pro, a 30 day trial can be downloaded here
Fun House (ZigZaggerate, Xaggerate and Streak Mirror), you can download here
My supplies here. The zip includes the tubes, image and mask
Put your mask in your mask folder
Open your image and tubes in psp
Set your Foreground color to #69221C
Set your Background color to #C26B4D
Minimize image and tubes for later use
File, New
Width: 600, Height: 300, Transparent background
Fill the layer with your dark color
Layers, New Raster Layer
Fill the layer with your light color
Layers, Load/Save Mask, Load Mask from Disk
Find ww-linemask8j mask and use the following settings:

Layers, Merge, Merge Group
Adjust, Sharpness, Sharpen
Effects, 3D Effects, Drop Shadow and use the following settings:

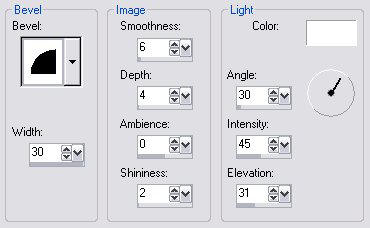
Effects, 3D Effects, Inner Bevel and use the following settings:
Layers, Duplicate
Effects, Distortion Effects, Curlicues and use the following settings:

Activate Group - Raster 2 layer (not the copy)
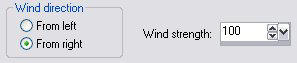
Effects, Distortion Effects, Wind and use the following settings:
Maximize butterfly2small tube and copy it
Back to our main image
Edit, Paste, Paste As New Layer
Layers, Arrange, Bring to Top
Effects, 3D Effects, Drop Shadow and use the following settings:
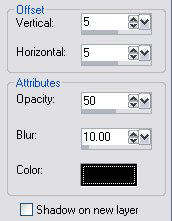
Repeat Drop Shadow but change Horizontal and Vertical for -5
Activate Raster 1
Layers, New Raster Layer
Selections, Select All
Maximize butterfly2big and copy it
Back to our main image
Edit, Paste, Paste Into Selection
Selections, Select None
Adjust, Blur, Gaussian Blur and set the Radius to 3
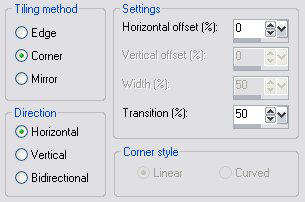
Effects, Image Effects, Seamless Tiling and use the following settings:
Layers, Properties and set Opacity to 40
Maximize bluebutterfly tube and copy it
Back on our main image
Edit, Paste, Paste As New Layer
Layers, Arrange, Bring to Top
Move the butterfly in the right bottom corner
Layers, Duplicate
Image, Mirror
Image, Flip
Layers, Merge, Merge Visible
Image, Canvas Size
Change the Height to 900 (the Width doesnt change)
Placement will be Bottom: 600
Effects, 3D Effects, Drop Shadow and use the following settings:
Make sure Shadow on new layer IS checked!

Activate Raster Deform Tool
Move your mouse until the white double-headed arrow appears
(like in the screen shot)

Once you see it left click on your mouse, hold and drag it past the right side of the image
(like in the screen shot)

This will extend the drop shadow out past the strip getting rid of any seams
Do the same thing on the left side
Layers, Merge, Merge Visible
Layers, New Raster Layer
Layers, Arrange, Send to Bottom
Selections, Select All
Maximize the butterfly2big image again and copy it
Back to our main image
Edit, Paste, Paste into Selection
Selection None
Adjust, Blur, Gaussian Blur and set the Radius to 20
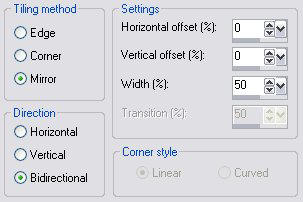
Effects, Image Effects, Seamless Tiling and use the following settings:
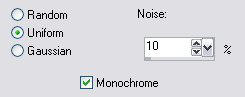
Adjust, Add/Remove Noise, Add Noise and use the following settings:
Effects, Plugins, Fun House, ZigZaggerate and use the following settings:

Effects, Plugins, Fun House, Xaggerate and use the following settings:

Effects, Plugins, Fun House, Streak Mirror and use the following settings:

Effects, Image Effects, Seamless Tiling and use the same settings as before
Layers, Properties, Change the Opacity to 30
Layers, New Raster Layer
Layers, Arrange, Send to Bottom
Fill with your light color
Layers, Merge, Merge All (Flatten)
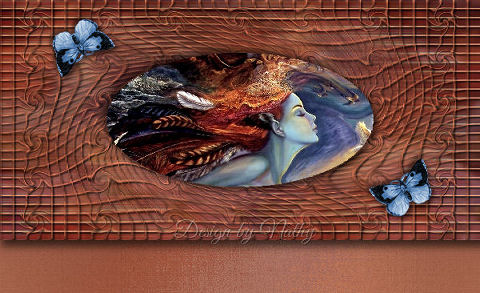
Add your watermark and your tag is finished. I hope you have enjoyed this tutorial.
Any resemblance to other online tutorials is purely coincidence
©N@thy 2006
This tutorial was written using PSP 9, but can be done in other versions
~ You will need ~
Paint Shop Pro, a 30 day trial can be downloaded here
Fun House (ZigZaggerate, Xaggerate and Streak Mirror), you can download here
My supplies here. The zip includes the tubes, image and mask
Put your mask in your mask folder
Open your image and tubes in psp
Set your Foreground color to #69221C
Set your Background color to #C26B4D
Minimize image and tubes for later use
File, New
Width: 600, Height: 300, Transparent background
Fill the layer with your dark color
Layers, New Raster Layer
Fill the layer with your light color
Layers, Load/Save Mask, Load Mask from Disk
Find ww-linemask8j mask and use the following settings:
Layers, Merge, Merge Group
Adjust, Sharpness, Sharpen
Effects, 3D Effects, Drop Shadow and use the following settings:
Effects, 3D Effects, Inner Bevel and use the following settings:
Layers, Duplicate
Effects, Distortion Effects, Curlicues and use the following settings:
Activate Group - Raster 2 layer (not the copy)
Effects, Distortion Effects, Wind and use the following settings:
Maximize butterfly2small tube and copy it
Back to our main image
Edit, Paste, Paste As New Layer
Layers, Arrange, Bring to Top
Effects, 3D Effects, Drop Shadow and use the following settings:
Repeat Drop Shadow but change Horizontal and Vertical for -5
Activate Raster 1
Layers, New Raster Layer
Selections, Select All
Maximize butterfly2big and copy it
Back to our main image
Edit, Paste, Paste Into Selection
Selections, Select None
Adjust, Blur, Gaussian Blur and set the Radius to 3
Effects, Image Effects, Seamless Tiling and use the following settings:
Layers, Properties and set Opacity to 40
Maximize bluebutterfly tube and copy it
Back on our main image
Edit, Paste, Paste As New Layer
Layers, Arrange, Bring to Top
Move the butterfly in the right bottom corner
Layers, Duplicate
Image, Mirror
Image, Flip
Layers, Merge, Merge Visible
Image, Canvas Size
Change the Height to 900 (the Width doesnt change)
Placement will be Bottom: 600
Effects, 3D Effects, Drop Shadow and use the following settings:
Make sure Shadow on new layer IS checked!
Activate Raster Deform Tool
Move your mouse until the white double-headed arrow appears
(like in the screen shot)
Once you see it left click on your mouse, hold and drag it past the right side of the image
(like in the screen shot)
This will extend the drop shadow out past the strip getting rid of any seams
Do the same thing on the left side
Layers, Merge, Merge Visible
Layers, New Raster Layer
Layers, Arrange, Send to Bottom
Selections, Select All
Maximize the butterfly2big image again and copy it
Back to our main image
Edit, Paste, Paste into Selection
Selection None
Adjust, Blur, Gaussian Blur and set the Radius to 20
Effects, Image Effects, Seamless Tiling and use the following settings:
Adjust, Add/Remove Noise, Add Noise and use the following settings:
Effects, Plugins, Fun House, ZigZaggerate and use the following settings:
Effects, Plugins, Fun House, Xaggerate and use the following settings:
Effects, Plugins, Fun House, Streak Mirror and use the following settings:
Effects, Image Effects, Seamless Tiling and use the same settings as before
Layers, Properties, Change the Opacity to 30
Layers, New Raster Layer
Layers, Arrange, Send to Bottom
Fill with your light color
Layers, Merge, Merge All (Flatten)
Add your watermark and your tag is finished. I hope you have enjoyed this tutorial.