|


They will both open
in a new window and print out on standard 8½" X
11" paper
For
information about which fonts, programs, etc I
used to construct my pages and my headers,
click
here.
|
For this tutorial you will need:
PSP,
and version
Filters and materials
needed
None
*****************
I am assuming you
know the basics of Paint Shop Pro and where the
tools can be located.
This is an extremely
easy tutorial and can be done by
beginners. |
Here are some
arrows and bars you can drag and drop where you
need to mark or underline where you are. .
Just left click and drag to where you want
it then let go.
They will stay where you put
them until you close your browser.
       

 |
I came up with this method
while camping. With no internet access and no
tutorial on hand to make curved text,
I just
played around till I came up with this method.
It's very, very simple and easy. |
1. Right click in layer
palette. New Vector Layer. Click on
Ellipse tool.
Set background on null (turn
it off), foreground can be any color.
 |
2. Draw an ellipse about the
shape and size you want your text.
It should
be an outline only if the color palette is
changed as shown in step 1..


 |
3. Click on the text tool. Your
ellipse will now show nodes (little red
boxes)

Change your color
palette. Now you want the foreground to be null,
and the color you want for the text as the
background.

Set it at Vector. Set the
font and size and color whatever you want it to
be.

 |
4. Hover over the spot in the
ellipse where you want your text to start. Click
down when you see a kind of sideways A.
 |
5. Type your text and apply.

After you apply it, if
it's not quite centered where you want it,
hover over the middle till you see the
crossed double headed arrows, drag and move to
left or right,
as many times as you need to
get it to move. It will not move right or left
but rather around the circle.
 |
6. Once the text is as you like
it, in the layer palette, click on the + next to
the vector layer.
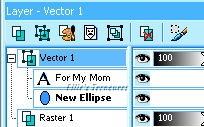
In the layers that open
out, right click on the ellipse layer and click
on properties.
Unclick the box that says
visible.

Your circle will be gone
but your text will remain. Right click and
convert to a raster layer.

With your selection tool,
crop around the excess canvas. |
7. Add a drop shadow and place
where you want and you're done.

For larger text, you may
want to change the blur to 2.

This works great for
simple shapes such as circles, squares, etc. Not
so great for complex shapes such as
stars,
hearts, etc. Seems to crowd the text that way,
but it's super easy for the simple
shapes.
When I get a bit of time to play with
it, I'll see if this method can be used for more
complex shapes.
If you will want it for a
picture that's not open yet but you'll be
applying the text in PSP, save it as a
pspimage or psp or a psd file if you want it
for a different program, such as PhotoImpact or
Photoshop.
If you want to add it to a
background, as I did for the tutorial header,
save it as a gif. |
| Saving as a gif |
Go to File>Export>Gif
Optimizer
In Transparency window, change
setting to "Existing Image or Layer
Transparency", change nothing else

Click on Partial
Transparency tag,
Click "Use Full
Transparency for pixels below" and change that
to 15%
Click "Yes, blend with background
color" and pick a color close to the
background color you'll be placing it on.
Change nothing else. Click ok and save.
 |
l hope you had fun!
Back to top |
| If you have any questions or suggestions,
click on the email button below to contact me.
Have a wonderful day! |
These
tutorials are all my own creations.
Any
resemblance to any other tutorial is purely
coincidental and unintentional.
Feel free to
share any of my tutorials on this site by a link
back to my site,
but do not copy and send
the entire tutorial to anyone or any group.
You do not need my permission to share a
text link only to this tutorial.
You may also
save it to your hard drive (go to File>Save
As, and save as an mht file-
this will save
the pictures with the page in one single file
and will open in a browser.
If not available,
save as Web Page, complete (*.htm, *.html).
This will save it with the pictures in a
separate folder)
or print it out for your own
personal use.
©2003-2007 Ellie's
Treasures
|

 |
|
Back
to top
Webpage Design
Information
This webpage background was
made in PhotoImpact with a tutorial by Deb
DeHaven
Sadly, she passed away but
her tutorials just came back online, thanks to
PIRCNet.
You can find the tutorial
here.
The font I used for all of
the text on the buttons is BrockScript
The
font I used for the "Text on a Path" tutorial
header is Ballantines-Bold.
Click on the font name to
download the font.
I use PhotoImpact to make
all of my headers due to the amazing
3D text
it has and the wonderful presets available free
online
Most of the presets I use
are either the ones that come with PhotoImpact,
usually the Gel ones,
or from Deb's PI
Tutorials and More (see below) or
Carol Oyl's
site
This is the address to
Deb's old pages
http://www.fortunecity.com/skyscraper/millenit/1716/pitutorials/objects/presets/presets1.html
I can't find any links to
her new pages but the presets are still on this
page for download.
For more sites to find PI
Presets, take a look at my
Great
Beginnings
page. |
