1. Open the image you were
working on from the previous page Choose a dark color
from your image or you can use black - I am using
#524137 You should already have the mask open but if
not, open it and minimize it on your workspace
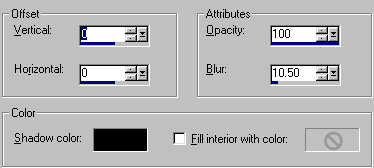
2. Selections - Select All Effects - 3d
Effects - Cutout Select none
3. Add 2px border Select and fill
with the gold pattern Select none
4. Add 1px
border - #524137 (your color choice or black)
5.
Add 3px border Select and fill with the gold
pattern Select none
6. Add 1px border -
#524137 (your color or black)
7. Add 15px
border Select and fill with the 2nd copy of the
graphic
Layers - New Raster Layer Fill the
border with the dark color Effects - Plugins - Eye
Candy 3 - Jiggle
8. Add 2px border Select and fill
with the gold pattern Select none
9.Add 1px
border - #524137 (your color or black)
10. Add
3px border Select and fill with the gold
pattern Select none
11. Add 1px border -
#524137 (your color or black)
12. Add 25px
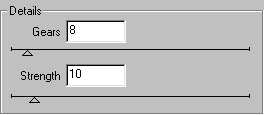
border Select and fill with the dark color Effects
- Plugins - DSB Flux - Gears Select none
13. Activate the magic wand Select
the solid brown areas - hold the Shift key and click if
needed Effects - Plugins - Eye Candy 3 -
Jiggle Apply the same settings as in Step
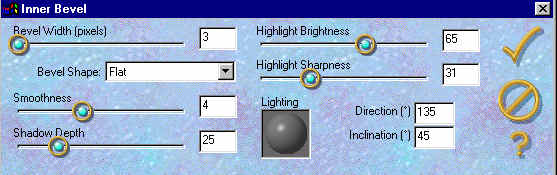
7 Effects - Plugins - Eye Candy 3 - Inner
Bevel Apply the same settings as in Step 7 Select
none
14. Add 2px border Select and fill with
the gold pattern Select none
15. Add 1px
border - #524137 (your color or black)
16. Add
3px border Select and fill with the gold
pattern Select none
17. Add 1px border -
#524137 (your color or black)
18. Set the
background pattern to the second image Add 30px
border Select and fill with the background
image Keep selected
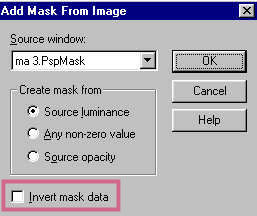
19. Layers - New Raster
Layer Flood fill with the dark color Layers - New
Mask Layer - From Image Choose ma 3.PspMask from the
drop down box or ma 3.jpg for those using
PSP8 Ensure Invert mask data is
unchecked
Click Ok Layers - Merge - Merge
Group Selections - Select none Layers - Merge -
Merge All
20. Activate the magic wand Select
the brown areas
You may need to adjust the tolerance
for your own image
Effects - Plugins - Eye Candy
3 - Inner Bevel Apply the same settings as in Step
7 Selections - Invert Effects - 3d Effects -
Cutout Apply the same settings as in Step 2 Select
none
21. Add 2px border Select and fill with
the gold pattern Select none
22. Add 1px
border - #524137 (your color or black)
23. Add
3px border Select and fill with the gold
pattern Select none
I haven't chosen to
add any embellishments as I felt the frame had
enough Feel free to add some of your own if you wish
I hope you have enjoyed this tutorial
As always if you have any questions,
feel free to email me