|
Dazzling Frame
A
tutorial by Mar ©2003

What you
need:
Corel
PSP. Download a 30 day trial
here
An image. I used this one by Dorothy Ramsey.
The Filter
Factory Gallery
E and Filter Factory Gallery
D.
Graphics Plus - Cross Shadow download
here.
Extract
to your plugins folder in PSP.
Tip!!
If your plugin won't work, you maybe need this
file
(MSVCRT10.DLL
download
here) extract to
Windows/System directory , for XP to System
32.
You never know!.
With some Filter Factory filters you
have to use
PluginCommander to configuration the plugins.
PluginCommander get it here.
You
don't know how?
Look at Nadine's tutorial.
~~~~

Image: © Dorothy Ramsey
Save often.
Let's get
started. Good luck.....
1. Open new image 400 X 300
> Transparent.
Fill with a color that matches
your image.
I used blue #418BBF.
2. Selections > All.
Selections > Modify > Contract 40
pixels.
Hit delete, to remove the middle part.
Selections >
Invert.
3. Effects > Plugins > Graphics Plus > Cross Shadow.
Default
setting. Apply.

4. Effects > 3D effects >
Inner bevel.
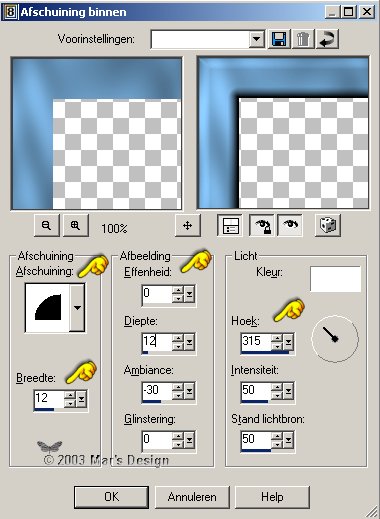
5. Copy.
Paste as a new
layer.
You will not see a thing at first.
Open your layer
palette, if you hadn't already and see if there's a new layer.
6. Effects > Plugins > Filter Factory Gallery D > MovingScreen.
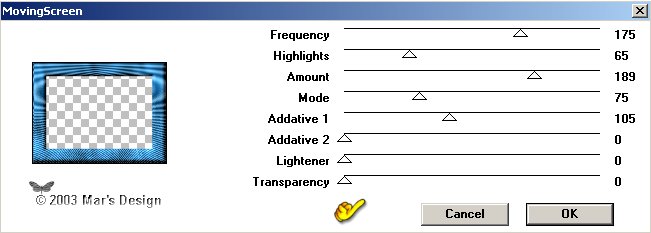
Keep selected.
7. Effects > Plugins >
Filter Factory Gallery E > Transparent Pizza.
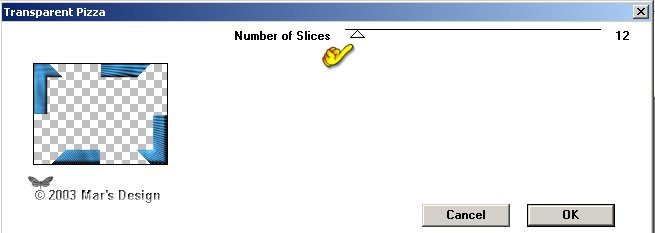
Apply.
8. Selections > Float.
Effects > 3D effects >
Inner bevel.
Same setting as before but
depth at 6.
Apply.
9. Merge visible layers.
With your wand  (feather 0) click in the middle part.
Selections
> Modify > Expand 5 pixels.
10. Layers > New raster layer.
Open your image now.
Copy and
paste into selection.
11. Layer palette > Move your image layer below your merged layer.
12. Layers
> New raster layer.
Effects > 3D effects > Cut
out.
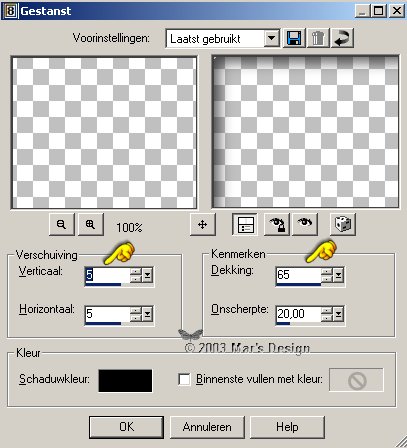
13. New layer.
Repeat the cut out but with
Vertical and Horizontal - 5.
14. Add borders 5 pixels >
White.
Select your white border.
Effects > Reflections
> Pattern.
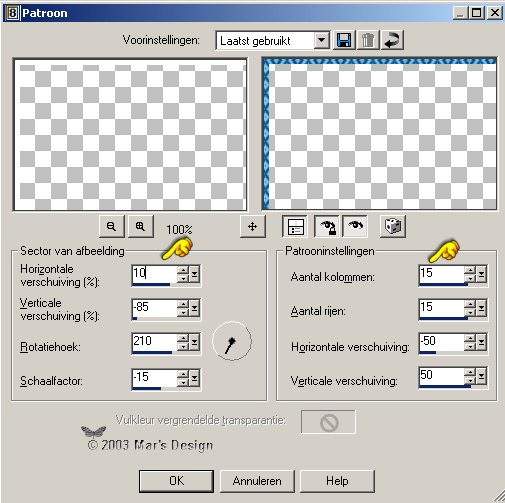
15. Effects > 3D effects >
Inner bevel.
Same settings but depth
again to 12.
Apply.
16. Add a border 25 pixels
(white).
Select your border.
Fill selection with blue (or your
own color).
17. Effects > Plugins > Graphics Plus > Cross Shadow.
Default.
Apply.
18. Repeat the same inner bevel (depth
12).
19. Copy and paste your selection as a
new layer
Check your layer palette, there
have to be 2 layers.
20. Repeat Filter Factory D >
MovingScreen.
21. Repeat Filter Factory E >
Transparent Pizza.
22. Selections > Float.
Repeat inner bevel (depth 6).
23. Add borders 5 pixels >
White.
Select your border.
Fill with
blue (or your own color).
24. Effects > Reflection effects
> Pattern.

25. Repeat inner bevel (depth
12) and the drop shadow.
~~~ Tip!!!! ~~~
You can make
another border with reflection, pattern.
Experiment by clicking
the dice.
Move your border in the preview window so
you can
see what you're doing. Not satisfied..... ?
Undo and try again!.
You can fill your image with a
pattern too, instead of a solid color.
Skip the Cross Shadow if
you do.
Add a new layer instead and fill with a contrasting color
or
pattern before you apply MovingScreen. (See purple
example).
Experiment . After these steps, follow the
tutorial again .
Your Dazzling Frame is
done.
Hope you did like it.
Thanks for trying out my tutorial.
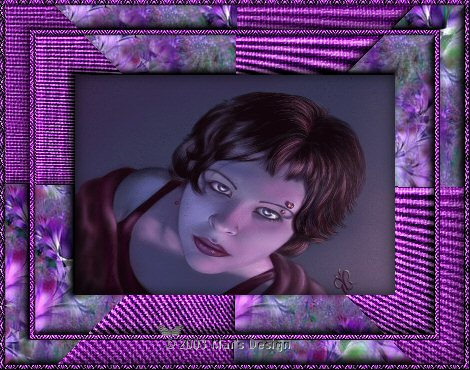
Image: © Jennifer Rodriguez.

Image: © Sheila Hill.
This tutorial is written and
designed by Mar and therefore her property.
This
tutorial may not be downloaded for any purpose other than to
follow the tutorial. If your a Moderator of a group,
please
e-mail me before adding this tutorial to any lessons.. etc.
This
tutorial may NOT be copied in part or whole without my
permission.
Translation into English
by my dear friend Trudie.
Thanks sweetie! You are the
best.

Since
10-04-2003:
|