Ok, let's get started.
Remember to save
often.
~~~~~~~~~~~~~~~~~~~~~~~~~~~~~~~~~~~~~~~~~~~~~~~
- open image A Pirates Life
duplicate
close original
promote background to layer
- New Layer flood fill with #526764
- Layers: load/save mask
find tyleress_mask9
Settings: fit to layer
source luminance
hide all mask
load
mask layer » delete » merge group
- selections: select all float defloat
make layer 1 (background image) the active layer
selections: invert
hit delete
delete your mask layer
- Keep your image selected
select all » float » defloat
selections contract 2
keep selected
- Apply effects:
- 1st: screen works » close knit »
default setting
- 2nd: apply filter: photo effex
scan lines
5 1 50 25 5 -115 verticle toggle checked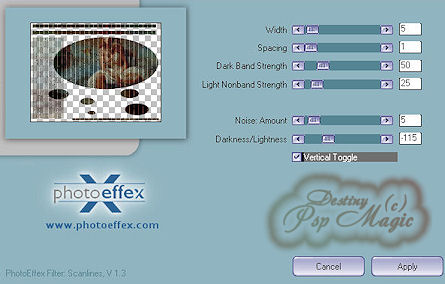
- 3rd: Distortion effect: wind strength: 25 » from left
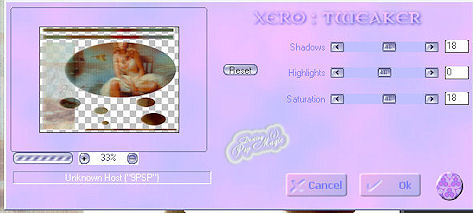
- 4th: Xero: tweaker 18 0 18
- 1st: screen works » close knit »
default setting
- Effects: 3d effects: inner bevel
settings: bevel: 5 width: 2 smoothness: 0 depth: 3 Ambience: 0 Shininess:0
Angle: 319 intensity: 42 elevation: 35 color: white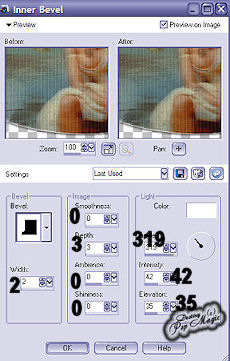
- effects: 3d effects » drop shadow »
settings: 2 0 63 5
- deselect
- Selection Tool: Select » rectangle: » select
area around top two bars
promote to layer
Go back to mask layer and hit delete
on promoted selection layer change opacity to 72
merge down
- Copy layer 1 of tube provided (image of
woman) to your working image
apply as new layer
resize 90% all layers unchecked
place your tube add same drop shadow as before
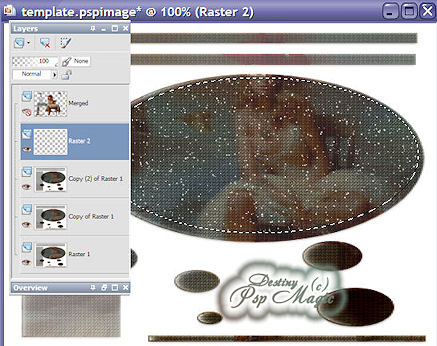
- Back to image provided choose the ship
layer(raster 2)
copy paste as new layer on your working image.
Place at left bottom (see my tag for reference)
Settings: luminance(L) » opacity: 75
- Back to image provided, copy the bird layer
paste as new layer on your working image
place above the 2 bars at top, duplicate merge down.
duplicate again and place at other end of top bars
- Make active Tube: JackSparrow~mistyE
edit » copy » paste as new layer » resize 40%
place as on example
Settings: luminance(L) opacity: 26
- Edit copy the text; (A pirates Life) place over the partial text already on the main image
- Copy, paste artist credit, place on rectangle, bottom left
- Brimg ship layer to top
- add your name, watermark, etc
If you do not want to add the rain animtion merge all and save as jpg
If you want to add the rain animtion:
- close bottom 2 layers » merge visible »
close
- open bottom 2 layers » merge down

Now we are going to add our rain animation
- choose your selection tool
shape ellipse starting in the center ,(317, 170) hold down the shift key
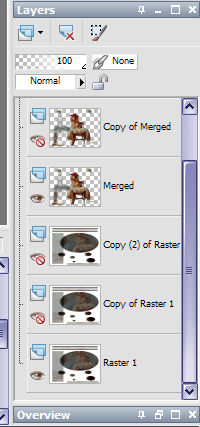
choose as much of the oblong image on your background that you can - duplicate image 2x
- you should have 3 copies of your background
layer
- close the top 2
- Activate the bottom layer » keep selected »
new layer
- effects: vanderlee: snowflakes amt 132 min
size 0 max size 11 hardness 100 transparency 0
basic snow random seed 1
- adjust » blur » motion blur » angle 169 blur 16
- merge down
- Keep selected
select copy of raster 1
new layer
repeat above except change random seed
- Select next layer and repeat as above.
Change random seed
- deselect
- All 3 of your bottom layers should be open
- select your merged layer
- duplicate twice so you have three layers
- close the top two layers of merged layers
- close the top two layers of your background
- select the bottom layer and choose merge visible
- close this layer
- now select the second layer of your merged and background layers
- make sure the bottom and top layers are closed
- merge visible
- close this layer
- choose the top layer of your merged image and background layer
- on background layer choose merge visible
- You should have 3 merged layers
- open all three layers
- save as psp animation shop
- open your saved image in animation shop
- edit select: select all
- animtion frame properties: 19
- save as gif optimized
If you want to resize your image, please do it in animation shop
I hope that you have enjoyed this tutorial and if you have any questions please e-mail me or leave a message in the forum.
Thank you, Destiny