|
Crumple Frame
(PSP 7, 8, 9
& 10 - no
filters)
A tutorial by Mar ©
2004.

What you need:
PSP
8. Download a
30 day trial
here.
A
nice image. I used this one.
Right click > Copy and
Paste in PSP.

© Author unknown
1. Open your image in PSP. Shift
D and close the original.
Foreground color to
#C2A171.
Background color #40372F.
Or choose two color's from
your own image.
2. Add borders > 5 Pixels >
White.
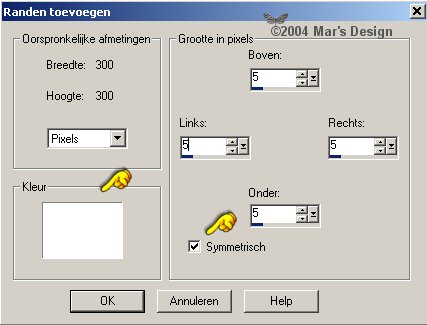
Select  the
white border (feather 0). the
white border (feather 0).
Foreground style to
gradient.
Choose fore-background gradient.

Fill your border.
3. Effects > 3D-effects > Inner
bevel.
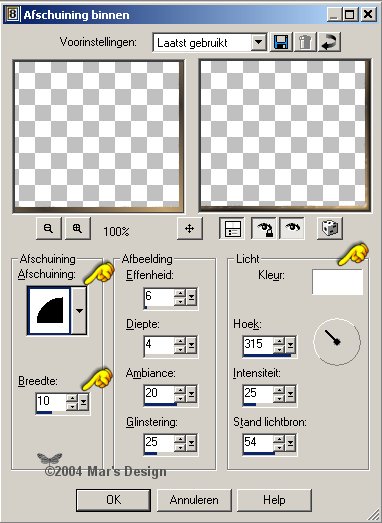
Selections > Invert.
4. Effects > 3-D effects >
Cut-out.
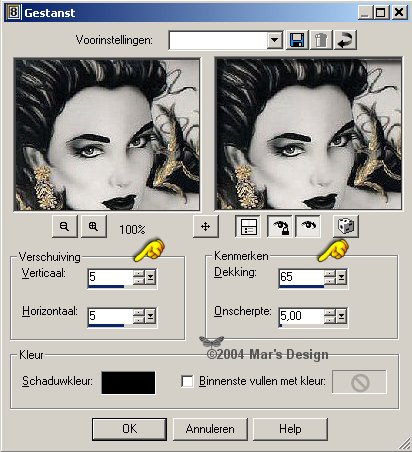
5. Layer > New raster
layer.
Repeat the cut-out
but H and Vert. to - 5.
Selections > None.
6. Add borders > 5 Pixels >
Black.
Confirm merging (only the
first time).
7. Add borders > 5 Pixels >
White.
Select your white border.
Fill with the gradient.
8. Repeat the inner bevel.
Repeat steps 6 to 8 another 2 times.
You have 4 gradient borders
and 3 black ones.
9. Selections > All.
Selections
> Modify > Contract 35 Pixels.

Selections > Invert.
10. Effects > Distortion >
Warp.
In PSP 7 > Geometric effects > Warp.
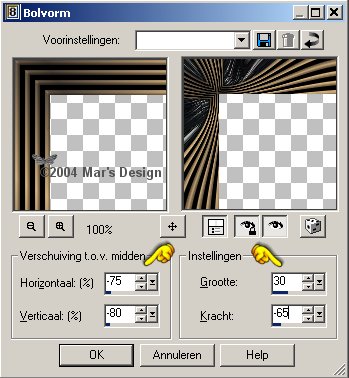
Image > Mirror.
Image > Flip.
11. Repeat > Effects > Distortion
> Warp.
Image > Flip.
12. Selections > Contract 10
Pixels.
Confirm defloat (PSP 8).
Repeat the warp.
Image > Mirror.
Image > Flip.
You must have this:

13. Repeat step 6 to 8 another 3 times.
14. Selections > All.
Selections
> Modify > Contract 10 Pixels.
Selections >
invert.
Repeat the warp effect.
Image > Mirror.
Image > Flip.
Repeat the warp effect.
15. Add borders 5 Pixels > White.
Selections > All.
Modify >
Contract 5 Pixels.
Selections > Invert.
Fill with gradient and repeat inner
bevel.
16. Open your original again.
17. Add borders > 5 Pixels >
Black.
Add borders > 5 Pixels > White.
Select the white
border and fill with gradient.
Repeat the inner
bevel.
Select > All.
Selections >
Contract > 10 Pixels.
(Invert!)
Copy this double black & gradient
border.
Go back to the Crumple Frame.
Edit > Paste as a new
layer.
18. Merge all flatten.
Your Crumple Frame is done. I
hope you liked it.
Thanks for doing my tutorials.


© Author unknown

©
Author unknown
This tutorial is written and
designed by Mar and therefore her property.
This tutorial may not be
downloaded for any purpose other
than to follow the tutorial. If
you're a Moderator of a group,
please e-mail me
before adding this tutorial to any lessons,
etc.
When you do have my permission..... only a text link is
allowed.
My tutorials are never ever to
be sent over any mailing list or to leave my
site.
Translation into English
with help of my best friends, Trudie.
Thanks sweetie! Couldn't do
it without you.

Since
04-04-2004:
|