|
Classic Cream
Frame
(PSP 8 &
9)
A tutorial by
Mar © 2004.

© Image Lorraine Brewer.
What you need:
PSP
8. Download a
30 day trial
here.
The corner, gold pattern and image Download
here.
Save
often.
Let's get started. Good
luck.....
1. Open a new image 350 X
350, transparent (for a square image).
If you use an Landscape
image, open 400 X 300 or 400 X 350.
For a
Portrait image, open an image 300 X 400 or 350 X 400.
So look at
your image to see what size you have to use.
Foreground
color #E6DBC0 background color to #F9F5D8.
2. Foreground material to gradient.
Look for Foreground-Background gradient:

Fill your image.
3. Selections > All.
Selections
> Modify > Contract 10 pixels.
Selections > Invert.
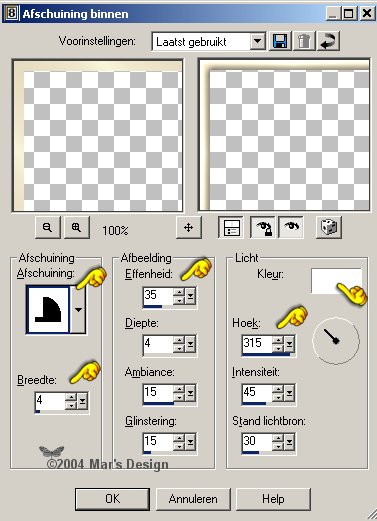
4. Effects > 3D-effects > Inner
bevel.
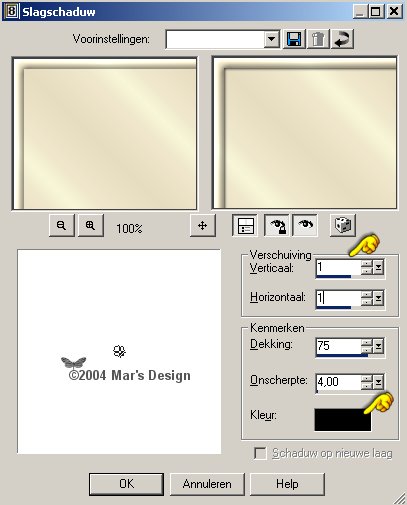
5. Effects > 3-D effects > Drop
shadow.
6. Repeat drop shadow but
Horiz. and Vert. to - 1.
7. Selections > All .
Selections
> Modify > Contract 14 pixels.
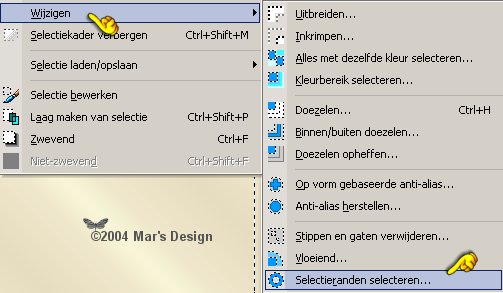
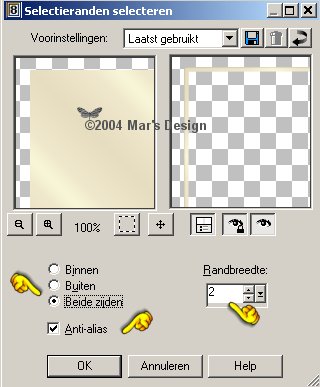
8. Selections > Modify >
Select selection borders.
9. Open TL-goldfill (ZIP).
Foreground to pattern and
find TL-goldfill.
Fill with gold pattern.
10. Effects > 3D-effects > Same
inner bevel.
11. Repeat same drop shadow Horiz. and
Vert. to 1 and - 1 .
12. Selections > All.
Selections
> Modify > Contract 45 pixels.
13. Selections > Modify >
Select selection borders.
14. Effects > 3D-effects >Same
inner bevel.
15. Same drop shadow as
before.
16. Selections > All.
Selections
> Modify > Contract 55 pixels.
17. Selections > Modify >
Select selection borders.
18. Effects > 3D-effects > Inner
bevel.
19. Repeat drop shadow Horiz. and
Vert. to 1 and - 1 .
If you did everything right you
have this now:

20. Selections > All.
Selections
> Modify > Contract 65 pixels.
21. Selections > Modify > Select
selection borders.
22. Fill again with gold
pattern
Effects > 3D-effects > Same inner bevel.
23. Same drop shadow Horiz. and
Vert. to 1 and- 1 .
24. Click with your wand in the middle
part of your frame.
Feather 0 Tolerance set to
15.
25. Open the Lorrain Brewer
image (ZIP) or use your own.
Make sure it's square if you used
350x350.
Copy your image.
26. Go back to your
frame.
Edit > Paste > Paste into
selection.
27. New raster layer.
Effects > 3D-effects > Cut
out.

28. New raster layer.
Repeat the cut-out but
Vert. and Hor. to - 4.
Selections > None.
Merge all flatten.
29. Open MD-CreamCorner.psp (ZIP)
and copy.
Paste as a new layer.
30. Move  to top left corner.
31. Layers > Duplicate. Layers >
Mirror.
32. Layers > Duplicate. Layers >
Flip.
33. Layers > Duplicate. Layers >
Mirror.
34. Merge all flatten.
With the examples below you see 400
X 325
(Landscape) and the middle one is 300 X 400
(Portrait).
In the Christmas frame I used two colors 
from an image by Barbara Mock.
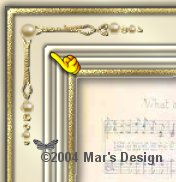
Your Classic Cream Frame is done.
I hope you did like it.
Thanks for trying my
tutorials.

© Image Lorraine Brewer

© Image Lorraine Brewer

© Barbara Mock
This
tutorial is nominated as
'Featured
Tutorial of the Month' at Fly-by-Night.
05-27-2005
This tutorial is written and
designed by Mar and therefore her property.
This tutorial may not be
downloaded for any purpose other
than to follow the tutorial. If
you're a Moderator of a group,
please e-mail me
before adding this tutorial to any lessons,
etc.
When you do have my permission..... only a text link is
allowed.
My tutorials are never ever to
be sent over any mailing list or to leave my
site.
Translation into English
with help of my best friends, Trudie.
Thanks sweetie! Couldn't do
it without you.

Since
11-08-2004:
|