|
WHAT YOU WILL NEED
PSP 9
Filters Unlimited
2
DSB Flux
Supplies
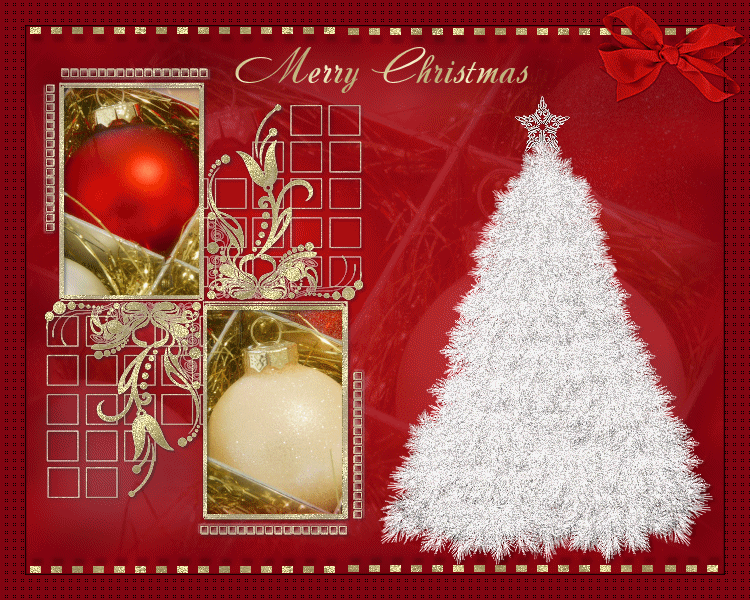
1. Open up a new image 700 x
550px
2. Set your foreground
#AD0018 and flood fill your layer
3. Apply Filters Unlimited 2
- Special Effects 2 - Centerspot - setting 192
4. Repeat the step
above
5. Copy and paste the large
tube of the christmas balls onto your working image and lower
the opacity to 20
6. Copy and paste the
christmas bars pspimage as a new layer onto your working image
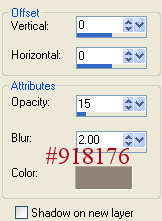
then apply the following drop shadow
7. Position the bars
up the top of your layer - still working on the same
layer - duplicate - image - flip
8. Copy and paste the
pspimage of the christmas frame as a new layer onto your
working image - position on the left hand side
9. Using the magic wand and
holding down the shift key, select the area in-between the 2
rectangler frames once you have the ants marching around, on
your layer palette move the highlight down to layer 2, this
should be the large christmas balls tube - now hit the delete
key once
10. Selections - select
none
11. Move your highlight back
up to your top layer which should be the frame tube and apply
the following drop shadow
12. On your layer palette
again, move the highlight to the layer under the frame - at
this point you can either copy and paste as a new layer each
of the pictures supplied or use pictures of your family
(cropped to the same size) and position the pictures so that
each sits into the frames
13. Layers merge
visible
14. Image - canvas size -
resize to 750 x 600 - using your wand select the area around
your image and fill with #800311 - Keep selected and apply
Screenworks - Point Array - still selected apply the following
drop shadow then apply again only change the vertical and
horizontal settings to minus 1 - select none
15. Copy and paste the words
as a new layer onto your working image then apply the
following drop shadow
16. Copy and paste the bow
as a new layer, position top right corner - layers merge
visible
17. Copy and paste the white
christmas tree as a new layer onto your working image -
position right side - add the star tube to the top of the
tree - layers merge visible
18. Duplicate the merged
layer twice - X off the bottom two layers and working on the
top layer get your lasso tool and trace around the christmas
tree, don't go outside the tree, keep a little bit to the
inside edge - once you have the ants marching around apply DSB
Flux - Bright Noise - Mix - 38
19. KEEP SELECTED - X off
the top layer and remove the X from the second tree layer,
make sure your highlight is on this layer and apply the
DSB Flux again using the same settings only this time click
the word MIX once
20. KEEP SELECTED - X off
this layer and remove the X from your third tree layer, again
make sure you move your highlight to this layer - apply the
DSB Flux, same settings but this time hit the word MIX twice -
select none
21. Copy and paste each of
your layers as a new image - save each of them as christmas1 -
2 and 3 pspimage
Animation
1. Open up animation shop -
select the animation wizard and follow the steps - I had the
setting for how long I wanted each frame to display set on 10
and make sure when you add your images you have them in
order of 1 -3. you can use the up and down keys to put them in
the right order - save your animated image to a folder of
choice
Hope you enjoyed this
one
*s*

All tutorials Copyright
©Designs by Sandee
My tutorials may not be
scripted, nor can the finished results be used for commercial
use,
this means you may not create
stationery, websets etc and sell them for profit
I no longer give permission for
my tutorials to be translated so please don't ask, sorry
!
Groups are welcome to give a
text link to any of my tutorials
|