"Animated Snow Globe"
This
tutorial is best viewed at 1024x768.
Please read my Terms of Use if you have any
questions.
At this time I am not allowing my tutorials to be
translated
so please don't ask!
All images are the sole property of ©
Designs By Astro
Do not copy, place on CD, make into Scripts or send
through email without my prior written permission.
A link is always
welcomed and appreciated though!!
All rights reserved.
The
image/images you make using this tutorial
is your property to do with as you
wish.
If you have any questions or need further help you can
Email me
Tutorial written January 2005.
This tutorial assumes you have a working knowledge of Paint Shop Pro and Animation Shop,
the use and location of tools and vectors. This tutorial is written using PSP 8.1 and
Animation Shop 3.1 but can be done using other version. This tutorial is not for beginners,
you will be working with multi layers to animate so it is recommended for advanced users.Images used in the making of my globe...
Santa tute can be found here ... Nesting Santas written by Astro
Train tute can be found here ... Circus Train written by Astro
Deer tute can be found here ... Putting Together a Log Deer written by Auntie Em
Tree tute can be found here ... Santa Tree written by Christina Gibbs
The Confetti tube if you do not already have it can be download here.
I believe this tube came with PSP 6 or 7, I can't remember.To install the Confetti tube, unzip and open in PSP, Go to File, Export, Picture Tube. Use these
settings to install the tube...Let's begin!
Please be sure to SAVE your work as you go.
1. Open a 300X300 transparent, Raster background, 16 million colors canvas.
2. Set your background and foreground colors to #C2E2F6.
Preset Shapes set to these settings...Draw out an oval in the top half of your canvas. Switch to the Pen Tool, shape your nodes so that
you have half of an oval, something like this....Convert this layer to Raster and rename as "Back". Go to Layers, Duplicate. Rename this layer
"Front". Close (hide) this layer by clicking on the eye in your layer palette, we will use it later.3. Go back to your original Back layer. Go to, Selection, Select All, Selections, Float. Go to
Effects, 3D Effects, Cutout and apply a cutout using these settings and this color #3F6E8B....4. While still selected, go to Effects, 3D Effects, Outer Bevel and apply the settings...
Selections, Select None.
5. Make visible your "Front" layer. Go to Selections, Select All, Selections, Float, Selections,
Defloat. Go to Effects, 3D Effects, Cutout and apply these settings using this color... #1F3949 ...Selections, Select None.
6. Set your foreground and your background to white. Preset Shapes same as you used for the Back.
Draw out a small oval, use the Pen Tool to edit the nodes so that you have something that looks like
this...Convert layer to Raster and rename as Bottom.
7. Make your top layer your active layer. With the same colors as above and the same Preset Shape,
draw out another oval, use the Pen Tool to make the outer rim of your globe. You should have
something like this...Convert to Raster, rename to Outer Rim. Go to Selections, Selections, Float. Apply a cutout
using these settings and this color.... #1F3949 ....Selections, Select None.
Now we have our basic globe finished. You may want to save a copy of this so that you can
make many different globes later.I sure hope you've been saving along the way, while making my globe and writing this tute PSP
crashed numerous times on me. So please save your work every few steps even if you have auto save
on.It's up to you what you'd like to place inside of your globe. Use some of your wonderful tubes
you've made in the past or create from scratch what you want. I'm using some tubes I've made
over the years to decorate my globe.Moving on....
8. Your Layer Palette should be in this order...
Make your Bottom your active layer. Add a new Raster layer above your Bottom layer, place your
tubes you wish to be inside your globe on this layer, add any shading or shadows you'd like.9. Once you have the tubes you wish to use added, close all your other layers and merge visible
the tube layer/layers, rename to Tube.10. Before we start adding our snow, I want you to use the Crop Tool and crop your image down
as small as you can. Flood fill Layer 1 with your desired background color you would like your
finished globe to have, rename as background.Now comes the complicated part. It is very important that you name your layers as you go
so that you can have the correct layer in the right order when we finish.11. I want you to merge all your layers visible. Go to Edit, Copy. You now have a copy of your
image on your clip board. Now UNDO the merged layers so that all your layers are back like
we started with. Make your background layer your active layer. Go to Edit, Paste, Paste as
New Layer, rename this layer as first image. Go back to Edit, Paste, Paste as New Layer,
rename this layer as second image.12. Go to Layers, View, None. This closes all your layers. In your layer palette make visible
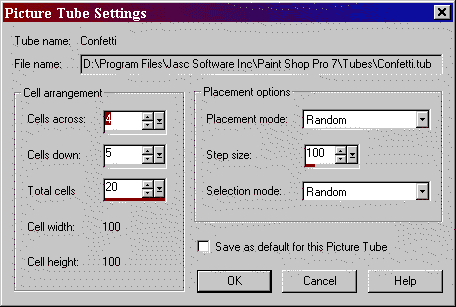
only your layer named "first image". Add a new Raster Layer. Click on your Picture Tube Tool and set
it to Confetti using these settings...Apply some confetti to the bottom of your globe and make a little stuck here and there in
whatever tube you used, be careful not to go outside the edges on your outer rim area. We
want to make it look as if the snow is sitting on the bottom and a few have gotten stuck here
and there. I know snow isn't colored but we'll fix that in a sec. You should have something that
looks like this.....13. Go to Adjust, Brightness and Contrast with these settings...
Now it looks more like snow. You can duplicate and mirror your snow layer if you don't feel you
have enough, just be careful that none goes outside the globe area.14. Merge Visible this layer with your First Image layer. Rename to First Image. Close this
layer by clicking on the eye in your layer palette.15. Make visible your "Second Image" layer. Go to Image, Flip. This image should now be
upside down. Add a New Raster Layer. Use the Confetti tube to make snow on this layer but only
at the top of the globe, we want it to look as if the globe has been turned upside down and all the
snow has fallen to the top. Use the Brightness and Contrast settings to turn the confetti to snow.
You should have something like this...16. Merge Visible your Second Image and your Raster Layer with the snow on it. Rename to Second
Image. Click on the Eye in your layer palette to close Second Image.17. Make visible all layers except, First Image and Second Image, you want to keep those two
layers closed. Merge Visible all open layers. Go to Layer, Duplicate. Do this two times so that
you have 3 copies of this layer. Close your 2 copies by clicking on the eyes in the layer palette.
This should leave only the original Merged Layer visible, make it your active layer, add a new
Raster Layer.18. On the New Raster Layer apply confetti as if it had just been turned back over in the upright
position and the snow is falling out of the top. Use the Brightness and Contrast settings to turn
confetti to snow. You should have something like this...19. Merge these two layers visible, rename to Third Image. Click on the eye in the layer
palette to hide Third Image.20. Make your 1st Copy of Merged Image visible and active (the one above your Third Image layer).
Add a New Raster Layer and apply your confetti. Use the Brightness and Contrast to turn to snow,
you should have something like this....
21. Merge these two layers visible, rename to Fourth Image. Click on the eye in your layer palette
to hide the layer. Make visible and active your last copied layer.22. Add a New Raster Layer, use the confetti just as you have before to make snow. This time
make some that has already landed on the bottom. Brightness and Contrast and you should have
something like this....Merge the two layers visible, rename to Fifth Image.
23. Go to Layers, View, All. Your Layer palette should now look like this....
24. Go to File, Save As. In your Save As box set to save as a Paint Shop Pro Image (pspimage).
Click on "Options", Set to "Save as PSP 6 compatible file" or as "PSP 7 compatible file"
either one is fine. Click okay, you should be back to your Save As box. Name your image. If you
are using PSP 8 or 9 you will need to remove the word image off the file extension. You should
save as only dot psp, it is very important you only have it saved as a .psp. Animations Shop
will not recognize PSP8 or 9 file extensions. Name like this...25. We are finished with making our snow globe, now to animate it! Open Animation Shop.
26. Go to File, Animation Wizard or click on the little tab that looks like film.
Below will be screen shots of what each window should be set to...
In this box, click the Add Image button, then find your image your saved in PSP.You will have two more boxes but you don't need to set anything in those. The last one you will
click Finished. You should then be back in Animation Shop with your image set in Frames. To view
your Animation before saving it, go to "View", "Animation".27. To save your animation, go to File, Save As. Use these settings...
In the first box name your animation.Second box set to Better Image Quality.
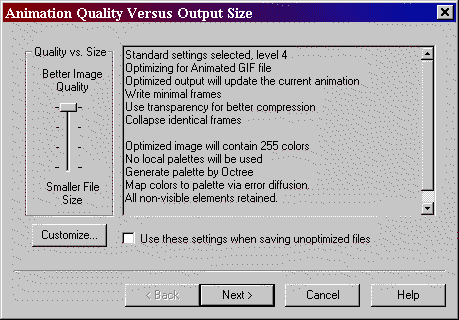
The next box shows it compressing.
The next box is a preview of what your finished image will look like.
The next box is what file size your image is and at what speed it will download.
The next finishes your animation!
You're all through! Your animation is ready to be displayed!
I hope you have enjoyed this tutorial and found it useful.
Until next time... God Bless!
Connie
Designs By
Astro Index of
Tutorials
Tutorial written January 5,
2005
© Copyright 2004 Designs By Astro
All rights reserved.