|
B & W
Piano Frame
(PSP
8)
A tutorial by Mar ©
2004.
What you need:
PSP
8. Download a
30 day trial
here.
RCS Filterpak: Download
here.
ZIP with materials: Download
here.
Unzip the filter in your Plugin folder in PSP.
Close
PSP and restart. If you don't the filter won't
work.
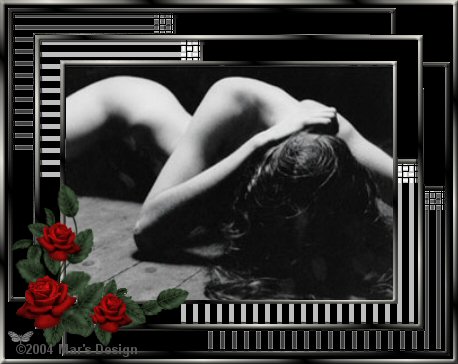
A nice black and white
image.
I used one from Ben
Christopher © (in ZIP).
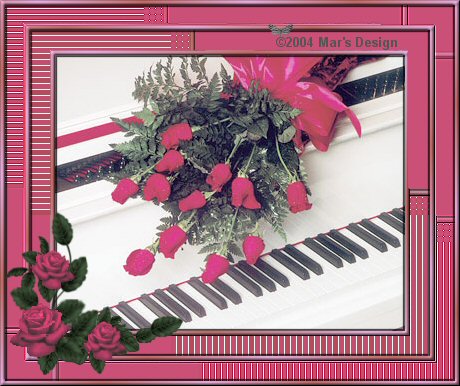
A color image
will work fine too. You have to pick two colors
from your image
(see pink sample at the end of this
tut).
Here
my result in a script.
Save often
Let's get started....... Good
Luck!
1. Open your image in PSP. Shift D and
close the original.
2. Foreground color to white
(#FFFFFF).
Background color to black (#000000).
Or choose 2
colors from the image you use.
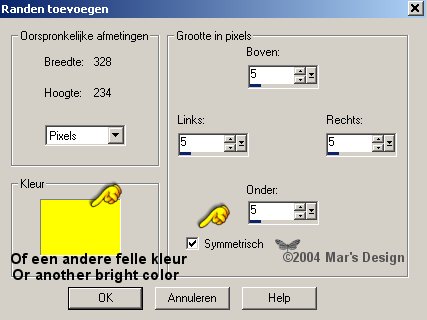
3. Add borders > 5 Pixels >
Yellow (or another bright color).
4. Select  the
yellow border (feather 0). the
yellow border (feather 0).
Foreground style to
gradient.
Choose fore-background gradient.
Notice!! This time the repeats set
to 3.
Later on in this tutorial we will change that to 5 and
7.

5. Fill your border.
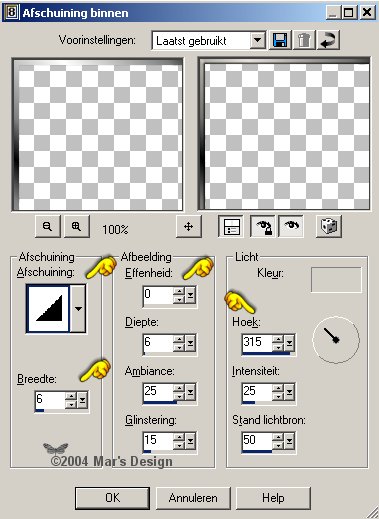
6. Effects > 3D-effects > Inner
bevel.
7. Effects > 3D-effects > Drop
shadow
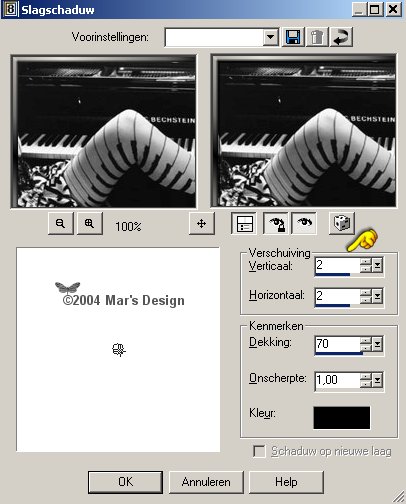
8. Repeat but Horiz. and
Vert. at - 2.
9. Add borders > 20 Pixels >
Yellow.
10. Select the
yellow border and fill with white.
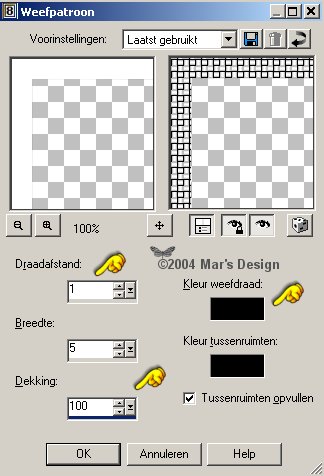
11. Effects > Texture effects >
Weave.
Both colors set to black.
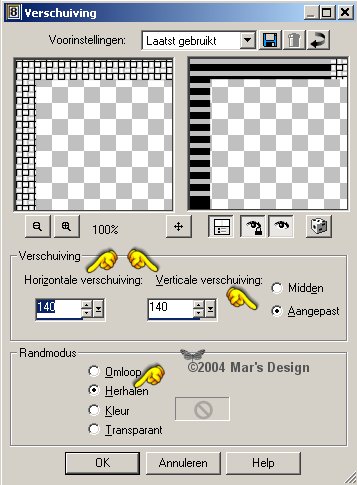
12. Effects > image effects or....
geometric > offset (PSP 8 only).
13. Selections > None.
14. Zoom in at the right top corner of
your picture.
Click the + (plus) key on your number
keyboard.
15. Your background set to
black.
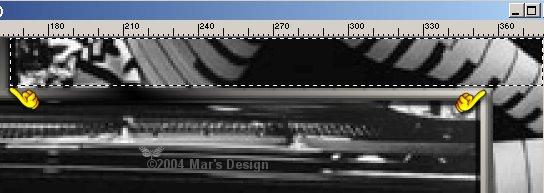
Select  the part
that is an duplicate from the image. the part
that is an duplicate from the image.
Start with the top. Make
sure your selection fits. Click delete.
If there is any leftover
from the picture, select again and delete again.
Leave the grey
bevel as it is.
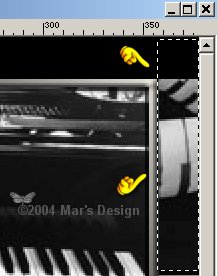
16. Now select the part on the right.
Click delete.
17. The right top corner has to have a
black fill now.
18. Add borders > 5 Pixels >
Yellow.
19. Select the
yellow border.
20. Fill with the gradient but set the
repeats to 5.
Repeat the inner bevel.
Repeat the drop
shadow at 2 and - 2.
21. Add borders > 30 Pixels >
Yellow.
22. Select the yellow
border and fill with black.
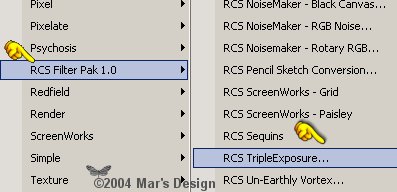
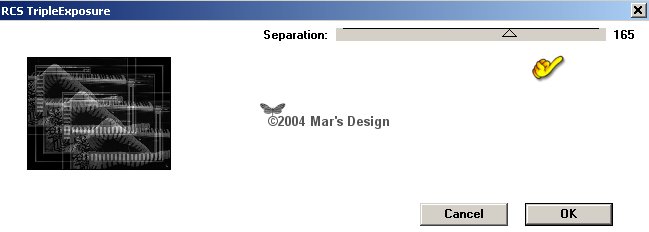
23. Effects > Plugins > RCS
Filterpak > TripleExpoure at 165.
24. Effects > Edge > Enhance
more.
25. Add borders > 5 Pixels >
Yellow.
26. Fill with the gradient but set the
repeats to 7.
Repeat the inner bevel.
Repeat the drop
shadow at 2 and - 2.
27. Selections > None.
28. Open the MD-rosecorner.psp from the
ZIP and copy.
29. Paste as a new layer.
30. With  place
in the left bottom corner. place
in the left bottom corner.
31. Layers > Merge all
flatten.
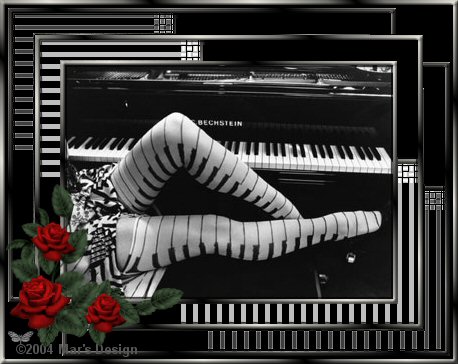
Your B&W Piano Frame is done.
I hope you did like it.
Thanks for using my tutorials.


This lesson is nominated 08-09-2004 as
de
'Featured Tutorial of the Month' by Fly-by-Night.
Thank
you Fly by Night.
I am so honored to receive this
award.
This tutorial is written and
designed by Mar and therefore her property.
This tutorial may not be
downloaded for any purpose other
than to follow the tutorial. If
you're a Moderator of a group,
please e-mail me
before adding this tutorial to any lessons,
etc.
When you do have my permission..... only a text link is
allowed.
My tutorials are never ever to
be sent over any mailing list or to leave my
site.
Translation into English
with help of my best friends, Trudie.
Thanks sweetie! Couldn't do
it without you.

Since
06-29-2004:
|