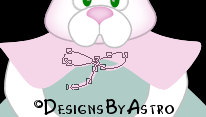
Lucy Hare
This tutorial is best viewed at 1024x768.
Please read my Terms of Use if
you have any questions.
At this time I am not allowing my tutorials to
be translated
so please don't ask!
All images are the sole property of
© Designs By Astro
Do not copy, place on CD, make into Scripts or send
through email without my prior written permission.
A link is always
welcomed and appreciated though!!
All rights reserved.
The
image/images you make using this tutorial
is your property to do with as you
wish.
If you have any questions or need further help you can
Email
Me
Tutorial written February 21, 2007
This tutorial is written using PSP X but can be done in all version. I do assume you have
experience working with vectors and layers. If you're using PSP 6, 7, or 8 you should know
that going into node edit mode works a little differently than they do in versions 9 and X.It's up to you how you like doing your vector layers. Some like to place all their vectors on
one layer and some, like me, prefer to have each vector on a separate layer. You can leave
the vector intact or convert to raster as you go. Do yours however you prefer.This tutorial was a "Hare" pulling tutorial for me. I started writing it way back in
November 2005 but could not get the eyes to be anything but sad so I put Lucy away.
Now here it is almost March 2007 and I have brought her back out to try and finish
her but I got the same results with the eyes... sooo, I've decided Lucy Hare was meant
to be a sad bunny! *L* As you follow this tutorial you will see that my eyes change a
couple of times. You are more than welcome to make "happy" eyes if you would prefer.Let's begin.
1. Open a 500 X 600 transparent canvas. Save your canvas as a PSP file. Be sure to Save
often throughout the tutorial.2. Set your background color to white and your foreground color to #c0c0c0
3. Preset Shapes set to these settings....
4. Draw out an oval at the radius' in the screenshot above.
5. If you're using PSP X, you need to click on the Pick Tool
to rotate your oval.
Rotate the oval slightly to the left. In version 9 and below, use the Object Selection Toolto rotate.
6. For PSP X, click on the Pen Tool, right click on your oval and select Convert to Path...
7. You're now in node edit mode. If you prefer you can click on the eye in your layers palette to
hide the color on your vector. I personally prefer to work with nodes this way.8. Shape your ear something like this....
9. Once you're finished editing your nodes, right click on the ear and select Apply...
SAVE!
10. Remember the steps above to go into vector mode and how to get out. From here on
I will just say, convert to path to go into node mode and apply to get out.11. Copy and Paste your ear as a New Layer. Go to Image, Mirror. Move the right ear
into position, edit the nodes a little if you wish. Apply when you're finished editing.12. Go to Layers, New Vector Layer. Same Preset Shape settings, let's make her face.
13. Draw out an oval starting at the bottom center of her ears....
14. Right click, convert to path, click on the Pen Tool.
15. Shape the face something like a bell. Apply when you're finished editing....
SAVE!
16. Layers, New Vector Layer. Same Preset Shape. Draw out a small oval at the bottom
center of her face. Convert to Path, click on the Pen Tool. On each side of the bottom
node add two new nodes. Move the original node witch is now in the middle up. Adjust
the other nodes something like this....
Apply when you're finished editing.17. Layers, New Vector Layer.
18. You can do her eyes two different ways. If you have the Tear Drop Preset Shape
you can use it, if you don't, then use the ellipse shape like we've been using. Below are
screenshots using the tear drop and using the ellipse to make the eyes....Using the Ellipse to make the eye....
Draw out an oval on the left of her face. Convert to Path, click on the Pen Tool.
Right click on the top node and change to Cusp. Pull down on each side of the handle
to make a shape something like this...
Right click, Apply. Copy and Paste this eye as a New Layer. Go to Image, Mirror,
move into position as the right eye.Using the Tear Drop to make the eye....
Draw out a tear drop. Click on the Pen Tool to go into node edit. Change the top node
to Cusp and pull down and inward a little on the right handle to get a shape something
like in the above screenshot. Click Apply when you're finished editing. Copy and Paste
as a New Layer. Go to Image, Mirror. Move into position as the right eye.19. Set your background color to #f4d6e9, your foreground should be turned off.
20. Preset Shapes set to the Ellipse settings. Add a New Vector Layer.
21. Draw out an oval for her nose. Convert to path, click on the Pen Tool.
Change the bottom node to Cusp and edit like such...
Apply!SAVE!
Note... once I had both eyes done, I thought they made Lucy look angry so I changed
positions of the eyes. I moved the right to the left and the left to the right....
22. Add a New Vector Layer. With the same pink we used for her nose, let's make
the inside of her ear.
Draw out an oval in the left ear. Rotate the oval to fit in the ear. Convert to path,
click on the Pen Tool. Shape the pink to fit in the ear. This is how I shaped mine....
Apply!23. Copy and Paste the inside of the ear as a New Layer. Mirror the layer and
edit the nodes to fit the right ear.SAVE!
We still have more of the face to do but let's stop here for now and work a her
dress, we'll come back and finish the face later.24. Set your background color to #afcdc6 or whatever color you'd like the main
part of her dress to be, foreground turned off . Make Raster Layer 1 your active
layer. Add a New Vector Layer.25. Preset Shapes set to the settings we used for the Ellipse. Draw out a large oval
just below the bottom of her face.26. Convert to path, click on the Pen Tool. Change the 4 nodes on your oval to Cusp.
Don't worry too much about the top part of the dress, it will be covered. Shape the
4 nodes so that you kind of have a bell shape. Add 3 nodes on the right side between
the bottom middle node, change to Cusp. Move the middle node of the 3 up to form a
slit in the dress bottom. Do that again on the right side. Shape the nodes so that you
have something like this....
Apply when you're happy with the look.SAVE!
27. Change your background color to our pretty pink #f4d6e9. Make Raster 1
Layer your active layer. Add a New Vector Layer.28. Draw out a horizontal oval across the bottom part of her dress. Change the
nodes to Cusp. Add a node on both ends of your oval to square off the ends a
little. Move the nodes so that the oval is above the slits in your dress and hangs
out a little below the bottom....Click Apply.
29. Make your green dress layer your active layer. Add a New Vector Layer.
30. Same color and Ellipse settings as used above. Draw out an oval just below
her head to make the collar of the dress....31. Right click, Convert to Path, click on the Pen Tool.
32. Add nodes and change to Cusp to shape your collar something like this....
Apply when you're finished.
33. Set your background color to White and your foreground color to #c0c0c0.
34. Make active your green dress layer. Add a New Vector Layer. This will be
the Left Arm.35. Preset Shapes set to the Ellipse settings used for the head.
36. Draw out an oval to the left of her collar. Right click, Convert to Path, click on
the Pen Tool.37. By adding nodes and changing to Cusp where needed, shape your arm something
like this...38. Click Apply. Copy, Paste as a New Layer, Mirror and move into position as
the Right Arm. You can use the Pick Tool to rotate the arm....39. Since we have our colors already set let's make our legs/feet. Make the bottom
Raster Layer your active layer. Add a New Vector Layer. Draw out an oval to the
left of your dress bottom. Add nodes changing them to Cusp and shape your left
leg/foot something like this...Here is a close up of the foot...
Apply.
40. Copy and Paste as a New Layer, Mirror and move into position as the Right leg/foot.
41. We are pretty much through with our vector shapes at this point. Go back and adjust
any of the shapes you're not happy with. Save a copy with the vectors intact if you wish.
Convert each of your shapes to Raster, naming them as you go.42. Make your Left Eye your active layer. Use the Pick Tool to rotate the eye to the right...
43. Rotate the Right Eye to the left a little...
44. Set your Foreground color to #c0c0c0 Background should be off.
45. Click on your Pen Tool with these settings.....
46. Click once at the top outer left of your left eye, click again just little towards the top....
47. Right click on the last node you added, change the type to Symmetric. Use the handle
to curve your lash....48. Convert the lash to Raster. Copy and Paste as a New Selection twice....
49. Duplicate the lash layer. Mirror and use the Pick Tool to move into position and
rotate the lashes...50. Use the Pen Tool, same setting as for the lashes, to make brows and a nose line...
51. Set your background color to #008000 or whatever color you would like her
eyes to be.52. Use the Ellipse to draw a small oval for the eye...
53. Convert to Raster. Duplicate and move to the Right Eye.
54. Add a New Raster Layer above the two green eye layers. Set your foreground to
#c0c0c0. Click on the Airbrush with these settings...55. Spray a small dash in both eyes....
56.Make your Head layer your active layer. Select and Float the layer. Apply
a cutout using these settings....
Shadow Color #d777b6
Deselect.57. Select and Float the pink nose. Apply a cutout with these settings...
Deselect.58. Select and Float each of the pink layers of the ear and apply the cutout above.
59. Make your top layer your active layer. Activate the Pen Tool with these settings..
60. Set your foreground color to the pink, background off. Draw a bow something
like this...61. Convert Raster. Draw the other end of the bow. Convert to Raster.
62. Close all layers except the two bow layers. Merge them visible. Open all your layers.
63. Select and Float the bow. Apply a Cutout using the settings for the nose and ears.
64. Select and Float the collar and then the pink of the dress. Apply the Cutout to those
two layers.65. While the Dress layer is selected. Use the Airbrush with these settings to apply
extra shading.....66.Use the Smudge Tool with these settings to blend the shading...
66. Select and Float the green of the dress. Apply a Cutout with these settings...
Shadow Color... #669a8e67. You can add extra shading to the dress using the shadow color above and the Airbrush
and Smudge Tool settings above if you wish.68. Select and Float the arms and legs, apply a Cutout using these settings...
Shadow Color .. #808080That's it, you're through with Lucy. You can add more shading to create folds in her dress
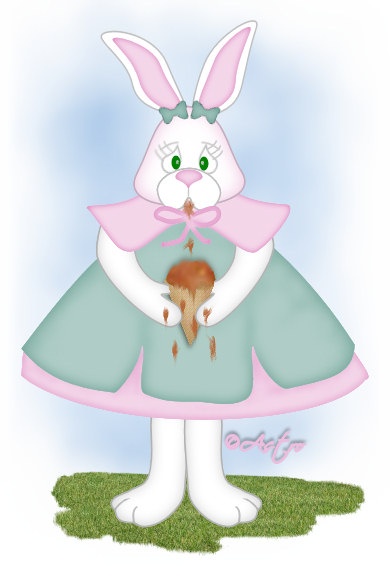
or maybe add a bow in her hair or a flower on her dress.I'm going to leave it up to you what to put in Lucy's hands that has caused her to be sad or
surprised. I chose an ice cream cone that has melted onto her pretty dress for the header
image but you could put a cracked Easter Egg or an empty Easter Basket or maybe a bee has
landed on her nose like the below image....
Whatever you decide to do with her I know she'll be cute.
Until next time... God Bless!
Connie
Designs By
Astro Index of Tutorials
Tutorial written February
2007
© Copyright 2005 Designs By
Astro
All rights
reserved.