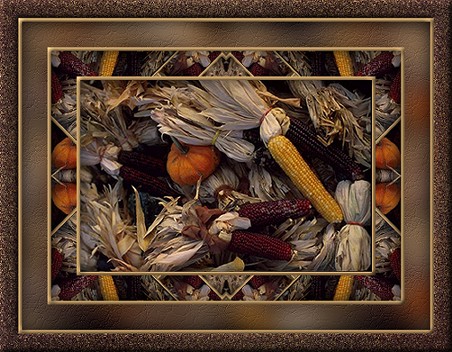
Autumn Frame

This tutorial was created on November 1, 2002. If it
bears any resemblance to another tutorial on the net, it is pure
coincidence. The skills that you will learn here are your own, and I
hope that you will find them useful.
In this tutorial, I will assume
that you have a basic working knowledge of PSP, and is made for the intermediate
skill level. I will not be using screen shots in this
tutorial. If you have any trouble, feel free to contact me, and I will do what I
can to help.
Materials:
These are the materials that you will need: You will
need Paint Shop Pro, or course. I use Version 7.04, but I am sure it
will work in other versions as well. You can download Paint Shop Pro
from Corel. You
will also need Simple Filters which is a free and very useful plug in that you
can use with your graphics program. If you are connected to the
internet you can download them through the links.
If you would like to
use the photograph that I used, you can download it here, or use a picture of your own.
Instructions:
- Open the image in PSP, duplicate it by Shift/D and minimise the
original. Name your new image, and save it now, and don't forget to
save it after every step.
- Pick one of the light colors in your image, and make it your background
color. I used #D0A86F. Make your foreground color
anything that you want that will contrast with the color that you selected.
- Image/Add Borders and add a border of 5.
- Select your border with your Magic Wand, feather and tolerance set
at 0. Do not deselect.
- Add an Inner Bevel with these settings: Pie shape,
width=3, smoothness=40, depth=5, ambience=0, shininess=20, color=white,
angle=315, intensity=40, elevation=30.
- Selections/Invert, then add a Cutout with these
settings: V & H=0, opacity=85, blur=35.
- Image/Add Borders and add a border of 35 with your contrasting
color.
** Want to know an easy way to switch your foreground and background colors? Just click on the arrow in between them, and they will change places. **
- Select your new border with your Magic Wand. Now switch
the foreground style to Pattern.
** Click on the arrow on the Style box for the foreground color, and then select the thing with nine dots on it. **
Now click on the pattern box, and select your minimized graphic from the list. It will be up at the top of the pattern selection. Flood fill your border with the pattern, scale=100%, angle=0.
- Effects/Plugins/Simple Filters/4 Way Average.
- Effects/Plugins/Simple Filters/Half Wrap.
- Next, Effects/Plugins/Simple Filters/Diamonds.
- and then apply Effects/Plugins/Simple Filters/Top Left Mirror.
- Image/Add Border and add a new border of 5 pixels, using the same
color that you used in your first border.
- Add the same Inner Bevel that you did before, then
Selections/Invert and add the same Cutout that you did before.
- Switch your colors, and Image/Add Border of 35
pixels. Select this border with your Magic Wand.
- Flood Fill your new border with the pattern that you used before.
- Effects/Blur/Gaussian Blur of 7. Keep selected.
- Effects/Texture Effects/Fine Leather and use the following
settings: color=#FFEDCF, angle=329, blur=90, number of furrows=25,
length of furrows=5, transparency=255.
- Now, switch your colors again, and Image/Add Border of 5.
- Add the same Inner Bevel that we have used previously.
- Selections/Invert, and apply the same Cutout that we have
used througout this tutorial.
- Switch your colors, and Image/Add Borders and add a border of 35.
- Select this border with your Magic Wand and flood fill it with
#5F3840.
- Keep this border selected, and add the same Inner Bevel.
- Effects/Texture Effects/Mosaic Glass with these
settings: Symetric checked, columns and rows=100, glass
curvature=50, edge curvature=5, grout width=5, grout opacity=80.
- Apply the same Inner Bevel again, and deselect.
Done! If you are doing this for a group, do not forget to resize to their specifications. Don't forget to sharpen after your resize, and thank you for doing one of my tutorials!

Ask me about...
Colon Cleanse, weight loss, health, nutrition & energy.
all rights reserved