|
Blue Summer
Frame
(PSP 7, 8 &
9)
A tutorial by Mar
© 2005.

What you need:
PSP. Download a 30 day trial
here.
Materials: Download
here.
Open all images from the ZIP in PSP.
Other flower
tubes? Download these from my tubes
site.
The Ormente filter: Download
here.
Create a folder Ormente in your plugins
folder in
PSP and extract all 3 Zip's in it.
Eye Candy 3.1. Download
here.
Close
and restart PSP otherwise your filters won't
work.
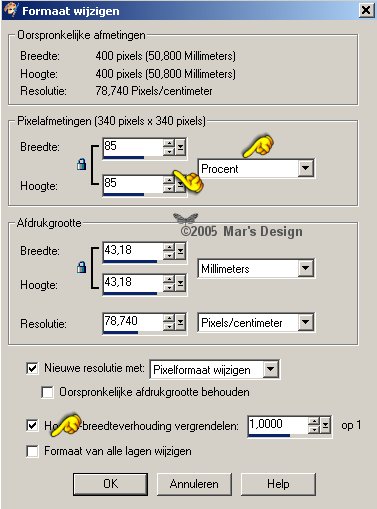
Save
often.
Let's go. Good
luck.....
1. Open a new image 400 X 400 >
Transparent.
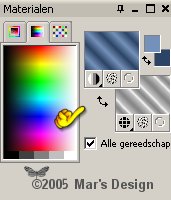
2. Foreground to
#7491b9.
Background to #2b4365.
Foreground to
gradient.
Look for the "Fore-back" gradient.
Texture unchecked
(bleu hand).

3. Now put your background style to
pattern
and look for the silver pattern from the ZIP.
4. Your menu has to look like
this:
5. Fill your image with the
gradient.
6. Selections > Select
all.
Selections > Modify > Contract with 2
pixels.
Selections > Invert.
7. Fill the selection with your right
mouse button (the silver pattern).
8. Effects > Plugins > Ormente's
Filters > Miropads.
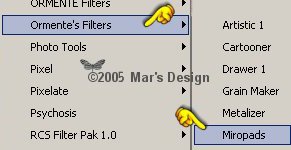
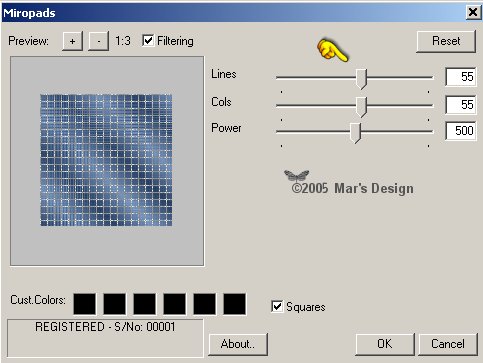
Notice!!!!
You have to use this filter, with this
settings,
every time you have filled a selection.
9. Selections > Invert.
10. Repeat the Ormente's
Filter.
Selections > Modify > Contract with 35
pixels.
11. Fill the selection with your right
mouse button (the silver pattern).
12. Repeat the Ormente's
Filter.
Selections > Modify > Contract with 2
pixels.
13. Fill the selection with the
gradient.
14. Repeat the Ormente's
Filter.
15. Selections > Modify >
Contract with 10 pixels.
16. Fill the selection with your right
mouse button (the silver pattern).
17. Repeat the Ormente's
Filter.
18. Selections > Modify >
Contract with 2 pixels.
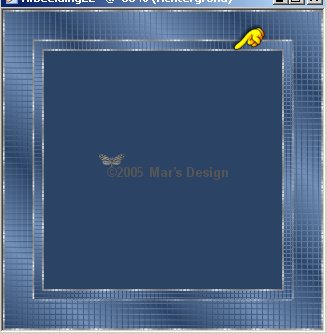
19. Layers > Merge > Merge all
flatten.
Click your delete key.
If all went well you'll l
have a dark blue fill now.
If the inner part is transparent, you
forgot to merge flatten.
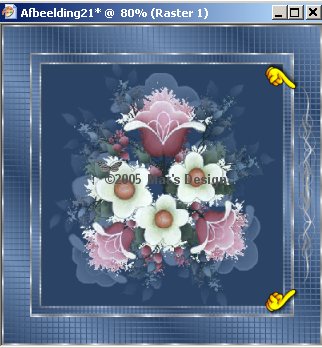
You have to have this
now:
20. Selections > Select
nothing.
21. Open the MD-summerflowers.psp and
copy.
22. Edit > Paste >
Paste as a new layer.
23. It's at the right spot so no need
to move.
24. Lower the layers opacity to
30.
Put the modus to Luminance (Legacy).

Your PC still has the flower in its
memory.
25. Edit > Paste >
Paste as a new layer.
26. Image > Change size > 85%
> all layers unchecked.
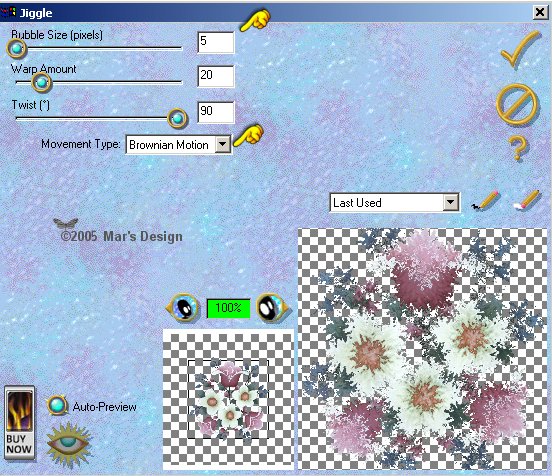
27. Effects > Plugins > Eye Candy
3.1 > Jiggle.
Your PC still has the flower in its
memory.
28. Edit > Paste >
Paste as a new layer.
29. Image > Change size > 75%
> all layers unchecked.
30. Layers > Merge > Merge all
flatten.
31. Open the MD-silverbanner.psp and
copy.
32. Edit > Paste >
Paste as a new layer.
33. Move  the
banner in the large frame part right. the
banner in the large frame part right.
Make sure it's centered as
much as possible.
34. Layers > Duplicate.
Image
> Mirror.
Layers > Duplicate.
Image > Rotate
> Free rotate > 90 Degrees to the left.
All layers
unchecked!

35. Move the banner to the center in
the large frame part at the bottom.
36. Layers > Duplicate.
Image
> Flip.
37. Layers > Merge > Merge all
flatten.
38. Open the MD-silvercorner.psp and
copy.
39. Edit > Paste >
Paste as a new layer.
40. Move to
the left upper corner.

41. Layers > Duplicate.
Image
> Mirror.
Layers > Duplicate.
Image > Flip.
Layers
> Duplicate.
Image > Mirror.
42. Layers > Merge > Merge all
flatten.
Your Blue Summer Frame is done.
I hope you like this tutorial.
Thank you for trying them out.


This tutorial is written and
designed by Mar and therefore her property.
This tutorial may not be
downloaded for any purpose other
than to follow the tutorial. If
you're a Moderator of a group,
please e-mail me
before adding this tutorial to any lessons,
etc.
When you do have my permission..... only a text link is
allowed.
My tutorials are never ever to
be sent over any mailing list or to leave my
site.
Translation into English
with help of my best friends, Trudie.
Thanks sweetie! Couldn't do
it without you.

Since
07-20-2005:
|