Tutorial written April 21, 2004 Frame
created using PSP8 but can also be done using
other versions of PSP Resemblance to any
other tutorial is purely
coincidental
Thanks to Diana for naming
this tutorial for me
What Is Needed
Paint Shop
Pro My Zip File - Here *includes Mask, Gold, Corner and
Graphic*
1. Open your
graphic, duplicate twice, and close the original
- minimize one on your workspace Choose two
colors from your graphic - a light one (I used
#88886e) and a dark one (I used
#232317) Set the light color as the
background and the dark color as the
foreground Set the foreground pattern to the
gold pattern from the zip
2. Selections
- Select all Selections -Modify - Contract -
20px Selections - Invert Adjust - Blur -
Gaussian Blur - Radius - 25 Effects - Art
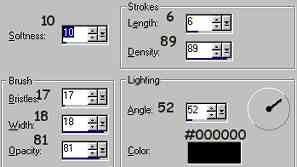
Media Effects - Brushstrokes
Selections - Invert Effects - 3d
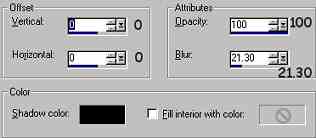
Effects - Cutout
Select none
3. Add
1px border - black
4. Add 3px
border Select with the magic wand Flood
fill with the gold pattern Select none
5. Add 1px border - black
6. Add
3px border Select with magic wand Flood
fill with the gold pattern Select none
7. Add 1px border - black
8. Add
20px border Set background to pattern and
choose the 2nd copy of the graphic Flood fill
the border with the background pattern Adjust
- Blur - Gaussian Blur - Radius - 25 Adjust
- Noise - Add Noise 10% Uniform and
Monochrome checked Do not deselect
9.
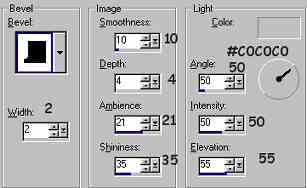
Effects - 3d Effects - Inner Bevel
Effects - 3d Effects - Chisel
Select none
10. Add 1px border -
black
11. Add 3px border Select with
the magic wand Flood fill with the gold
pattern Select none
12. Add 1px
border - black
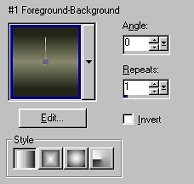
13. Add 30px
border Set background to gradient
Flood fill the border with the
gradient Adjust - Noise - Add Noise -
10% Uniform and Monochrome checked Keep
selected
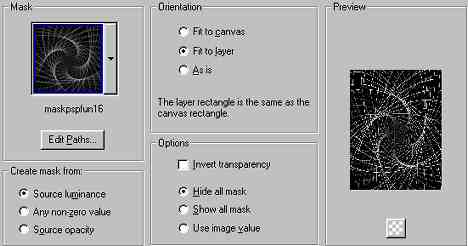
14. Layers - New Raster
Layer Flood fill the layer with the gold
pattern Layers - Load/Save Mask - Load Mask
From Disk Look for maskpspfun16 in the
dropdown box Set up the mask options as shown
below:
Click Load Layers - Merge - Merge
Group Layers - Merge - Merge All Keep
selected
15. Effects - 3d Effects -
Inner Bevel Apply the same setting as
previous but change the lighting color to
#808080 Effects - 3d Effects -
Chisel Apply the same settings as
previous Select none
16. Add 1px
border - black
17. Add 3px
border Select with the magic wand Flood
fill with the gold pattern Select none
You are done with the basic
frame Now is the time to add the corners, use
the ones I supplied or ones of your own If
you require help with adding corners, I have
written a tutorial to help You can find it
Here