|
Alpha Frame
(PSP 7, 8, 9 &
10)
A tutorial by Mar ©2003
What you
need:
The ZIP with base and tubes: download
here.
For PSP 7 users:
Extract the
grey mottled.bmp to your folder 'Patterns' in PSP 7.
PSP 8
already has this pattern.
What
else:
VM (Visman)
Toolbox Instant Tile. Download
here.
Extract to your folder plugins in PSP.
A dolphin image.
I used this one by Dana Queen.
Dana Queen has much more
beautiful art.

Image: © Dana Queen
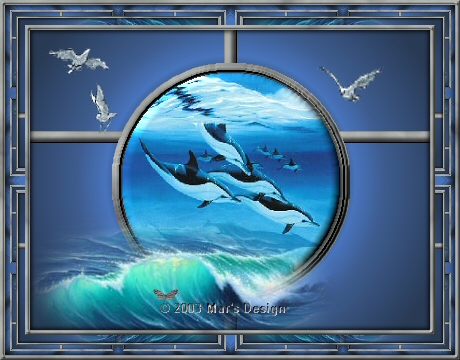
This
is what I did with this frame.
Let's go.
Good luck
with this Alpha Frame.
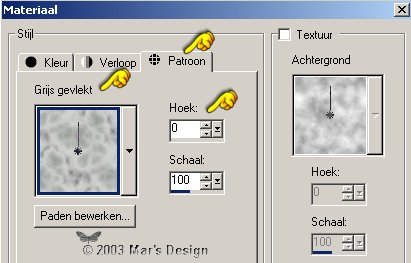
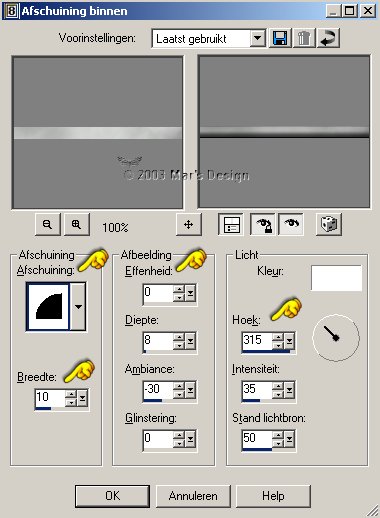
1. Foreground style to
pattern and find grey mottled.
2. Open the
base.pspimage from the ZIP.
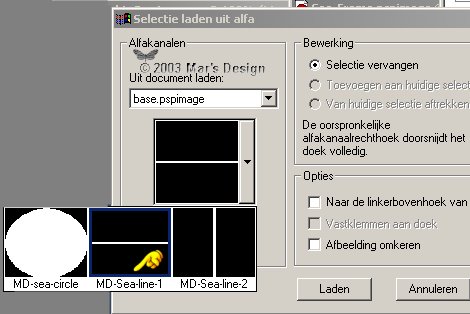
3. Selections > Selections
load/save > Selection load from alpha channel.
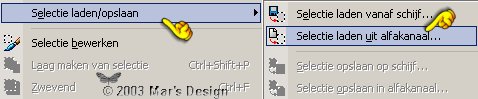
Choose MD-Sea-line-1.
4. Layers > New raster layer.
Fill the selection with the grey
pattern.
5. Effects > 3D effects >
Inner bevel.
Selections > None.
6. Image > resize to 103% (all
layers unchecked).
7. Layers > New raster layer.
Selections > Selections
load/save > Selection load from alpha channel.
Choose
MD-Sea-line-2.
Fill again with the grey pattern.
Selections > None.
Repeat the inner bevel and the resize.
8. Layeres > New raster ayer.
Selections > Selections
load/save > from alpha channel.
Choose
MD-sea-Circle.
Selections > Modify
> Expand 15 pixels.
Fill with grey
pattern.
Same Inner bevel, but use this shape.

9. Selections > Selections
load/save > load from alpha channel.
Again
MD-sea-Circle.
Selections > Modify > Expand 5
pixels.
10. Layers > New raster layer.
Open your dolphin image or the one
you like to use.
Make sure it is square.
Copy.
Edit > Paste > Paste into
selection.
11. Effects > 3D effects >
Inner bevel.
Preset like the very first
but 'Ambiance' at 0.
12. Effects > 3D effects
> Drop
shadow.

Repeat but with Vert. and
Hor. at -2.
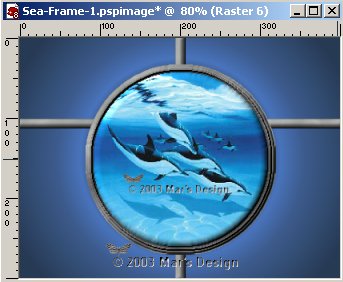
13. Selections > None.
Merge visible layers.
You must have this:
14. Open sea.pspimage (ZIP).
I
don't know to whom this tube belongs, if it's
yours
please let me know?
Copy sea.pspimage and paste as a
new layer.
15. With  move to
the left corner. move to
the left corner.
a little out of focus.
Like this:

16. Open birds-1.pspimage
(ZIP).
Copy and paste as a new
layer.
17. With move up
to the left top corner.
The same with the birds-2.pspimage,
but to the right.
If you're
satisfied:
Layers > Merge > Merge
all layers.
18. Image > Add borders 5 pixels > White.
19. With your wand  select the
border. select the
border.
Fill with grey pattern.
Inner bevel, same settings as
in the beginning.
Repeat also the drop shadow at 2 en
- 2.
20. Image > Add borders 20 pixels > White.
21. With your wand select the
border.
22. Open Frame-fill.jpg
(ZIP).
Change your pattern.
Look for
Frame-fill you just opened.
Fill your border and keep the
selection active.
23. Effects > Plugins > VM Tools > Instant Tiles.
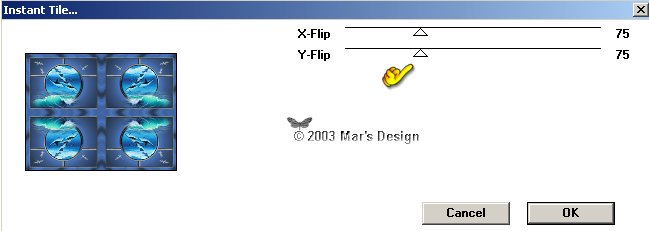
24. Repeat Instant Tiles
but move the sliders to 150.
25. Image > Add borders 5 pixels > White.
26. Select your
border.
Fill again with the grey pattern.
Inner bevel, same
settings.
27. Effects > 3D effects >
Drop shadow at 2 en -2.
Layers > Merge > Merge all
layers flatten.
Your Alpha Frame is
done.
I hope you liked it.

Image: © Dana Queen
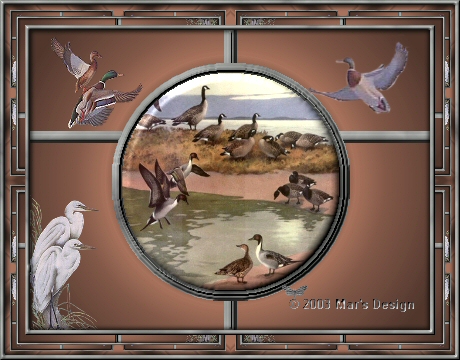
Image: Author unknown
This tutorial is written and
designed by Mar and therefore her property.
This tutorial may not be
downloaded for any purpose other
than to follow the tutorial. If
you're a Moderator of a group,
please e-mail me
before adding this tutorial to any lessons,
etc.
When you do have my permission..... only a text link is
allowed.
My tutorials are never ever to
be sent over any mailing list or to leave my
site.
Translation into English
with help of my best friends, Trudie.
Thanks sweetie! Couldn't do
it without you.

Since
09-18-2003:
|