|
|
| 13. |
The Legs |
|
Active layer="body".
New Vector Layer Name it
"left back leg". Name it
"left back leg".
Foreground:
Null
Background: #F4ECE1
Ellipse Tool 
Retain Style: Unchecked
Antialias: Checked
Create on Vector: Checked
Line Style: Solid
Line Width:
1
Draw out a long thin oval. Make
it a bit longer than you think you'll need ...the upper end
will be hidden behind the body and we need room to jockey
these into position.
Right click
on your ellipse/Convert to path.
Click on the Pen Tool  to edit to edit
Shape the leg as indicated below.

Convert to Raster
Layer.
Selections/Select
All/Float
Effects/3D
Effects/Cutout with these settings
Vertical= 0
Horizontal= 7
Opacity= 75
Blur= 15
Shadow Color= #592A0B
Selections/Select
None
Active layer="left back
leg".
New Vector Layer Name it "hoof".
Foreground: Null
Background:
#F4ECE1
Symmetric
Tool 

Draw a small triangle on the hoof part
of the leg.
Right click on your
ellipse/Convert to path.
Click on the
Pen Tool to edit
Shape the bottom edge to match the
curve of the foot.

Convert to Raster Layer.
Selections/Select All/Float
Effects/3D Effects/Cutout with these settings
Vertical= 0
Horizontal= -3
Opacity= 75
Blur= 4
Shadow Color= #592A0B
Selections/Select
None
Make sure that "hoof" is
your Active Layer and that the "left back leg" layer is
immediately below.
Right
Click/Merge/Merge Down
In the
Layers Palette...move the "left back leg" layer to below the
body layer.
It was at this point
I decided that the "body" layer was too far down. Using the
Moving Tool  bump it up a
little. bump it up a
little.
Active Layer= "left back
leg".
Right Click/Duplicate
Using the Mover Tool Click on the leg
that is visible and move it to the right. Do not use
Mirror...this would change the angle of the shadow on the
hoof.
Rename the "copy layer" to
"right back leg".
Active Layer=
"right back leg"
Right
Click/Duplicate
Using the Mover Tool
Click on the "right back leg" that is visible and
move it to the left. It then becomes the "left front leg" so
rename it that.
Active Layer= "left front leg"
Right Click/Duplicate
Using
the Mover Tool Click on the "left
front leg" that is visible and move it to the right. It then
becomes the "right front leg". Time to rename again.
Reposition as needed. Of
course, the back legs should be shorter. If I haven't totally
confused you they should now look like this.

Active Layer= "left back
leg"
Adjust/Brightness/Contrast/Brightness/Contrast
Brightness= -25
Contrast= 0
Repeat for the "right back leg".
|
|
| 14. |
The Wings |
|
Active layer="body".
New Vector Layer Name it
"left wing1".
Foreground:
Null
Background: #FFFFFF
Ellipse Tool
Retain Style: Unchecked
Antialias: Checked
Create on Vector: Checked
Line Style: Solid
Line Width:
1
Make a good sized oval to the
left of the body.
Right click on
your ellipse/Convert to path.
Click
on the Pen Tool to edit
Add nodes as needed to form feathers
such as you see below. Actually, I encourage you to make what
ever shape of wings you like. Give your sheep
individuality.

Convert to Raster Layer.
Selections/Select All/Float.
Effects/3D Effects/Cutout with these settings
Vertical= 0
Horizontal= 0
Opacity= 75
Blur= 15
Shadow Color=
#592A0B
Active Layer= "left
wing1"
New Vector Layer
Name it "left wing2".
Draw out a
second oval. This one as wide as the first wing, but thinner.
Right click on your
ellipse/Convert to path.
Click on the
Pen Tool to
edit
Turn off your background
color by clicking on the eye in the layers panel.
Zoom in and carefully fit the second image
over the first.

Turn the background color on
again.
Convert to Raster
Layer
Selections/Select
All/Float.
Effects/3D
Effects/Cutout with these settings
Vertical= 0
Horizontal= 0
Opacity= 75
Blur= 15
Shadow Color= #592A0B
Selections/Select
None
Effects/3D Effects/Drop
Shadow
Vertical=
5
Horizontal=
0
Opacity=
75
Blur=
25
Shadow Color=
#592A0B
Shadow on
new layer: Checked
Active
Layer= "left wing2 Shadow1"
Switch to
the Eraser Tool  . Use whatever
settings work for you. . Use whatever
settings work for you.
Erase only
the shadow portion that appears above the
wing.
In the Layers Panel...Right
Click/View/None.
Remove the  indicaters from the "left wing1 layer, the "left
wing2 layer and the "left wing2 Shadow1 layer. indicaters from the "left wing1 layer, the "left
wing2 layer and the "left wing2 Shadow1 layer.
Right Click/Merge/Merge
Visible
Rename the merged layer
"left wing".
Right
Click/View/All.
Use the Raster
Deform tool to tilt the wing and move it into the proper
position.

Active Layer= "left wing"
Right Click/Duplicate
Image/Mirror
Rename "copy" to
"right wing"
|
|
| 15. |
The Halo |
|
Active Layer= top layer.
New Vector Layer Name it
"halo".
Foreground:
#FFFFFF
Background: Null
Ellipse Tool
Retain Style: Unchecked
Antialias: Checked
Create on Vector: Checked
Line Style: Solid
Line Width:
6
Just over his head, draw a
small oval.
Convert to Raster
Layer
Selections/Select
All/Float
Effects/plugins/FlamingPear/SuperBladePro and any
"gold" preset of your choosing.
If you don't have SBP go to Effects/Texture
Effects/Sculpture/use the "gold" preset.
The resulting gold is pretty dark...you may want to go
to Adjust/Brightness/Contrast/Brightness/Contrast/ and set the
brightness to about 65 and leave the Contrast at 0.
Selections/Select None.


|
|
| 16. |
The Cloud |
|
Active Layer= "Raster1"
New Raster Layer Name it
"cloud". Name it
"cloud".
Foreground:
#FFFFFF
Background: #404040
Airbrush Tool 
Retain Style: Unchecked
Antialias: Checked
Create on Vector: Checked
Line Style: Solid
Line Width:
1
Brush= default round.

Spray both the white and the
gray paint in a random manner until you get something like
this.

Change to the Smudge Tool 
Brush= default round

Work the paint until you get something that resembles
a cloud. I am woefully inadequate in this department, but I
have fun trying.
Here is what I
came up with.

|
|
| 16. |
The Ribbon |
|
Active Layer= "cloud"
New Vector Layer Name it
"ribbon".
Foreground: Null
Background: #232EFF
Rectangle Tool 
Retain Style: Unchecked
Antialias: Checked
Create on
Vector: Checked
Line Style:
Solid
Line Width: 1
Draw a long thin rectangle.
Right click on your rectangle/Convert to
path.
Click on the Pen Tool to
edit

Shape the rectangle so it looks like it is draped over
the cloud. Put a slight bend in it to give it depth.
Convert to raster
Layer
Selections/Select
All/Float
Change to the
Lighten/Darken brush
Brush= default
round

Right Click and hold ...run the brush back and forth
to darken the part of the ribbon covering the side of the
cloud.
Selections/Select None
Active layer="ribbon".
New Vector Layer Name it
"moon".
Foreground: Null
Background: #FFFF00
Preset Shape Tool 
Retain Style: Unchecked
Antialias: Checked
Create on
Vector: Checked
Line Style:
Solid
Line Width: 1
Version 9 did not come with all the
preset shapes that were available in Version 8 but for the
time being the Paint Shop Pro 8 Resource Pack can be
downloaded by going
here.
Set the preset shape to
"Moon2".
Draw out a tiny moon
that will fit on your ribbon. Tilt it to face the direction
you will be writing your text.
Convert to Raster Layer
Make sure that "moon" is your Active Layer and that
"ribbon" is directly below.
Right
click/Merge/Merge Down
Active
layer="ribbon".
New Vector
Layer Name it "text".
Foreground: Null
Background:
#000000
Text Tool
Create as: Vector
Font of
your choice...I used Comic Sans MS
Size 12
Click on your
canvas/Enter the text/Apply.
Since
we created this as a vector it comes with the handle and the
ability to stretch or shrink...fit it to your ribbon.
Convert to a Raster Layer.
Make sure that "text" is your Active
Layer and that "ribbon" is directly below.
Right click/Merge/Merge Down
Your ribbon should now look
something like this.

|
|
| 17. |
The Background |
|
Active layer="Raster1"
Now it is time to add a background or maybe just
change from a working background to something
pretty.
I chose to use the MuRa
Meister/Cloud plugin. This is strictly optional, it is your
call. Let's see how creative we can be.
|
|
| 18. |
Odds and Ends |
|
Active Layer=
"Raster1"
Here I added an
Illumination Effect/Sunburst
Preset:
"top center", but I tweaked it a bit to tone it down.
Active Layer="head"
Effects/3D Effects/Drop Shadow
Vertical= 5
Horizontal= 0
Opacity= 75
Blur= 25
Shadow Color= #592A0B
Shadow on new layer:
Checked
Erase the upper portion of
the shadow. Mostly we just want a little definition of the
cheeks and chin.
Active Layer=
"head Shadow1"
With the eraser set to
about a size 7, Zoom in and carefully erase the shadow over
the lower teeth and lip.
Active Layer="left
ear"
Effects/3D Effects/Drop
Shadow
Vertical=
3
Horizontal=
0
Opacity=
75
Blur= 5
Shadow Color=
#592A0B
Shadow on
new layer: unchecked
Active
Layer="right ear"
Effects/3D
Effects/Drop Shadow
Vertical= 3
Horizontal= 0
Opacity= 75
Blur= 5
Shadow Color= #592A0B
Shadow on new layer:
unchecked
Active
Layer="body"
Effects/3D
Effects/Drop Shadow
Vertical= 5
Horizontal= 0
Opacity= 75
Blur= 25
Shadow Color= #592A0B
Shadow on new layer: Checked
Active Layer= "body Shadow1"
Switch to the Eraser Tool . Use
whatever settings work for you.
Erase only the shadow portions that protrude along the
sides of the body. We DO want it to show on his
legs.
Make the "left back leg" the
Active Layer.
Right
Click/View/None
Remove the 's
from each of the "leg" layers by clicking on them. Do the same
with the "cloud" layer
Right
Click/Merge/Merge Visible
Right
Click/View/All
Rename this layer
"cloud".
Switch to your Smudge
Tool
Use the same settings as
for making the "cloud", but change the Brush size to size
5.
Smudge along the bottom edges of
the feet. Pulling up a few wisps here and there. We want him
to look like he is sinking into the cloud itself.
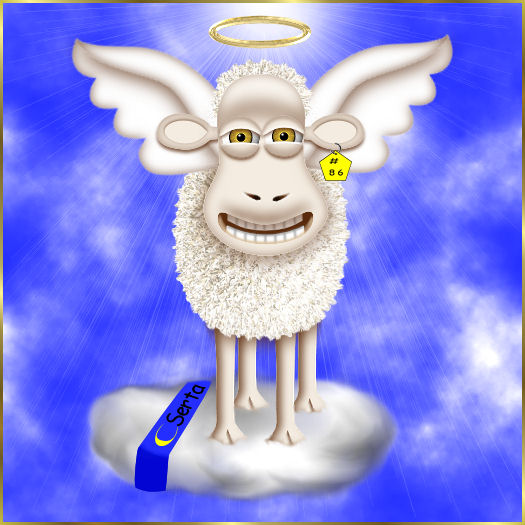
There...I think that about does it.
This tutorial has turned out to be much longer than I planned.
I appreciate those of you who have stuck through to the end.
Thank you so much! I added the ear tag as an afterthought.
Here is our finished product...
|