|
YOU WILL NEED |
|
 Paint Shop Pro Paint Shop Pro
Download a trial version here: 
Glitterato by Flaming Pear (Optional)
Download a trial version here: 
Glitterato preset Get
it here.
Bow of your
choice. (Optional)
Moon Preset
Shape Get
it here.
This moon
preset is a collaboration between Lady Fox and myself.
Pacifier Tube Get
it here.
Basic knowledge
of vectors and layers |
|
Remember to Save Often Often
|
| 1. |
Getting Started |
|
New Image 300 x 300
File/Save As:  hcow1.pspimage hcow1.pspimage |
| 2. |
The Head |
|
Fill the Raster 1 layer with any solid color you
find easy on the eyes. This is only to make what we're working on
easier to see and will be changed later. with any solid color you
find easy on the eyes. This is only to make what we're working on
easier to see and will be changed later.
New Vector Layer Name it "head" Name it "head"
Foreground: #A2A2A6
Background: #FFFFFF
Ellipse
Tool 
Show
Nodes: Checked
Create on Vector:
Checked
Line Style: Solid
Line Width: 1
Antialias:
Checked
Draw an oval in the center of
your canvas. Go to Objects/Align/Center in Canvas. (We will be
resizing, moving and tilting this later on.)
Right click on the oval and select "Convert to Path" from
the drop down menu.
Now, click on the Pen
Tool  and we're ready to edit those pesky nodes. You may find
things easier to see if you click on the eye and we're ready to edit those pesky nodes. You may find
things easier to see if you click on the eye  next to "head" in the Layers
panel. This makes the "fill color" disappear and leaves only the
outline showing. Of course, clicking again on the eye next to "head" in the Layers
panel. This makes the "fill color" disappear and leaves only the
outline showing. Of course, clicking again on the eye  toggles the "fill
color" back on. toggles the "fill
color" back on.
Note: If at any point
you deselect the object you are working on and want to return. You
must then click on your "Object Selection Tool"  , click on the
object on your canvas and then reclick on the "Pen Tool" to get back
into the Edit mode. , click on the
object on your canvas and then reclick on the "Pen Tool" to get back
into the Edit mode.
Add nodes all around the
perimeter of the head by holding down the Ctrl key and clicking when
the cursor changes and the word +ADD appears. I added 10 new nodes
for a total of 14.

Try to place the nodes similar to what you see below. Right
click and select "Node Type" then "Cusp" if sharp angles are needed.
I am assuming that you have a working knowledge of vectors. This
part didn't change in version 9.

|
| 3. |
The Inner Ears |
|
New Vector Layer Name it "right inner
ear"
Foreground: #A2A2A6
Background: #F5A3C4
Ellipse Tool
Show
Nodes: Checked
Create on Vector:
Checked
Line Style: Solid
Line Width: 1
Antialias:
Checked
Draw a small pink oval over the
right ear.
Right click on the oval and
select "Convert to Path" from the drop down menu.
Click on the Pen Tool to edit. Here you will need to
click on the eye next to "right inner ear" in the Layers panel in order to
see the bottom edge of the ear. Form the inner ear similar to the
illustration below.

New Vector Layer Name it "left
inner ear"
Using the same settings,
repeat the above instructions on the left ear.
|
| 4. |
The Mouth |
|
Active layer="raster1".
New Vector Layer Name it
"mouth".
Foreground: #A2A2A6
Background: #F5A3C4
Ellipse Tool
Show
Nodes: Checked
Create on Vector:
Checked
Line Style: Solid
Line Width: 1
Antialias:
Checked
Draw a small oval where the
mouth should be. Right click on the oval and select "Convert to
Path" from the drop down menu.
Click on the
Pen Tool to edit.
The top edge of the mouth is
not important...you just want a bit of lip showing below.
 Are you remembering to
SAVE?
Are you remembering to
SAVE?
|
| 5. |
The Lashes |
|
Active layer="the head".
New Vector Layer Name it "right
lashes"
Foreground: #000000
Background: Null
Pen Tool
Line Style: Solid
Line Width: 4
Antialias:
Checked

Place your cursor about where you want the inner edge of the
lashes to start, hold down the left mouse button and then drag the
mouse to the right and slightly down. Release the mouse button when
the first control arm reaches the desired length. Place a second
node about where you want the lash line to end, again holding down
the mouse button and dragging it ever so slightly to create another
control arm. These nodes can now be repositioned and the curve
adjusted. Once you are happy with how it looks, go to
Selections/Select None.

Make sure that "right lashes" is your active layer in the
layer panel. Right click and select "Duplicate" from the menu, then
go to "Images/Mirror". Use the to reposition if necessary.
Rename this layer "left lashes. We'll put the finishing touches on
them later. to reposition if necessary.
Rename this layer "left lashes. We'll put the finishing touches on
them later.
|
| 6. |
The Nostrils |
|
Active layer= "left lashes"
New Vector Layer Name it "right
nostril"
Foreground: #A2A2A6
Background: #F5A3C4
Ellipse Tool
Show
Nodes: Checked
Create on Vector:
Checked
Line Style: Solid
Line Width: 1
Antialias:
Checked
Holding down the Shift key,
draw out a small circle. Selection/Select None.
Change the Foreground setting to "Null".
Background= #000000
Again
holding down the Shift key draw out another circle. This one
slightly smaller than the first.
Click on
the Object Selection Tool
You should now have a bounding box around your black circle.
Use this to position it inside of and off center on the pink
one.

Make sure that "right nostril" is your active layer in the
layer panel. Right click and select "Duplicate" from the menu, then
go to "Images/Mirror". Use the to reposition if necessary.
Rename this layer "left nostril.
|
|
|
|
And here is what we have SO FAR. Surely do
hope I'm making myself clear enough for you.
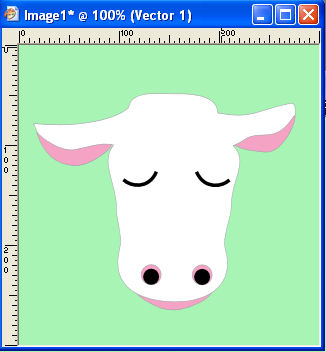
Continued on Page
2. |
