"Life is like a box of
Chocolates?"
Making a box of Valentine
candy!

Please read my Terms of Use if you have
any questions.
The layout of this tutorial is set for 1024 x 768
All
images are the sole property of © Designs By Astro
Do not
copy, reproduce or send through email
without my prior
written permission.
All rights
reserved.
The
image/images you make using this tutorial
is your property to
do with as you wish.
If you
have any questions or need further help you can
Email
me
~~~~~~~~~~~~~~~~~~~~~~~~~~~~~~~~~~~~~
This tutorial will work in
both PSP 6 & 7 and most likely in
earlier versions
also.
I
will be using version 7 so my images will look a little
different than those using
6.
You have probably guessed
already that there is a little
vectors and node editing with this
tutorial, but I will
try to make it as simple as possible.
*L*
You will also need Blade
Pro with this tutorial but if you do
not have it you can use the inner bevel
that comes with PSP
and get close to the same
effects.
A candy tube is also needed. I have placed the one I used
here
in
a zip file so you may download it if you wish to use
it,
just download & unzip to your tubes
folder.
A friend of mine,
Sharron/CDRmom, has recently wrote a tutorial
for making your own
chocolates. So if you'd like to make
your own instead of using the tube
below headed on over
to her site. Chocolate Tutorial
 Click to download
Candy Tube
Now to get started open a
400x400 transparent (16 million colors)
This will be larger than needed but you
can resize later.
Set your forground color to Black and
your background
color to White.
Using your "preset tool",
set it to ellipse, create as vector and
antialias checked, line width =
2

Create an oval that looks
something like this.

Now click on the Object
selector tool, also know as that
dreaded node editing thingy!
*L* 
(In PSP9 you must right click and
choose "Convert to path" first. Then you have to return to the "Pen Tool".
Here you can do as they say below!)
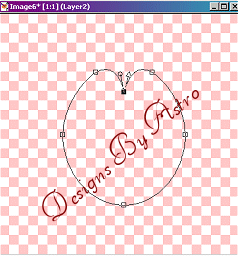
Now with the node thingy make two new
nodes beside the top
one that is already there by holding
the control key down on
your keyboard and clicking on the line
where you want them.
Should look something like
this.

Let's first play with the
middle node that was already there.
Click on it and pull it down a little.
(In PSP9 you must right click on the node and click on "node type" and
then "cusp" to do this right)
Then click and hold the
right side of the little arrow and
bring it up some, then
bring the left side up even with the
right. Something like
this.

When you're happy with the
look move down to
the bottom node that was already there
and lets
play with it. First pull it down some.
(Again, in PSP9 you must right click, "node type" and "cusp" to
do this.)
Then take
the
right side of the arrow and pull it inwards a
little,
then do the same with the left side. Making it
look something like
this.

(To do the rest of the
node work you might want to in PSP9 remake all the nodes to "cusp".)
Now lets move those side
nodes up and out just a little
to round out our heart a little more.
Then go to the two
nodes you added and bring them out and
maybe up just
a little. Play with them until you get the look you
want.
You can click on your taskbar from time to time to
check
how your heart is looking then come back to the node
tool
to
continue playing until you are satified with how it
looks.
(In PSP9 when happy with your heart, click "Apply" on the taskbar.)
When you're finished go to "Layers" and "Convert
to
Raster Layer" Here is what mine looks like.

Yippeee we are through with
node editing!! *S*
Now be honest that wasn't to hard, was
it??
We need to duplicate our
heart now so that we will have
a top and a bottom. So go up to
"Window" and click
on "Duplicate".
You should now have two
hearts just a like.
At this point you may want to merge all
layers visible on
one of your hearts and export as a tube
for later use with
a different project. If you do this
make sure to undo your
merge when you are finished so that you
will once again
have two layers to work
with.
~~~~~~~~~~~~~~~~~~~~~~~~~~~~~~~~~~
Now for the fun part. No more nodes I
promise, but we will use
the deformation tool just a little,
later on.
Set aside one of your
hearts that you duplicated for later and
lets work on making the
bottom of our box.
Make sure layer 2 (your heart layer) is
your active layer.
Using your selection tool
select the area around your heart, then
click on the middle of your heart to
make the ants be around just
the heart. Now go to your flood fill
tool and lets add a pretty
pattern to our heart. I'm using PSP7
and chose to use the
Red Lava pattern. If you do not have
this pattern chose
one you like or make one of your own.
When you have the
pattern you want flood fill the heart
with it.
Do not deselect!

On with turning this heart
into something that looks like a box.
With the heart still selected go into
Blade Pro.
(If you don't have a working Blade Pro, use SuperBladePro,
which is found for free and much better.)
These are the setting I used
on my heart.

If you do not have Blade
Pro you could try using
inner bevel to create a bevel on your
heart.
With the heart still
selected go to "Colors" Brightness and Contrast and apply these
settings.
(In PSP9 go to "Adjust" to find "Brightness and Contrast".)

Deselect
Add a new layer and lets
start filling in our candy tube.
I have my candy tube set to size 17 you
may need yours
smaller or larger depending on the size you made
your
heart. Now fill in the heart with the candy
making
sure to leave a little of your bevel on your
heart
showing. Something like this. You can also
place
one or two candies outside of the box at this
time
if
you would like.

We are finished now with
the bottom of our box. So you can merge
all layers visible and set aside for
later.
Now make your other heart
active. Make sure you have layer
2 as your active
layer.
Using your magic wand click
on the black area around your heart
making them loving little ants appear.
Now lets go into Blade Pro
and add a pretty preset to that plain
black. (note while the ants
are around the black area you may want
to change the color to
white by flood filling it before you go
into Blade Pro if you
chose to use the gold glitter preset as
I did. It may leave a little
area of the black around the inside of
the heart but that's okay
it just adds some depth to it.) Now go
into Blade Pro and add
the preset you like. I chose to use
gold-glitter to mine.
Deselect
Here is
mine.

Now on to turning that not
so pretty white into something
stunning *L*
Take your magic wand again
and click on the white part
of your heart making the ants march
around it. Now with
the flood fill tool, flood fill the
white with the same pattern
you used before on the bottom part of
your heart. I used
the Red Lava here
again.

Deselect
Now go to your selection
tool, "rectangle" and select the area
around your heart, then click in the
center of your heart making
only the heart as your selection. The
little ants should only be
around the heart now.
Lets add an inner bevel to
make our heart look a little puffy.
I used these setting to do mine with
but you can play around
and find ones you
like.

Deselect
Here is where you can add
a layer and place
some text or a tube on your heart if
you would like.

Merge all Layers
Visible.
Now here comes the fun
part, putting both hearts together!
Merge all Layers
Visible.
Have both hearts visible in
PSP. Copy and paste the top of your heart
as a "new layer" into the bottom of
your box heart that you
created earlier.
Click on the deformation
tool 
Now lets turn our heart just a little
to make it look as if the lid
of the chocolates are open. Something
like this.

Set your deformation when
you're satisfied.
With your selection tool,
(still set to rectangle) select the area
around your heart and click in the
middle of the heart like we
did before, making only the heart
selected.
Now lets apply a shadow to our heart using these settings or
play
around with the shadows and find one you like.

Deselect!
Your box of heart chocolate is now
finished.
You can click on layer one and add a background
to
it or
you can merge all layers visible and export as a
tube or copy and paste and
set as a transparent.
Resize as needed.
Here is what mine turned
out like.

Hope you have enjoyed this
tutorial and that your life is
always filled with yummy
chocolates!
Tutorial
Index Designs By Astro
©2001-2003 Designs By Astro.
All rights reserved.


