|


Translated
with permission from the creator, Violette at
Violettegraphic tutorial site.
Click here
or scroll down for an alternate version.


See the original
tutorial here for PSP in French
This
is not my tutorial, it belongs to Violette. If
you would like to translate into another
language, you must ask her permission.
You
can contact her here.
 
They will both open
in a new window and print out on standard 8½" X
11" paper
For
information about which fonts, programs, etc I
used to construct my pages and my headers,
click
here.
|
For this tutorial you will
need:
 or or 
I've done this
tutorial in PSP 9 and Violette did it in PSP
XII.
I believe it can be done in most
versions.
You may have to look around for
the commands but it's likely they are
there.


Filters and
materials needed
FM Tile Tools, available
here
Pentacom>Jeans,
available free here
Graphics Plus>Cross
Shadow, available free here
Supplies in zip file
here
for version 8 and up
(((Supplies in zip file here
for older psp versions has .psd tubes instead of
pspimage.))) these can be opened in any
program.
The psd zip file also includes a
premade gradient filled canvas to start in case
the gradient file doesn't work in your
program.
Both Zips contains the tubes, the
gradient and the
font.
*************
Credits
Tubes
are by Mou, Marcio C, and
Christine
************
My plugin
windows may look different from yours as I use
Filters Unlimited 2 to manage my
plugins.
It's available for purchase here:
http://www.icnet.de/filters_unlimited/
*************
I am assuming you
know the basics of Paint Shop Pro and where the
tools can be located. |
Here are some
arrows and bars you can drag and drop where you
need to mark or underline where you are. .
Just left click and drag to where you want
it then let go.
They will stay where you put
them until you close your browser.


Here's a small version of
the tag that you can drag with you for
reference
 |
Preparation
Open your
tubes, duplicate them (shift-D) and close the
originals.
I always open all of my tubes and
close as I use them
The tube
"Chrismist_Valentine+Box" is used twice. None of
the rest of the tubes are used more than
once.
Put the gradient file in your gradient
folder.
Double
click the font to open it and keep it open to
make it available in your
program.
Drag the little tag just
above with you as you go. |
1 - Change foreground color to
#cdd6de (Dove grey) and then the gradient
vyp_gradient03.jgd and change background color
to #7794b1 (medium smoky blue)


Click on foreground color
box and configure gradient: style linear, angle
135°, Repeats 5, Invert checked
 |
2 - Open a transparent canvas
700 X 500 pixels
With your bucket tool, fill
with gradient
Adjust>Blur>Gaussian
Blur 15
 |
3 - Effects/FM Tile
Tools/Collage Circular: -0.375/0.340/0


Effects/Edge
Effects/Enhance
 |
4 - Effects/Pentacom/Jeans:
31/4


 |
5 - Activate the tube
"Chrismist_Valentine+Box"
Edit>Copy
(Control-C), Edit>Paste as new layer
(control-L)
Resize copy to 80%, resize all
layers not checked
Effects/Image
Effects/Offset:
-225/73/Custom/Transparent


Blend Mode: Luminance
(Legacy)


 |
6 - Edit/Copy/Edit/Paste as new
layer a second time
Image/Resize to 80%,
resize all layers not checked
Effects/Image
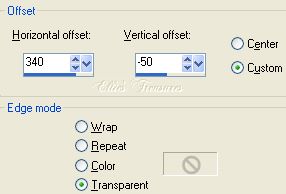
Effects/Offset: 340/-50/ Custom/Transparent: It
will be half off the canvas on the bottom
right


Blend Mode: Luminance
(Legacy)
 |
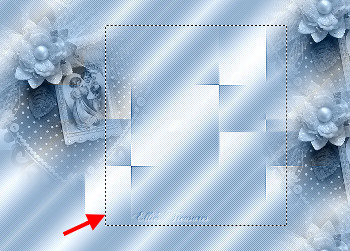
7 - Effects/Image
Effects/Seamless Tile: check Corner, Vertical,
14-50


 |
8 - Activate the Selection
Tool
In the toolbar, click on Custom
Selection


place these figures : top
50-bottom 450-left 210-right 572


 |
9 - Layers>New Raster
Layer
Fill with color #41536c (dark smoky
blue)

Selections/Modify/Select
selection borders:


 |
10 - Selection/Invert/hit your
delete key.

Deselect |
11 - Select the frame with the
magic wand
Effects/Texture Effects/Blinds:
2-80-Light from left/top checked/color #7794b1
(med smoky blue)
 |
12 - Effects/3D Effects/Drop
Shadow: 0/0/50/5/black

Deselect |
13 - Activate the Selection
Tool
Click on Personalized (Custom) Selection, it will
still have Step 6 (8!!!) settings in it, keep
them
New raster layer
Fill with gradient,
Foreground-Background, Style Halo, Repeats 0,
50-50-50-50, Invert not checked
 |
14 - Effects/Texture
Effects/Weave: 1-10-2-Weave Color #7695B1
(background color) and Gap Color white, fill
gaps checked


Deselect |
15 - Layers/New raster layer
Open the tube of the couple
"mc238"
Edit/Copy/Edit/Paste as new
layer |
16 - Duplicate/turn off the
copy layer (click on eye)
Highlight the
original tube layer (second layer from
top)
Adjust>Blur>Gaussian Blur 5
Blend Mode: Luminance (Legacy) |
17 - Highlight the copy layer,
turn it on
Effects/3D Effects/Drop Shadow:
-5/5/85/5/color #41536c (dark smoky
blue)
 |
18 - Layers/Merge down two
times, to merge the tubes together, Move the
tubes down slightly so the shadow at the top of
the hair is not over the top of the frame, then
merge down once more to merge them with the
dotted background.
Layers>Arrange>Move
down, this will bring the frame to the
top |
| 19 - Highlight the layer your
frame is on and Layers>Merge down. |
20 - Effects/3D Effects/Drop
Shadow: 0/0/60/5/color black
 |
21 - Duplicate
Image/Resize
to 40%
Uncheck "all layers"
Effects/Image
Effects/Offset:
-175/-140/Custom/Transparent


Effects/3D Effects/Drop
Shadow: 0/0/60/5/color black |
22 - Activate the tube
"Mou_Necklace"
Edit/Copy/Edit/Paste as new
layer
Resize layer twice at 85%, resize all
layers not checked
Effects/Image
Effects/Offset:
-298/-145/Custom/Transparent


Blend Mode: Luminance
(Legacy)
Effects/3D Effects/Drop Shadow:
0/0/80/5/color black


Check that all is where
you want it. Merge all. |
23 - Image/Add Borders: 2
pixels color #41536c

Edit/Copy |
24 - Image/Add Borders: 25
pixels contrasting color
Select with the
magic wand
Edit/Paste into
selection
Adjust>Blur>Gaussian Blur 15
Effects/Graphics Plus>Cross Shadow:
50-50-50-50-50-128-184


Deselect |
| 25 - Image/Add Borders: 2
pixels color #41536c |
26 - Selections/Select
all
Selections>modify>Contract 29
pixels
Effects/3D Effects/Cutout:
0/0/80/25/black


Deselect |
27 - Activate the Text tool,
font of choice (I used the font 38, supplied,
size 36)/
background color #41536c,
foreground color turned off


Enter the text of your
choice. I typed Love and the dots in one layer,
then Always in a second layer to arrange them
better.
Right click in layer palette and
convert to raster |
28 - Effects/3D Effects/Drop
Shadow: 1/1/60/1/color black
I also rotated
the words slightly: Image>Rotate>Free
Rotate>10° Left
 |
29 - type your name on small
heart

You're done. Merge
all. |
Resizing
To resize,
make sure, to retain the texture and the
clarity, resize at 90% bicubic and repeat till
you get close to the size you want.
At that
point you can resize by pixels as usual. You
will find this makes a big difference in your
final result.
If you resize, use the unsharp
mask or Brightness/Contrast to sharpen it a bit.
Adjust>Sharpness>Unsharp mask at
Radius 1, strength 60, clipping 4.
or
Adjust>Brightness and Contrast set
to Brightness of 5-contrast of 15. |
Watermark
Layers>New
raster layer. Add your water mark on this new
layer
Layers>Merge>Merge all
(flatten) |
Save
File>Export>Jpeg
optimizer - compression of 20. |
l
hope you had fun!
Back
to top |
| If
you have any questions or suggestions, click on
the email button below to contact me. Have a
wonderful day! |
Tutorial
translated February 23, 2008
* * *
These
tutorials are translated with permission from
the original writer.
Any resemblance to any
other tutorial is purely coincidental and
unintentional.
Feel free to share any of my
tutorials on this site by a link back to my
site,
but do not copy and send the entire
tutorial to anyone or any group.
©2003-2008
Ellie's Treasures

|


 |
Alternate
versions
By my friend Bobbi,
of Ramblin
Roots
 |
|
Back
to top
Webpage Design
Information
This webpage
background was made in PhotoImpact with a
tutorial by Deb
DeHaven
Sadly, she passed away but
her tutorials just came back online, thanks to
PIRCNet.
You can find the tutorial
here.
The font I used for all of
the text on the buttons is BrockScript
The
font I used for the "Amour . . Toujours "
tutorial header is 38.
Click
on the font name to download the font.
I use
PhotoImpact to make all of my headers due to the
amazing
3D text it has and the wonderful
presets available free
online
Most of the presets I use
are either the ones that come with PhotoImpact,
usually the Gel ones,
or from Deb's PI
Tutorials and More (see below) or
Carol Oyl's
site
This is the address to
Deb's old pages
http://www.fortunecity.com/skyscraper/millenit/1716/pitutorials/objects/presets/presets1.html
I can't find any links to
her new pages but the presets are still on this
page for download.
For more sites
to find PI Presets, take a look at
my Great
Beginnings
page. |