
Tutorial was created April 18th,
2004.
Resemblance to any other tutorial is purely
coincidental.
Paint Shop Pro 8 was used to design the
tag but I am sure it can be
done in
PSP7
Supplies
Paint Shop
Pro
Fantastic Machines Paint Engine
Masks - Here
Tube
- Here
Brush
PSP8 - Here
Brush
PSP7 - Here
Font
- Here
Accents
- Here
The masks I am unsure of where I got them so if
they are yours
please let me know so I can give
proper credit.
The brush is from Cat - and the site
is sadly closed down now.
Tube was tubed by McHooii
and I was graciously given permission to
use it for
this tutorial.
Please leave the file name intact!
1. Open the font, tube, and masks in
PSP
Choose a light and a dark color from your
tube
I chose #ac63b1 for my light color and #5b4c77
for the dark
Minimize your tube for now
Open a new
image 600 x 600 - transparent background
2.
Layers - New Raster Layer
Rename this layer Mask
1
Flood fill the layer with the light color
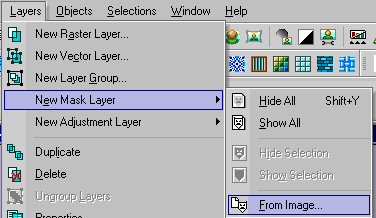
Layers
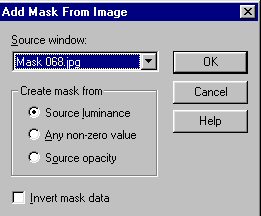
- New Mask Layer - From Image
In the drop down find Mask
068.jpg - as shown below
Hit Ok
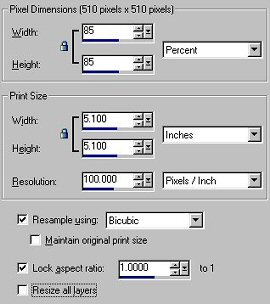
3. Layers - Merge - Merge
Group
Resize this layer 85% - Bicubic
Resample
Resize all layers is unchecked
4. Layers - New Raster
Layer
Rename this layer Mask 2
Flood fill the
layer with the dark color
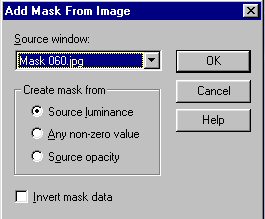
Layers - New Mask Layer -
From Image
In the drop down find Mask 060.jpg - as
shown below
Hit Ok
5. Layers - Merge - Merge
Group
Effects - Plugins - Fantastic Machines - Paint
Engine
Apply the following settings:
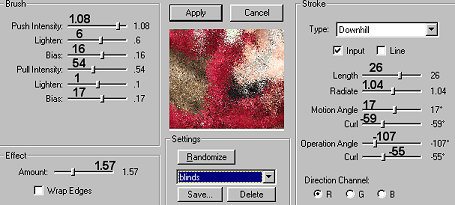
To save this setting, hit the save button
The
original setting is from Hayler's
Heavenly Creations
It remains one of my favorite
Paint Engine Settings!
Effects - Texture Effects
- Blinds
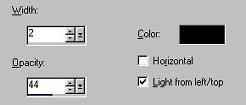
Image - Resize 75% - Bicubic
Resample
Resize all layers is unchecked
6.
Layers - New Raster Layer
Rename this layer
Gridlines
Activate your brush tool
Look for the
cat30 006 Brush in the drop down menu
Set the brush
tool up as follows

With your light color, place
some gridlines on the layer
On mine I clicked about 6
times in different areas
Once you are happy with your
grid add a drop shadow as follows:
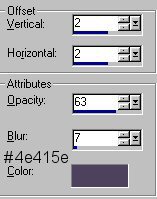
Choose a shade from your color
group
to use as your drop shadow color
7.
Maximize your tube - copy and paste as a new layer on
your mask image
Rename this layer tube
You can
close the tube out
Resize your tube if necessary -
the one I am using didn't require resizing
If you
resize, use the settings in Step 3 as a guideline
Add
the same drop shadow as in Step 6
8. Layers -
New Raster Layer
Rename this layer text
Activate
your text tool and in the drop down menu find the Locust
Regular font
Set the text tool options up as follows:

I used all caps for my text
Stretch the nodes
out until you are satified with how the text looks
On
the layer palette, right click on the Vector Layer and
Convert to Raster Layer
Apply the same drop shadow as
previous.
Apply the drop shadow a second time
9. I have supplied you with some accent tubes
which can be colored to match
your color
scheme
Add each accent on a different layer so they
can be moved around
Feel free to resize them as
required also
On each of them add the same drop
shadow as in Step 6
Apply the drop shadow a second
time
10. On the layer palette - right click and
Merge - Merge Visible
Edit - Copy
Edit - Paste -
Paste As A New Image
This will get rid of the extra
canvas
Resize if necessary - I resized mine
85%
Layers - Merge - Merge All (Flatten)
Save as a
.jpg
I hope you have enjoyed this
tutorial
Please contact me if you have any questions
or comments
Email

Thanks to Diana and
Rosia for testing this tutorial for me!


Graphics Copyright Marlie's Place© 2004
| | | |